From Java Builders to Kotlin DSLs
From Java Builders to Kotlin DSLs
Introduction
DSLs – Domain Specific Languages – are an ever trending topic in Kotlin circles. They allow us to flex some of the most exciting language features while accomplishing more readable and maintainable solutions in our code.
Today I’d like to show you how to implement a certain kind of DSL – we’re going to be wrapping an existing Java Builder in Kotlin. No doubt you’ve come across the builder pattern in Java before, for example if you’re an Android developer, you must’ve used an AlertDialog.Builder, an OkHttpClient.Builder, or a Retrofit.Builder at some point. Wrapping a builder like this is a good exercise in just pure DSL design. All you have to worry about is designing the API you provide with your wrapper, since all the implementation for whatever your DSL provides its users is already done inside the builder!
Our example case
It just so happens that I’m the creator and maintainer of a library that does this very thing, and a small part of its implementation is what we’re going to be using as our example. The original library is the wonderful and hugely popular MaterialDrawer by Mike Penz, which allows you to create complex, good looking, and customized navigation drawers in your application, all via various Builder objects in Java, with no XML writing involved on your part. This is what my library, MaterialDrawerKt provides a convenient Kotlin DSL wrapper for.
The Builder API
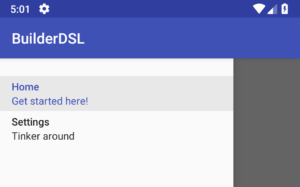
Let’s take a look at the drawer we’re going to be creating in our example.

Here’s the code, using the builders in the original API:
DrawerBuilder()
        .withActivity(this)
        .withTranslucentStatusBar(false)
        .withDrawerLayout(R.layout.material_drawer_fits_not)
        .addDrawerItems(
                PrimaryDrawerItem()
                        .withName("Home")
                        .withDescription("Get started here!"),
                PrimaryDrawerItem()
                        .withName("Settings")
                        .withDescription("Tinker around")
        )
        .withOnDrawerItemClickListener { view, position, drawerItem ->
            when(position) {
                0 -> toast("Home clicked")
                1 -> toast("Settings clicked")
            }
            true
        }
        .withOnDrawerListener(object: Drawer.OnDrawerListener {
            override fun onDrawerSlide(drawerView: View?, slideOffset: Float) {
                // Empty
            }

            override fun onDrawerClosed(drawerView: View?) {
                toast("Drawer closed")
            }

            override fun onDrawerOpened(drawerView: View?) {
                toast("Drawer opened")
            }
        })
        .build()
In this code, we’ve…
– set the Activity we want the drawer to appear in,
– made some layout adjustments so that the drawer is below the ActionBar,
– created just two menu items with names and descriptions,
– set a listener where we can handle item selections by position, using a SAM conversion to implement a single method interface,
– added a listener to detect drawer movement, using an object expression, because the necessary interface has multiple methods.
We saw two different builders used here, namely, the DrawerBuilder and PrimaryDrawerItem classes. While their builder syntax actually looks pretty decent and readable, we’ll see that a DSL can do even better.
Note that you can check out the entire working demo project for this article on GitHub here. See the commit history to follow the article step by step as we build our DSL.
Creating instances
Let’s start small. We’ll want to create a drawer with a drawer {} call, let’s implement just that.
fun Activity.drawer(dummy: () -> Unit) {
    DrawerBuilder()
            .withActivity(this)
            .build()
}
We’ve defined our first function as an extension on Activity, so that it’s available when we’re in one, and it can access the Activity instance as this without us having to pass it in explicitly.
Now, we should add our PrimaryDrawerItem instances. This syntax would be nice for a start:
drawer {
    primaryItem()
    primaryItem()
}
To get this, we’ll need a primaryItem function that’s only available within the drawer block, and that somehow adds an item to the DrawerBuilder we’ve already created.
To be able to call methods on our DrawerBuilder instance before we build() it, we’ll introduce a new wrapper class that holds it:
class DrawerBuilderKt(activity: Activity) {
    val builder = DrawerBuilder().withActivity(activity)

    internal fun build() {
        builder.build()
    }
}
We’ll update our original drawer function to create an instance of this wrapper class. We’ll also modify its parameter – by making the setup function an extension on our own class, the client of the DSL will be placed in a new scope inside the lambda passed to the drawer function, where the methods of DrawerBuilderKt become available, as we’ll see in a moment.
fun Activity.drawer(setup: DrawerBuilderKt.() -> Unit) {
    val builder = DrawerBuilderKt(this)
    builder.setup()
    builder.build()
}
You might have spotted that we’ve marked our own build method internal – this is because the only call to it will be the one inside the drawer function. Hence, there’s no need to expose it to the clients of our library.
The visibility of builder is another story – we’ll have to keep this public so that our library stays extensible. We could make it internal for the purpose of us implementing wrappers around the built-in drawer items, but that would mean that nobody else could add their own custom drawer items to the DSL – something you could do with the original library. This is functionality we don’t want to strip from our clients.
Now we can finally add the primaryItem function we were planning earlier. To make this available inside the lambda passed to drawer, we could make it a member of the DrawerBuilderKt class. Modifying this class for every new drawer item type we add, however, seems like an odd thing to do. The various types of drawer items should in no way affect how the drawer itself works.
We can instead use the same mechanics as clients would use to create custom drawer items. We’ll get a neat, decoupled design by adding primaryItem as an extension function:
fun DrawerBuilderKt.primaryItem() {
    builder.addDrawerItems(PrimaryDrawerItem())
}
We can now add blank drawer items to our drawer!
Setting properties
Before we get to setting the name and description of our drawer items with the DSL, we have the properties of DrawerBuilder to take care of, as we’ve seen in the very first code snippet. This is the syntax we’ll create for these:
drawer {
    drawerLayout = R.layout.material_drawer_fits_not
    translucentStatusBar = false
}
These, of course, will be properties on the DrawerBuilderKt class so that they’re available in the right scope.
Since the original builder doesn’t let us access the values we’ve set, what we’ll need to create are essentially write-only properties. These properties won’t have backing fields to store values, all they’ll do is forward the calls to the appropriate builder methods.
Unfortunately, Kotlin only has properties that can be both read and written (var) and read-only ones (val). We’ll solve this by using a var, and throwing an exception when someone tries to read these properties. We’ll also include Kotlin’s powerful @Deprecated annotation that lets us mark using the getters an error, so that clients are stopped from doing so at edit/compile time, rather than just getting the runtime exception:
class DrawerBuilderKt(activity: Activity) {
    ...

    var drawerLayout: Int
        @Deprecated(message = "Non readable property.", level = DeprecationLevel.ERROR)
        get() = throw UnsupportedOperationException("")
        set(value) {
            builder.withDrawerLayout(value)
        }
}
Alternatives for setting properties
Now, we can move on to customizing the drawer items themselves. The obvious solution here is to continue with the same syntax style as before:
drawer {
    primaryItem {
        name = "Home"
        description = "Get started here!"
    }
}
We know how to do this by creating a wrapper class around PrimaryDrawerItem, and then adding a couple non-readable properties, just like we did before. But let’s do something more interesting, and create this alternative syntax:
drawer {
    primaryItem(name = "Home", description = "Get started here!")
}
This is also pretty straightforward, we’re just calling a function that has two parameters, and using named parameters for readability. Let’s add these parameters to primaryItem then. We’ll also throw in default values so that they’re each optional:
fun DrawerBuilderKt.primaryItem(name: String = "", description: String = "") {
    val item = PrimaryDrawerItem()
            .withName(name)
            .withDescription(description)
    builder.addDrawerItems(item)
}
This, of course, isn’t a feasible method for adding dozens of properties to an item we’re constructing with our DSL, adding a wrapper around the PrimaryItemClass with separate write-only properties that can be set in a setup lambda is still the way to go for most things.
However, this is a nice way to lift some very basic or commonly set properties to a more prominent position in the code. Here’s what the DSL could look like with some more properties implemented:
primaryItem(name = "Games", description = "Ready, player one?") {
    iicon = FontAwesome.Icon.faw_gamepad
    identifier = 3
    selectable = false
}
Listeners
We know how to add properties to our DSL, now let’s see how we can go about listeners. We’ll start with the easy one, setting the OnDrawerItemClickListener to handle item clicks for a given position in the drawer. Here’s our goal:
drawer {
    onItemClick { position ->
        when (position) {
            0 -> toast("Home clicked")
            1 -> toast("Settings clicked")
        }
        true
    }
}
onItemClick will be a method in DrawerBuilderKt, and it will take a lambda parameter that can be called when the original listener fires:
class DrawerBuilderKt(activity: Activity) {
    ...

    fun onItemClick(handler: (view: View?, position: Int, drawerItem: IDrawerItem<*, *>) -> Boolean) {
        builder.withOnDrawerItemClickListener(handler)
    }
}
We’re making use of SAM conversion with the call to the withOnDrawerItemClickListener method of the builder here. The usual SAM conversion syntax would have us passing in a lambda that gets transformed to the OnDrawerItemClickListener interface, but instead, we’re going just a small step further, and we’re passing in the handler parameter which has the appropriate function type for a conversion.
We’ll simplify the above method a bit, by taking a lambda which only gets the position passed to it, as clients will usually only care about that parameter. We’re using SAM conversion again, this time with a regular lambda, because we want to ignore some parameters when calling our simpler handler parameter.
class DrawerBuilderKt(activity: Activity) {
    ...

    fun onItemClick(handler: (position: Int) -> Boolean) {
        builder.withOnDrawerItemClickListener { _, position, _ -> handler(position) }
    }
}
Of course, having only this version of the method would hide functionality of the original library, so in the real wrapper library, I’ve included both of these.
Complex listeners
Last but not least, let’s see what we can do about the OnDrawerListener in our example. This interface has three methods, so the previous, simple solution won’t work here. As always, let’s start with the syntax we want to achieve. Not that we’re only setting two of the three methods that the interface defines.
drawer {
    onClosed {
        toast("Drawer closed")
    }
    onOpened {
        toast("Drawer opened")
    }
}
As you can see, it would be nice to be able to specify either one or multiple of the methods of the interface independently of each other. We know that we’ll want to define three methods to take the appropriate handler lambdas, very similarly to what we did before:
class DrawerBuilderKt(activity: Activity) {
    ...

    fun onOpened(handler: (drawerView: View) -> Unit) {
        // TODO implement
    }

    fun onClosed(handler: (drawerView: View) -> Unit) {
        // TODO implement
    }

    fun onSlide(handler: (drawerView: View, slideOffset: Float) -> Unit) {
        // TODO implement
    }
}
The question is how to pass these handlers to the builder we’re holding. We can’t make a withOnDrawerListener call in each of them and create an object that wraps just that one handler, as the object created there would always implement just one of the three methods.
What I came up with for this is an object property in our DrawerBuilderKt wrapper class that implements the OnDrawerListener interface, and delegates each of these calls to one of its properties.
class DrawerBuilderKt(activity: Activity) {
    ...

    private val onDrawerListener = object : Drawer.OnDrawerListener {
        var onSlide: ((View, Float) -> Unit)? = null

        override fun onDrawerSlide(drawerView: View, slideOffset: Float) {
            onSlide?.invoke(drawerView, slideOffset)
        }

        var onClosed: ((View) -> Unit)? = null

        override fun onDrawerClosed(drawerView: View) {
            onClosed?.invoke(drawerView)
        }

        var onOpened: ((View) -> Unit)? = null

        override fun onDrawerOpened(drawerView: View) {
            onOpened?.invoke(drawerView)
        }
    }
}
All our previous methods have to do then is to set these properties when they’re called:
class DrawerBuilderKt(activity: Activity) {
    ...

    fun onOpened(handler: (drawerView: View) -> Unit) {
        onDrawerListener.onOpened = handler
    }

    fun onClosed(handler: (drawerView: View) -> Unit) {
        onDrawerListener.onClosed = handler
    }

    fun onSlide(handler: (drawerView: View, slideOffset: Float) -> Unit) {
        onDrawerListener.onSlide = handler
    }
}
Of course, we’ll still have to pass this object to the builder at some point – we’ll do that after the setup lambda passed to drawer has already done its work, and it calls our DrawerBuidlerKt.build() method:
class DrawerBuilderKt(activity: Activity) {
    val builder = DrawerBuilder().withActivity(activity)

    internal fun build() {
        builder.withOnDrawerListener(onDrawerListener)
        builder.build()
    }

    ...
}
Result
As a reminder, here’s the builder code we started the article with:
DrawerBuilder()
        .withActivity(this)
        .withTranslucentStatusBar(false)
        .withDrawerLayout(R.layout.material_drawer_fits_not)
        .addDrawerItems(
                PrimaryDrawerItem()
                        .withName("Home")
                        .withDescription("Get started here!"),
                PrimaryDrawerItem()
                        .withName("Settings")
                        .withDescription("Tinker around")
        )
        .withOnDrawerItemClickListener { view, position, drawerItem ->
            when(position) {
                0 -> toast("Home clicked")
                1 -> toast("Settings clicked")
            }
            true
        }
        .withOnDrawerListener(object: Drawer.OnDrawerListener {
            override fun onDrawerSlide(drawerView: View?, slideOffset: Float) {
                // Empty
            }

            override fun onDrawerClosed(drawerView: View?) {
                toast("Drawer closed")
            }

            override fun onDrawerOpened(drawerView: View?) {
                toast("Drawer opened")
            }
        })
        .build()
And then here’s the final DSL we’ve put together:
drawer {
    drawerLayout = R.layout.material_drawer_fits_not
    translucentStatusBar = false

    primaryItem(name = "Home", description = "Get started here!")
    primaryItem(name = "Settings", description = "Tinker around")

    onItemClick { position ->
        when (position) {
            0 -> toast("Home clicked")
            1 -> toast("Settings clicked")
        }
        true
    }
    onClosed {
        toast("Drawer closed")
    }
    onOpened {
        toast("Drawer opened")
    }
}
I hope this serves as a good example of how much better looking and more expressive a DSL can be than builder style solutions. Another benefit is how much easier making changes in the DSL is, which of course becomes apparent when you’re actually making them (but worrying about placing commas in the right places, for example, is in the past).
Conclusion
Thank you for sticking with me for this entire journey. I hope you got a good feel for how to design your own DSLs (always write down your desired syntax first!), and how to structure your DSL implementations.
If you’re interested in more, I recommend checking out the source of the actual MaterialDrawerKt library, as it deals with many more advanced concepts that I couldn’t fit in this post. Among other things, it uses generics and inheritance heavily to deal with MaterialDrawer‘s complex hierarchy of built-in drawer item types, restricts function calls and property accesses to the appropriate levels of the DSL hierarchy, and much more. I might cover these in a future article.
Additionally, you can find another article covering the process of writing a DSL here, and another article about more general DSL design here.
But this is it for now, and with that, it’s now your time to go and start creating your own DSLs. Good luck!
The post From Java Builders to Kotlin DSLs appeared first on Kotlin Expertise Blog.