We are excited to introduce Kandy, a new Kotlin plotting library by JetBrains. It provides a new, powerful DSL for creating charts of various kinds. The first public preview version is ready for you to try, and we welcome any feedback and comments you may have.
df.plot {
   points {
       x(xShot) { axis.name = "Horizontal Position (meters)" }
       y(yShot) { axis.name = "Vertical Position (meters)" }
       size = 8.5
       color(outcome) {
           scale = categorical(
               true to Color.GREEN, false to Color.RED
           )
           legend {
               name = "Outcome"
               breaksLabeled(true to "Goal", false to "Miss")
           }
       }
   }
   layout.title = "Penalty Shot Outcomes Analysis"
}
Why Kandy?
Our Kotlin for Data Analytics ecosystem is growing rapidly. However, until now, an important piece of the puzzle was missing: a plotting tool. That’s why we decided to create Kandy, a simple, idiomatic, readable, typesafe DSL for plotting, deeply integrated with our other tools – Kotlin DataFrame and Kotlin Notebook.
In Kotlin Notebook
To start using Kandy in your notebook, just use the %use kandy line, which will automatically load the latest stable version of Kandy, add all necessary imports, and add plot rendering. Charts are rendered directly in the notebook cell outputs using Swing, and they are interactive – you can hover over a plot element to see tooltips. Plots are displayed with an automatic theme. They can also be saved in one of the available formats from outputs (via the output menu).
Kandy provides a direct continuation of the DataFrame workflow, adding the .plot {} extension for DataFrame, a quick and easy way to visualize your data. Moreover, when working in Kotlin Notebook or with the DataFrame plugin in IntelliJ IDEA, you can use auto-generated DataFrame extension property columns, making plotting even more typesafe and protecting against misspelled column names.
What kind of charts does Kandy support?
Kandy provides a wide range of charts, including the most popular ones:
Have you found a bug? Or maybe you didn’t find the kind of chart or the feature you wanted, or you have another problem or suggestion. Feel free to visit our GitHub issues page to let us know what we can improve.
We also invite you to join the #datascience channel in the Kotlin Slack (get an invite here). In this channel, you can ask questions, participate in discussions, and get notifications about the new releases.
It’s time for another Kotlin Dataframe update to start off the new year. There have been a lot of exciting changes since the last 0.8.0 preview release. So without any further ado, let’s jump right in!
JSON schema inference is great, but it’s not perfect. DataFrame has had the ability to generate data schemas based on given data for a while now, but this can lead to errors in types or nullability when the sample doesn’t correctly reflect how future data might look. Today, more and more APIs offer OpenAPI (Swagger) specifications. Aside from API endpoints, they also hold Data Models (Schemas) which include all the information about the types that can be returned from or supplied to the API. Obviously, we don’t want to reinvent the wheel and use our own schema inference when we can use the one provided by the API. Not only will we now get the proper names of the types, but we will also get enums, correct inheritance, and overall better type safety.
From DataFrame 0.9.1 onward, we will support the automatic generation of data schemas based on OpenAPI 3.0 type schemas.
To get started, simply import the OpenAPI specification file (.json or .yaml) as you would import any other data you would want to generate data schemas for. An OpenAPI file can contain any number of type schemas that will all be converted to a data schema. We’ll use the pet store example from OpenAPI itself.
Your project does need an extra dependency for this to work:
val PetStore = importDataSchema(
    "https://petstore3.swagger.io/api/v3/openapi.json"
)
After generating the data schemas, all type schemas from the OpenAPI spec file will have a corresponding data schema in Kotlin that’s ready to parse any JSON content adhering to it. These will be grouped together under the name you give, which in this case is PetStore. Since the pet store OpenApi schema has the type schemas Order, Customer, Pet, etc., you will have access to the data schemas PetStore.Order, PetStore.Customer, PetStore.Pet, etc. that you can use to read and parse JSON data. (Hint: You can explore this generated code in your IDE and see what it looks like.)
For example:
val df = PetStore.Pet.readJson(
   "https://petstore3.swagger.io/api/v3/pet/findByStatus?status=available"
)
val names: DataColumn<String> = df
    .filter { /* this: DataRow<Pet>, it: DataRow<Pet> */
        category.name == "Dogs" &&
            status == Status1.AVAILABLE
    }
    .name
If you’re interested in the specifics of how this is done, I’ll break down an example below. Otherwise, you can continue to the next section.
OpenAPI Deep Dive
We can compare and see how, for instance, Pet is converted from the OpenAPI spec to Kotlin DataSchema interfaces (examples have been cleaned up a bit):
As you can see, it’s an object type that has multiple properties. Some properties are required, like name and photoUrls. Others, like id and category are not. No properties are nullable in this particular example, but since Kotlin has no concept of undefined properties, non-required properties will be seen as nullable too. There are primitive properties, such as id and name, but also references to other types, like Category and Tag. Let’s see what DataFrame generates using this example:
enum class Status1(override val value: String) : DataSchemaEnum {
    AVAILABLE("available"),
    PENDING("pending"),
    SOLD("sold");
}

@DataSchema(isOpen = false)
interface Pet {
    val id: Long?
    val name: String
    val category: Category?
    val photoUrls: List<String>
    val tags: DataFrame<Tag?>
    val status: Status1?

    companion object {
      val keyValuePaths: List<JsonPath>
        get() = listOf()
      fun DataFrame<*>.convertToPet(convertTo: ConvertSchemaDsl<Pet>.() -> Unit = {}): DataFrame<Pet> = convertTo<Pet> {
          convertDataRowsWithOpenApi()
          convertTo()
      }
      fun readJson(url: java.net.URL): DataFrame<Pet> =
        DataFrame.readJson(url, typeClashTactic = ANY_COLUMNS, keyValuePaths = keyValuePaths)
          .convertToPet()
      fun readJson(path: String): DataFrame<Pet> = ...
      ...
    }
}
Let’s look at the generated interface Pet. All properties from the OpenAPI JSON appear to be there: id, name, and so on. Non-required or nullable properties are correctly marked with a ?. References to other types, like Category and Tag, are working too and are present elsewhere in the generated file. Interestingly, since tags is supposed to come in the form of an array of objects, this is represented as a List of DataRows, or more specifically, a data frame. Thus, when Pet is used as a DataFrame type, tags will become a FrameColumn. Finally, status was an enum that was defined inline in the OpenAPI JSON. We cannot define a type inline like that in Kotlin, so it’s generated outside of Pet. Since DataSchemaEnum is used here, this might also be a good opportunity to introduce it properly. Enums can implement this interface to control how their values are read/written from/to data frames. This allows enums to be created with names that might be illegal in Kotlin (such as numbers or empty strings) but legal in other languages.
To be able to quickly read data as a certain type, the generated types have specific .readJson() methods. The example only shows the URL case in full, but the others are very similar. After calling one of them, the data frame is converted to the right type (in this case, using convertToPet(), which applies, corrects, and converts all the properties to the expected types). Those conversion functions can also be used to convert your own data frames to one of these generated types.
Adding support for OpenAPI type schemas was a difficult task. OpenAPI is very flexible in ways Kotlin and DataFrame cannot always follow. We’re certain it will not work with 100% of the OpenAPI specifications out there, so if you notice some strange behavior with one of your APIs, please let us know on Github or Slack so we can improve the support. 🙂
JSON Options
To make the OpenAPI integration work better, we made several changes to how JSON is read in DataFrame. While the default behavior is the same, we added some extra options that might be directly beneficial to you too!
Key/Value Paths
Have you ever encountered a JSON file that, when read into a data frame, resulted in hundreds of columns? This can happen if your JSON data contains an object with many properties (key/value pairs). Unlike a large list of data, a huge map like this is not so easily stored in a column-based fashion, making it easy for you to lose grip on your data. Plus, if you’re generating data schemas, the compiler will most likely run out of memory due to the sheer number of interfaces it needs to create.
It would make more sense to convert all these columns into just two columns: “key” and “value”. This is exactly what the new key/value paths achieve.
Let’s look at an example:
By calling the API from APIS.GURU (a website/API that holds a collection of OpenAPI APIs), we get a data frame of 2366 columns in the form as shown here:
Inspecting the JSON as a data frame, we can find two places where conversion to keys/values might be useful: The root of the JSON and the versions property inside each website’s object. Let’s read it again but now with these key/value paths. We can use the JsonPath class to help construct these paths (available in Gradle too, but not available in KSP) and since we have a key/value object at the root, we’ll need to unpack the result by taking the first row and first column:
Way more manageable, right? To play around more with this example, check out the Jupyter notebook or Datalore. This notebook contains examples of key/value paths and examples of the new OpenAPI functionality.
Type Clash Tactics
A little-known feature of DataFrame is how type clashes are handled when creating data frames from JSON. Let’s look at an example:
Using the default type clash tactic ARRAY_AND_VALUE_COLUMNS, JSON is read as follows:
Clashes between array elements, value elements, and object elements are solved by creating a ColumnGroup in the data frame with the columns array (containing all arrays), value (containing all values), and a column for each property in all of the objects. For non-array elements, the array column will contain an empty list. For non-value elements, the value column will contain null. This also applies to elements that don’t contain a property of one of the objects.
If you’re not very fond of this conversion and would rather have a more direct representation of the JSON data, you could use the type clash tactic ANY_COLUMNS. This tactic is also used by OpenAPI to better represent the provided type schema. Using this tactic to read the same JSON sample as above results in the following data frame:
We could consider more type clash tactics in the future. Let us know if you have any ideas!
How to use JSON Options
Both of these JSON options can be used when reading JSON using the DataFrame.readJson() functions and (for generating data schemas) using the Gradle- and KSP plugins:
On the reading side, this includes better reading of Data and Time types, UInts, and configurable nullability options. For more information, check out the docs.
On the writing side, well, this is completely new! DataFrame gained the ability to write to both the Arrow IPC Streaming format (.ipc) and the Arrow Random Access format (.feather). You can use both formats to save the data to a file, stream, byte channel, or byte array:
df.writeArrowIPC(file) // writes df to an .ipc file
df.writeArrowFeather(file) // writes df to a .feather file

val ipcByteArray: ByteArray = df.saveArrowIPCToByteArray()
val featherByteArray: ByteArray = df.saveArrowFeatherToByteArray()
If you need more configuration, then you can use arrowWriter. For example:
// Get schema from anywhere you want. It can be deserialized from JSON, generated from another dataset
// (including the DataFrame.columns().toArrowSchema() method), created manually, and so on.
val schema = Schema.fromJSON(schemaJson)

df.arrowWriter(

    // Specify your schema
    targetSchema = schema,

    // Specify desired behavior mode
    mode = ArrowWriter.Mode(
        restrictWidening = true,
        restrictNarrowing = true,
        strictType = true,
        strictNullable = false,
    ),

    // Specify mismatch subscriber
    mismatchSubscriber = { message: ConvertingMismatch ->
        System.err.println(message)
    },

).use { writer: ArrowWriter ->

    // Save to any format and sink, like in the previous example
    writer.writeArrowFeather(file)
}
Let’s finish this blog with a quick-fire round of some bug fixes and new features. Of course, there are far too many to mention, so we’ll stick to the ones that stand out:
Version 0.5 of our deep learning library, KotlinDL, is now available!
This release focuses on the new API for the flexible and easy-to-use deployment of ONNX models on Android. We have reworked the Preprocessing DSL, introduced support for ONNX runtime execution providers, and more. Here’s a summary of what you can expect from this release:
We introduced ONNX support in KotlinDL 0.3. ONNX is an open-source format for representing deep learning models with flexible and extensible specification, and it is supported by many different frameworks. It was designed to be fast, portable, and interoperable with existing toolsets such as TensorFlow or PyTorch. With this release of KotlinDL, you can now run ONNX models on Android devices using the concise Kotlin API!
The most convenient way to start with KotlinDL on Android is to load the model through ModelHub. You can easily instantiate models included in our ModelHub through the ONNXModels API, and then you’ll be ready to run inference on Bitmap or ImageProxy.
Use cases supported by the Android ONNX ModelHub include:
Object Detection
Image Classification
Pose Detection
Face Detection
Face Alignment
Models from Android ONNX ModelHub used in the sample app
KotlinDL ONNX is ready to be used with the ImageAnalysis API. This allows you, for example, to directly infer models shipped via ModelHub on the ImageProxy object.
class KotlinDLAnalyzer(
	context: Context,
	private val uiUpdateCallBack: (List<detectedobject>) -> Unit
) : ImageAnalysis.Analyzer {
	val hub = ONNXModelHub(context)
	val model = ONNXModels.ObjectDetection.EfficientDetLite0.pretrainedModel(hub)
	override fun analyze(image: ImageProxy) {
    	val detections = model.detectObjects(image, topK=5)
    	uiUpdateCallBack(detections)
	}
}
Inference of the EfficientDetLite0 model directly on the ImageProxy input. Check out the demo here.
Note that the orientation of the retrieved camera image will be corrected automatically.
Preprocessing DSL
When working with images, it is often necessary to perform some preprocessing steps before feeding them to the model. KotlinDL provides a convenient DSL for preprocessing, allowing you to apply a sequence of transformations to the input image easily. The DSL is based on the concept of a pipeline, where each transformation is a pipeline stage. Each stage is described by an input and output data type. If the output type of one stage matches the input type of another, you can combine them into a pipeline. In this case, type-checking occurs at compilation time.
This approach allows you to implement different transformations for BufferedImage on the desktop and Bitmap on Android while utilizing a single DSL.
Bitmap preprocessing vs. BufferedImage preprocessing (side by side)
Note that the DSL is not limited to image preprocessing. You can use it to implement any preprocessing pipeline for your data.
We implemented the following set of operations for an Android Bitmap:
Resize
Rotate
Crop
Rescale
Normalize
ConvertToFloatArray
The ConvertToFloatArray operation supports two popular layouts for the low-level representation of a tensor, ChannelFirst (TensorLayout.NCHW), and ChannelsLast (TensorLayout.NHWC).
Inference on accelerated hardware
With KotlinDL 0.5, it is possible to run models on optimized hardware using the ONNX Runtime Execution Providers (EP) framework. This interface provides flexibility for you to deploy their ONNX models in different environments in the cloud and at the edge and optimize execution by taking advantage of the platform’s computational capabilities.
KotlinDL currently supports the following EPs:
CPU (default)
CUDA (for the devices with GPU and CUDA support)
NNAPI (for Android devices with API 27+)
NNAPI is a framework that allows you to run inference on Android devices using hardware acceleration. With NNAPI, resource-intensive computations can be performed up to 9 times as fast as with the CPU execution provider on the same device. However, it is important to note that NNAPI cannot accelerate all models. NNAPI supports only a subset of operators. If the model contains unsupported operators, the runtime falls back to using CPU. Therefore you may not get any performance improvements, and you may even encounter performance degradation due to data transfer between the CPU and the accelerator. The ONNX runtime provides a tool for checking whether NNAPI can accelerate your model inference.
One option for defining execution providers for inference is to use the initializeWith function.
val model = modelHub.loadModel(ONNXModels.CV.MobilenetV1())
model.initializeWith(NNAPI())
Loading and initialization of the model with NNAPI execution provider
KotlinDL ONNX ModelHub is a great way to start with KotlinDL on Android. However, if you have your own ONNX model, you can easily use it with KotlinDL.
Any ONNX model can be loaded and inferred using a lower-level API.
val modelBytes = resources.openRawResource(R.raw.model).readBytes()
val model = OnnxInferenceModel(modelBytes)
val preprocessing = pipeline<bitmap>()
	.resize {
    	outputHeight = 224
    	outputWidth = 224
	}
	.toFloatArray { layout = TensorLayout.NCHW }
	.call(InputType.TORCH.preprocessing(channelsLast = false))
val (tensor, shape) = preprocessing.apply(bitmap)
val logits = model.predictSoftly(tensor)
val labelId = logits.argmax()
Loading and inference of custom model using the OnnxInferenceModel API. Check out the demo here.
As we see here, it’s possible to instantiate OnnxInferenceModel from the byte representation of the model file. The model file can be stored in the application’s resources or retrieved over the network.
Additional details
Breaking changes in the Preprocessing DSL
Starting with version 0.5, KotlinDL has a new syntax for describing preprocessing pipelines.
Before version 0.5, the Preprocessing DSL had several limitations. The DSL described a preprocessing pipeline with a fixed structure, namely the BufferedImage processing stage (transformImage) and the subsequent tensor representation processing stage (transformTensor). We’ve changed this approach in version 0.5. From now on, the Preprocessing DSL allows you to build a pipeline from an arbitrary set of operations.
The save operation is no longer supported, but you can use the onResult operation as an alternative. This operation allows you to apply a lambda to the output of a previous transformation. This method can be useful for debugging purposes.
Another feature of the Preprocessing DSL in KotlinDL 0.5 is the ability to reuse entire chunks of the pipeline in different places using the call function. Many models require input data with identical preprocessing, and the call function can reduce code duplication in such scenarios.
Convenience functions for inference with execution providers
KotlinDL provides convenience extension functions for the inference of ONNX models using different execution providers:
inferUsing
inferAndCloseUsing
Those functions explicitly declare the EPs to be used for inference in their scope. Although these two functions have the same goal of explicitly initializing the model with the given execution providers, they behave slightly differently. inferAndCloseUsing has Kotlin’s use scope function semantics, which means that it closes the model at the end of the block; meanwhile, inferUsing is designed for repeated use and has Kotlin’s run scope function semantics.
If you need to implement a custom preprocessing operation, you can do so by implementing the Operation interface and corresponding extension functions.
Most of the models in KotlinDL have a single output tensor. However, some models have multiple outputs.
For example, the SSD model has three output tensors. In KotlinDL 0.5, we introduce a new API for parsing composite outputs and add a bunch of convenience functions for processing the OrtSession.Result, for example:
getFloatArrayWithShape
get2DFloatArray
getByteArrayWithShape
getShortArray
This allows you to write more explicit and readable code and reduces the number of unchecked casts.
For example, this code is used to get the output of the SSD model.
Learn more and share your feedback
We hope you enjoyed this brief overview of the new features in KotlinDL 0.5! Visit the project’s home on GitHub for more information, including the up-to-date Readme file.
If you have previously used KotlinDL, use the changelog to find out what has changed.
We’d be very thankful if you would report any bugs you find to our issue tracker. We’ll try to fix all the critical issues in the 0.5.1 release.
You are also welcome to join the #kotlindl channel in Kotlin Slack (get an invite here). In this channel, you can ask questions, participate in discussions, and receive notifications about new preview releases and models in ModelHub.
Introducing Multik 0.2.0! Now a multiplatform library, it allows you to use multidimensional arrays in your favorite multiplatform projects. Let’s take a closer look at what’s new in v0.2.0.
We are very grateful to Luca Spinazzola for his huge contribution to the multiplatform capabilities included in this release of the library.
Before we move on to reviewing Multik’s new multiplatform structure, we need to say a few words about the new naming conventions. Ever since we multiplied the number of artifacts and added platform suffixes, such as jvm, macosx64, js, and others, there have been collisions with older names. To solve this problem, we’ve renamed some of the modules.
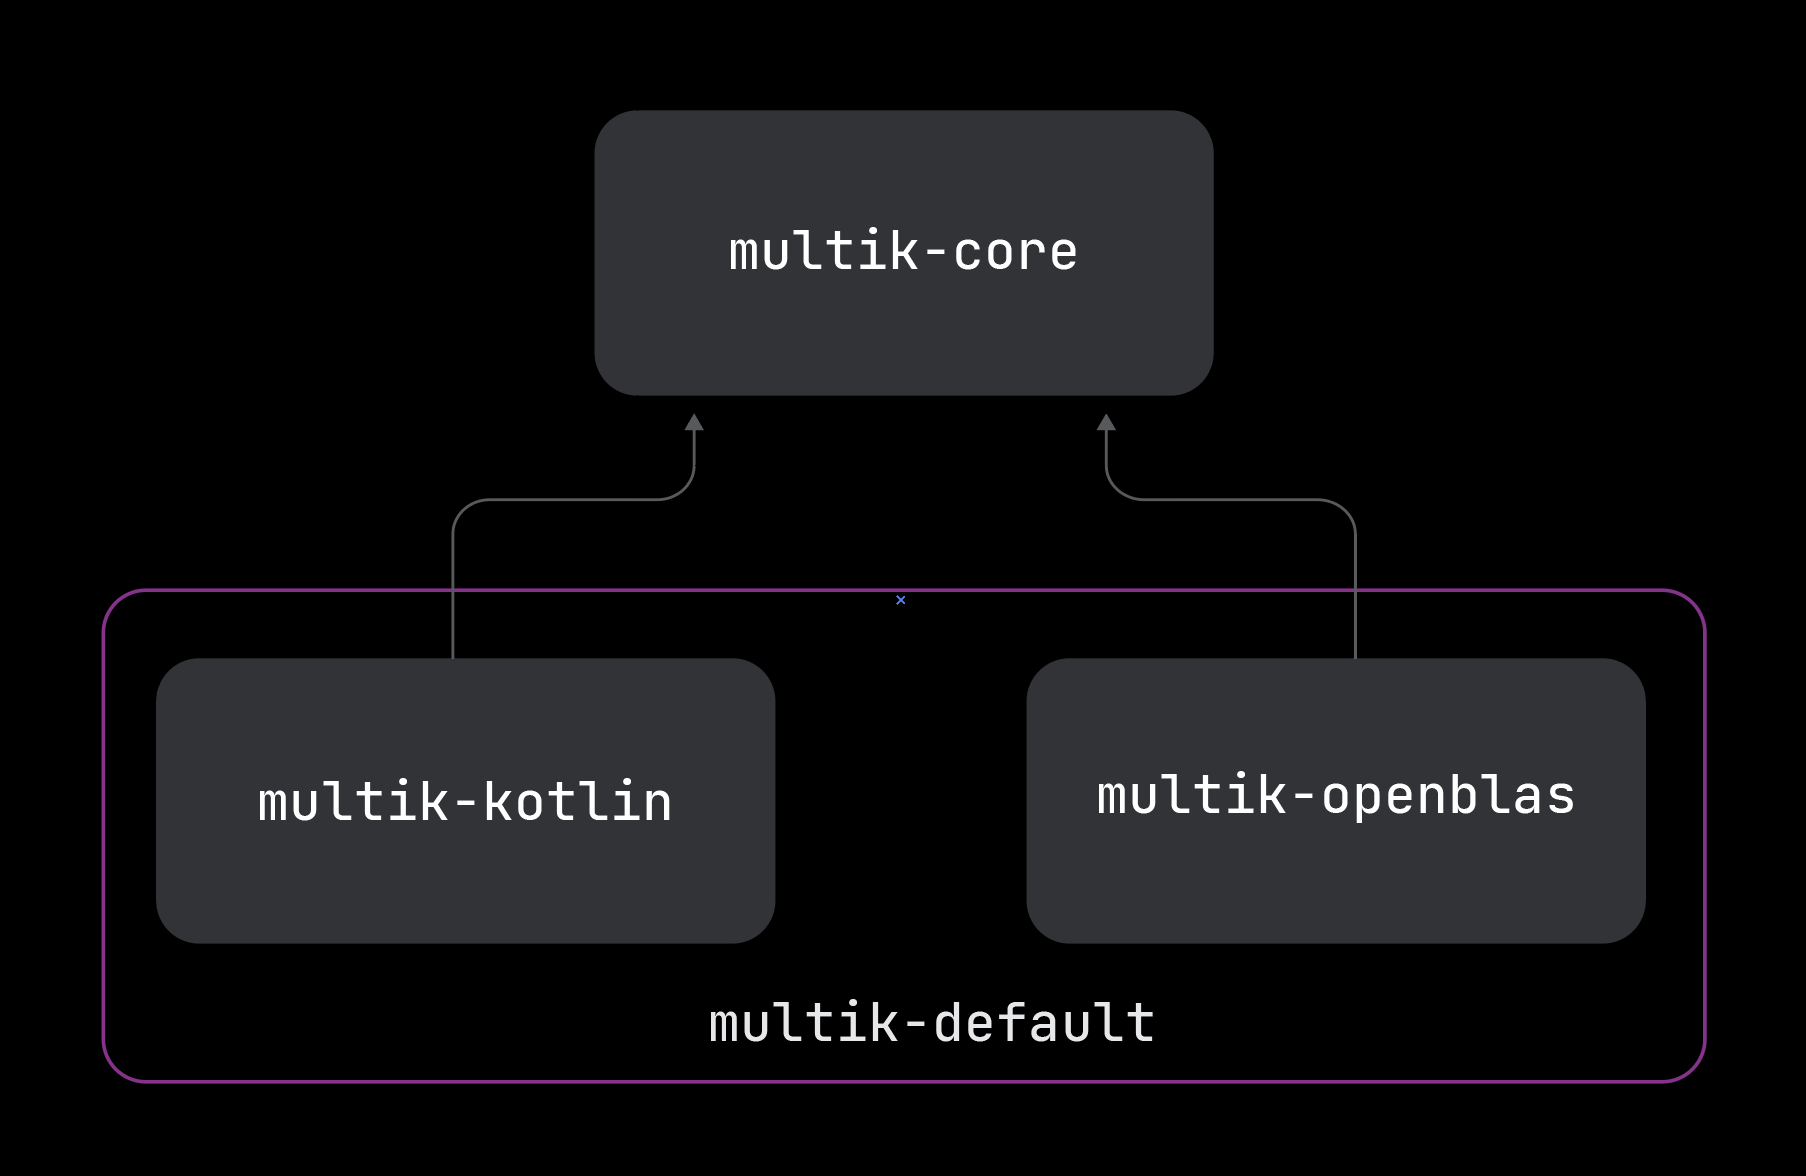
Let’s reacquaint ourselves with the modules and get a sense of which platforms each module now supports.
multik-core
As the name suggests, this is the main module providing multidimensional arrays and the ability to perform transformations, iteration, and arithmetic operations with them. This module also provides an API for calculations that require complex algorithms and resources. Now there are three types of such APIs: mathematics, linear algebra, and statistics. Other modules are responsible for the implementation of this API. Remember – Multik lets you replace these implementations at runtime.
We have added support for all major platforms for this module. Note that JavaScript uses a new IR and Kotlin/Native uses a new memory model, so these artifacts will only be compatible with projects that support them.
The first module that implements the above API is multik-kotlin. In this module, all algorithms and logic are written in pure Kotlin. Even though it may be slower than native libraries, it provides more stability and allows for easier code debugging.
Because everything is written in Kotlin, it was also possible to support most of the important platforms, including JVM, Desktop, iOS, and JavaScript.
multik-openblas
The next module is multik-openblas. Here, the OpenBLAS library is responsible for all linear algebra as well as the C wrapper over the Fortran libraries LAPACK and BLAS. C++ code is responsible for mathematics and statistics.
This module, unlike the previous one, is quite demanding on the environment and the platform it’s launched on. In the table, you can see that the code under the JVM will only work on the specified systems and architectures. On these platforms, we ensure that it works out of the box and the users are rewarded with excellent performance.
multik-default
multik-default, the last of the 4 models available at the moment, has kept its old name. It includes the two previous modules, multik-kotlin and multik-openblas. The idea is to combine the pros of both modules while doing away with the cons.
It supports all of the same platforms as the previous modules.
Support for Android and Apple Silicon processors
multik-openblas is supported by Android and macOS on new Apple processors. Now you can enjoy the speed of applications on Android with ARMv8 processors and native support for M1 and M2 processors from Apple.
Random, norm matrix, easy creation of complex numbers, and more
In this release, we have also improved the usability of the library. For example, we wrapped random from Kotlin to create arrays with random numbers:
val ndarray = mk.rand<Float>(3, 5, 2)
We have changed the matrix norm calculation function and added it to the native one:
val ndarray = mk.ndarray(mk[mk[1.0, 2.0], mk[3.0, 4.0]])
mk.linalg.norm(ndarray)
mk.linalg.norm(ndarray, Norm.Inf)
And now you can create complex numbers easily and naturally. Credit for this contribution goes to Marcus Dunn.
val complexNumber: ComplexDouble = 1.0 + 1.0.i
For more details about this new release, please check out the changelog.
How to try it
To try Multik 0.2.0 in your project, do the following:
Make sure that you have mavenCentral() in your list of repositories:
Introducing Multik 0.2.0! Now a multiplatform library, it allows you to use multidimensional arrays in your favorite multiplatform projects. Let’s take a closer look at what’s new in v0.2.0.
We are very grateful to Luca Spinazzola for his huge contribution to the multiplatform capabilities included in this release of the library.
Before we move on to reviewing Multik’s new multiplatform structure, we need to say a few words about the new naming conventions. Ever since we multiplied the number of artifacts and added platform suffixes, such as jvm, macosx64, js, and others, there have been collisions with older names. To solve this problem, we’ve renamed some of the modules.
Let’s reacquaint ourselves with the modules and get a sense of which platforms each module now supports.
multik-core
As the name suggests, this is the main module providing multidimensional arrays and the ability to perform transformations, iteration, and arithmetic operations with them. This module also provides an API for calculations that require complex algorithms and resources. Now there are three types of such APIs: mathematics, linear algebra, and statistics. Other modules are responsible for the implementation of this API. Remember – Multik lets you replace these implementations at runtime.
We have added support for all major platforms for this module. Note that JavaScript uses a new IR and Kotlin/Native uses a new memory model, so these artifacts will only be compatible with projects that support the new IR and new memory model, respectively.
The first module that implements the above API is multik-kotlin. In this module, all algorithms and logic are written in pure Kotlin. Even though it may be slower than native libraries, it provides more stability and allows for easier code debugging.
Because everything is written in Kotlin, it was also possible to support most of the important platforms, including JVM, Desktop, iOS, and JavaScript.
multik-openblas
The next module is multik-openblas. Here, the OpenBLAS library is responsible for all linear algebra as well as the C wrapper over the Fortran libraries LAPACK and BLAS. C++ code is responsible for mathematics and statistics.
This module, unlike the previous one, is quite demanding on the environment and the platform it’s launched on. In the table, you can see that the code under the JVM will only work on the specified systems and architectures. On these platforms, we ensure that it works out of the box and the users are rewarded with excellent performance.
multik-default
multik-default, the last of the 4 models available at the moment, has kept its old name. It includes the two previous modules, multik-kotlin and multik-openblas. The idea is to combine the pros of both modules while doing away with the cons.
It supports all of the same platforms as the previous modules.
Support for Android and Apple Silicon processors
multik-openblas is supported by Android and macOS on new Apple processors. Now you can enjoy the speed of applications on Android with ARMv8 processors and native support for M1 and M2 processors from Apple.
Random, norm matrix, easy creation of complex numbers, and more
In this release, we have also improved the usability of the library. For example, we wrapped random from Kotlin to create arrays with random numbers:
val ndarray = mk.rand<Float>(3, 5, 2)
We have changed the matrix norm calculation function and added it to the native one:
val ndarray = mk.ndarray(mk[mk[1.0, 2.0], mk[3.0, 4.0]])
mk.linalg.norm(ndarray)
mk.linalg.norm(ndarray, Norm.Inf)
And now you can create complex numbers easily and naturally. Credit for this contribution goes to Marcus Dunn.
val complexNumber: ComplexDouble = 1.0 + 1.0.i
For more details about this new release, please check out the changelog.
How to try it
To try Multik 0.2.0 in your project, do the following:
Make sure that you have mavenCentral() in your list of repositories:
TL;DR: We at the Kotlin team have developed a Kotlin library for data frames. Today we’re releasing its first public preview version. It provides a readable and powerful DSL for data wrangling and i/o via CSV, JSON, Excel, and Apache Arrow, as well as interop with Kotlin data classes and hierarchical data schemas. The library is ready for you to try, and we’re keen to get your feedback.
Today we’re unveiling a new member of the collection of Kotlin libraries for data science. We’ve previously written about KotlinDL for deep learning and Multik for tensors. Now we’d like to introduce Kotlin DataFrame, a library for working with data frames.
Overview
One blog post is not enough to cover every aspect of the library, so we started a series of videos about Kotlin DataFrame. Below you’ll find the first video, which covers basic operations and the process of working with plain (non-hierarchical) tables. More videos are in the works, so please let us know whether you like this format and what we can improve.
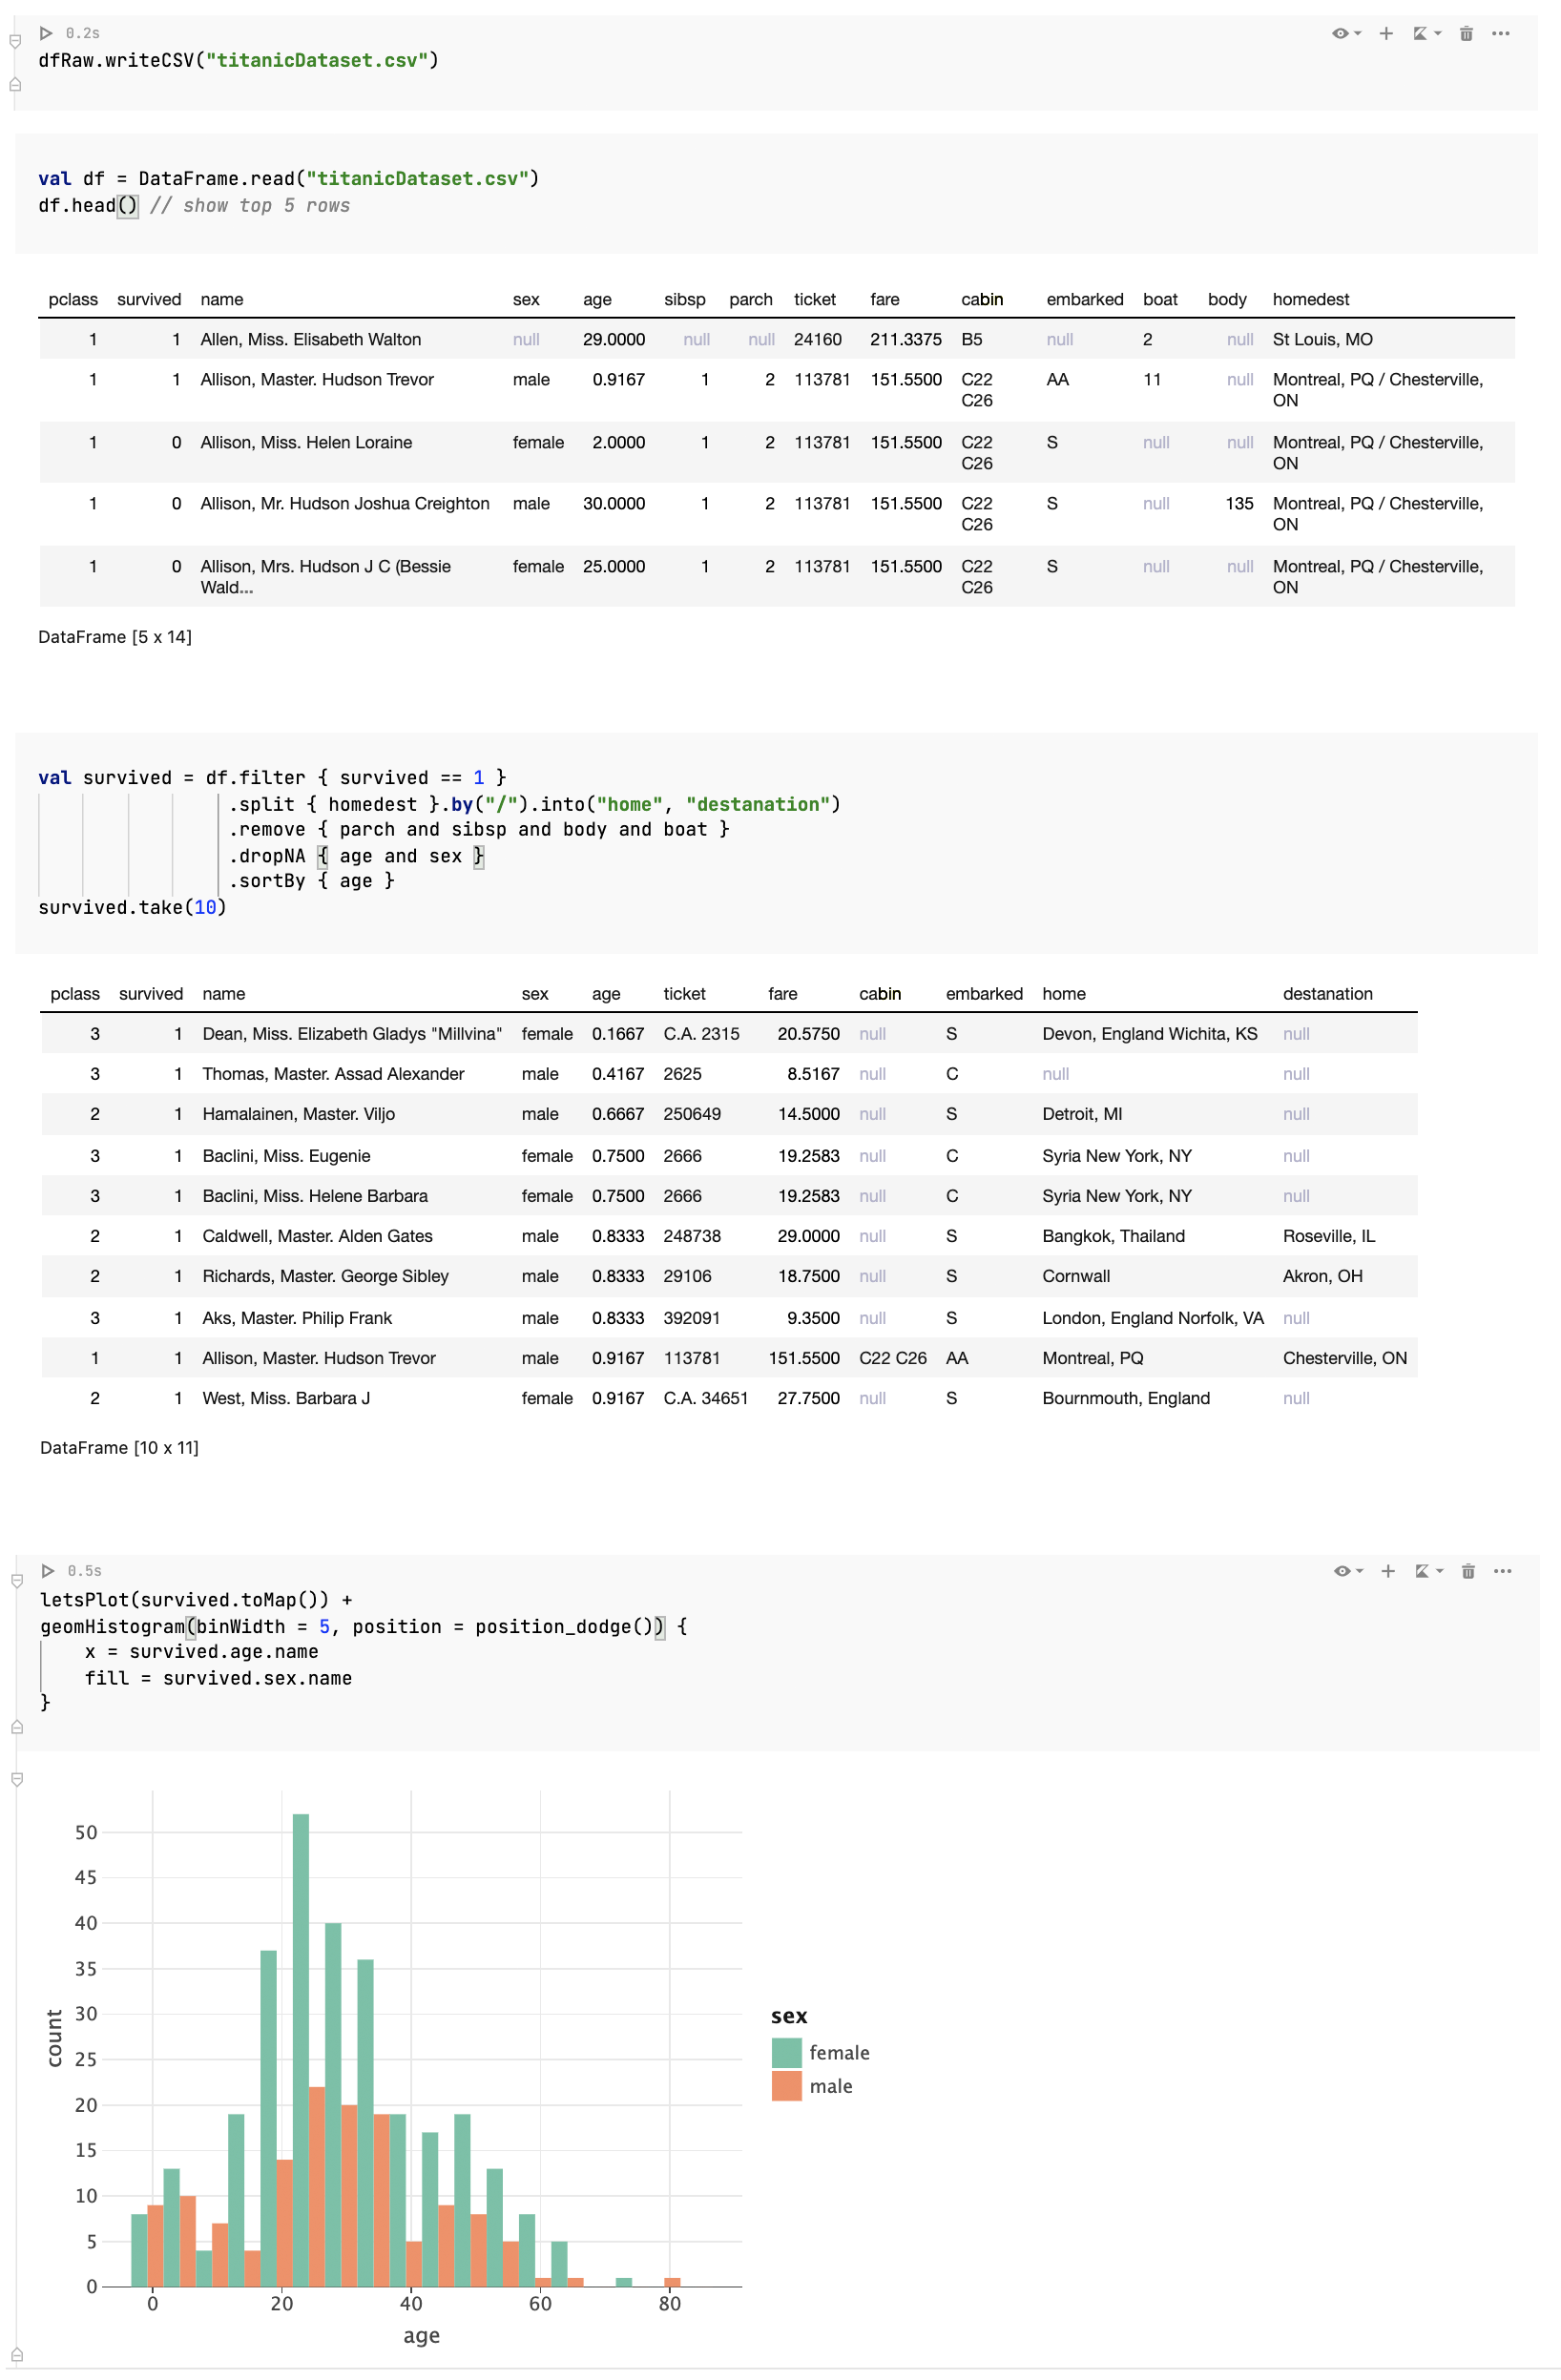
What does it look like?
A simple example using the DataFrame library in Datalore
What is a data frame?
So what is a data frame? A data frame is a convenient abstraction for working with structured data. Essentially, it’s a 2-dimensional table with labeled columns of potentially different types. You can think of it as a spreadsheet or SQL table, or a dictionary of collections. If you’ve ever worked with Excel or CSV files, you are already more or less familiar with the concept of data frames.
But what makes this abstraction so convenient is not the table itself, but rather the set of operations defined in on it. And Kotlin DataFrame is an idiomatic Kotlin DSL-based language for defining such operations. The process of working with data frames is often called data wrangling. This involves transforming and mapping data from a “raw” data format onto another format that is more appropriate for analytics and visualization. The goal of data wrangling is to ensure that data is useful and of high quality. Data analysts typically spend the majority of their time wrangling data, rather than analyzing. And that’s why it is so important to make this process easy, smooth, and enjoyable.
I’m not a data scientist, why should I care?
First of all, who knows? Maybe you willbecome a data scientist one day. 🙂
Analyzing data is not restricted to the field of data science. We often do it in our roles as software developers. For example, we analyze what’s actually inside collections when debugging, dig into memory dumps or databases, work with REST APIs, and receive JSON files with data in them. Having a typesafe and easy DSL for these sorts of tasks would be really beneficial.
Why a new library?
Why are we developing a new library if several JVM-based data frames already exist?
Kotlin DataFrame was inspired by the Krangl library and started as a wrapper on top of it. Over time, however, we had to rewrite more and more of the library, and we ended up changing almost all of it. While rewriting it, we’ve followed these guiding principles:
Idiomatic – The API should be natural for Kotlin developers and consistent with the Kotlin standard library.
Hierarchical – Data frames should be able to read and present data from different sources, including not only plain CSV but also JSON, e.g. directly from REST APIs. That’s why data frames have been designed hierarchically and allow the nesting of columns and cells.
Generic – Data frames should be able to store not just a limited set of value types, but any Kotlin object, providing null-safety support for all of them.
Interoperable – We need to add seamless integration with Kotlin collections, converting any object structure in application memory to a data frame, and vice versa.
data class Person(val name: String, val age: Int)
val persons = listOf(Person("Alice", 15), Person("Bob", 20), Person("Charlie", 22))
// Convert collection to DataFrame
val df = persons.convertToDataFrame()
// Convert DataFrame to Kotlin collection
val persons1 = df.toListOf<Person>()
Typesafe and practical – Data frames are highly dynamic objects. Their labels depend on the input source, and new columns can also be added or removed during data wrangling. To make it possible to access them in a safe and convenient way, we’ve developed a mechanism for the on-the-fly generation of extension properties that correspond to the columns of a data frame. In interactive notebooks like Jupyter or Datalore, this generation runs after the execution of each cell. Currently, we’re working on a compiler plugin that infers and transforms the data frame schema while typing. The generated properties ensure you’ll never misspell column names or mess up their types. And of course, nullability is also preserved.
Properties correspond names, types and nullability of the columns
Polymorphic – If all the columns of one data frame are presented in some other data frame, then the former can be a supertype for the latter. This means we can define a function for a data frame with an expected set of columns and later safely execute it for any data frame that contains them
You’re also welcome to join the #datascience channel in Kotlin Slack (get an invite here). In this channel, you can ask questions, participate in discussions, and get notifications about the new releases
Version 0.4 of our deep learning library, KotlinDL, is out!
KotlinDL 0.4 is now available on Maven Central with a variety of new features – check out all of the changes that are coming to the new release! We’re currently introducing new models in ModelHub (including the EfficientNet and EfficientDet model families), the experimental high-level Kotlin API for Pose Detection, new layers and preprocessors contributed by the community members, and many other changes.
Pose detection is using an ML model to detect the pose of a person from an image or a video by detecting the spatial locations of key body joints (keypoints).
We’re excited to launch the MoveNet family of pose detection modes with our new pose detection API in KotlinDL. MoveNet is a fast and accurate model that detects 17 keypoints on the body. The model is offered on ONNXModelHub with two variants, MoveNetSinglePoseLighting and MoveNetSinglePoseThunder. MoveNetSinglePoseLighting is intended for latency-critical applications, while MoveNetSinglePoseThunder is intended for applications that require high accuracy.
If you need to detect a few poses on a given image or video frame, try MoveNetMultiPoseLighting. This model is able to detect multiple people in the image frame at the same time, while still achieving real-time speed.
There are two ways to detect poses within the KotlinDL: parsing the model output manually or using our LightAPI for Pose Detection (the recommended way).
Just load the model:
val modelHub = ONNXModelHub(cacheDirectory = File("cache/pretrainedModels"))
val model = ONNXModels.PoseDetection.MoveNetSinglePoseLighting.pretrainedModel(modelHub)
Run the predictions and print out the pose landmarks and edges connecting the detected pose landmarks:
model.use { poseDetectionModel ->
       val imageFile = …
       val detectedPose = poseDetectionModel.detectPose(imageFile = imageFile)

       detectedPose.poseLandmarks.forEach {
           println("Found ${it.poseLandmarkLabel} with probability ${it.probability}")
       }

       detectedPose.edges.forEach {
           println("The ${it.poseEdgeLabel} starts at ${it.start.poseLandmarkLabel} and ends with ${it.end.poseLandmarkLabel}")
       }
}
Some visualization examples, where we drew landmarks and edges on the given images, are below.
If you want to run the MoveNet model to detect multiple poses on the given image, you need to make some minor changes to your code.
First, load the model:
val modelHub = ONNXModelHub(cacheDirectory = File("cache/pretrainedModels"))
val model = ONNXModels.PoseDetection.MoveNetSinglePoseLighting.pretrainedModel(modelHub)
Secondly, run the model and get the MultiPoseDetectionResult object, which contains the list of pairs <DetectedObject, DetectedPose>. As a result, we have access not only to the landmarks’ coordinates and labels, but also to the coordinates of the bounding box for the whole person.
model.use { poseDetectionModel ->
       val imageFile = …
       val detectedPoses = poseDetectionModel.detectPoses(imageFile = imageFile, confidence = 0.0f)

       detectedPoses.multiplePoses.forEach { detectedPose ->
           println("Found ${detectedPose.first.classLabel} with probability ${detectedPose.first.probability}")
           detectedPose.second.poseLandmarks.forEach {
               println("Found ${it.poseLandmarkLabel} with probability ${it.probability}")
           }

           detectedPose.second.edges.forEach {
               println("The ${it.poseEdgeLabel} starts at ${it.start.poseLandmarkLabel} and ends with ${it.end.poseLandmarkLabel}")
           }
       }
}
Some visualization examples, where we drew the bounding boxes, landmarks, and edges on the images are below.
Running predictions on ready-made models is good, but what about fine-tuning them for your tasks?
The classic approach to Transfer Learning is to freeze all layers except the last few and then train the top few layers (the fully connected layers at the top of the network) on a new piece of data, often changing the number of model outputs.
Before the 0.4 release, KotlinDL users needed to remove the last layers manually, but with the 0.4 release, TensorFlowModelHub provides an option to download “noTop” models – equivalent to earlier available models, but without weights and configurations for the last few layers.
The following “noTop” models are now available:
VGG’16
VGG’19
ResNet50
ResNet101
ResNet152
ResNet50V2
ResNet101V2
ResNet152V2
MobileNet
MobileNetV2
NasNetMobile
NasNetLarge
DenseNet121
DenseNet169
DenseNet201
Xception
Inception
In the example below, we load the ResNet50 model from our TensorFlowModelHub and fine-tune it to classify cats and dogs (using the embedded Dogs-vs-Cats dataset):
val modelHub = TFModelHub(cacheDirectory = File("cache/pretrainedModels"))

val modelType = TFModels.CV.ResNet50(noTop = true, inputShape = intArrayOf(IMAGE_SIZE, IMAGE_SIZE, NUM_CHANNELS))

val noTopModel = modelHub.loadModel(modelType)
The topModel is the simplest neural network and can be trained quickly, as it has few parameters.
The new helper function could join two models together: noTop and topModel: val model = Functional.of(pretrainedModel = noTopModel, topModel = topModel)
After that, load weights for the frozen layers from the noTop model, and the weights for the unfrozen layers from the topModel will be initialized during the fit method call.
Until v0.4, our ModelHub contained only one model (SSD) suitable for solving the Object Detection problem. Starting with this release, we’re gradually expanding the library’s capabilities for solving the Object Detection problem. We’d like to introduce to you a new family of object detectors, called EfficientDet, which consistently achieve much better efficiency than prior object detectors across a wide spectrum of resource constraints.
All models from this family have the same internal architecture which scales for different inputs (image resolution). The final user has a choice of models: from the smallest EfficientDet-D0, model with 3.9 million parameters and 10.2 ms latency on the V100 up to the EfficientDet-D7, with 52 million parameters and 122 ms latency on the V100.
Internally, EfficientDet models use another famous model, EfficientNet, as a backbone. It extracts features from input images and passes them to the next component of the Object Detection model).
EfficientDet Architecture
An example of EfficientDet-D2 usage can be found here.
The EfficientNet model family is also available in the ONNXModelHub. There are 8 different types of models and each model is presented in two variants: full and “noTop” for fine-tuning.
These models achieve better accuracy on the ImageNet dataset with 10x fewer parameters than ResNet or NasNet. If you need fast and accurate image recognition, EfficientNet is a good choice.
An example of EfficientNet0 usage can be found here.
Multiple callbacks
Earlier, Callback support for KotlinDL was pretty simple and not fully compatible with Keras. As a result, users faced difficulties in implementing their neural networks, building the custom validation process, and monitoring the neural network’s training.
The callback object was passed during compilation and was unique for each stage in the model’s lifecycle. However, model compilation can be located in very different places in the code than fit/predict/evaluate, meaning that users may need to create different callbacks for different purposes.
Let’s assume that we need to define EarlyStopping and TerminateOnNaN for training to handle exceptional cases, and also add two custom callbacks for the prediction and evaluation phases:
val earlyStopping = EarlyStopping(
   monitor = EpochTrainingEvent::valLossValue,
   minDelta = 0.0,
   patience = 2,
   verbose = true,
   mode = EarlyStoppingMode.AUTO,
   baseline = 0.1,
   restoreBestWeights = false
)
val terminateOnNaN = TerminateOnNaN()


class EvaluateCallback : Callback() {
   override fun onTestBatchEnd(batch: Int, batchSize: Int, event: BatchEvent?, logs: History) {
       println("Test batch $batch ends with loss ${event!!.lossValue}..")
   }

   override fun onTestEnd(logs: History) {
       println("Train ends with last loss ${logs.lastBatchEvent().lossValue}")
   }
}

class PredictCallback : Callback() {
   override fun onPredictBatchBegin(batch: Int, batchSize: Int) {
       println("Prediction batch $batch begins.")
   }

   override fun onPredictBatchEnd(batch: Int, batchSize: Int) {
       println("Prediction batch $batch ends.")
   }
}
Many contributors to this release have added layers to Kotlin for performing non-trivial logic. With these added layers, you can start working with autoencoders and load the GAN models:
These activation functions are not available in the TensorFlow core package, but we decided to add them after seeing how they’ve been widely used in recent papers.
We’d be delighted to look at your pull requests if you’d like to contribute a layer, activation function, callback, or initializer from a recent paper!
Breaking changes in the Image Preprocessing DSL
There are a few major changes in the Image Preprocessing DSL:
CustomPreprocessor was removed.
The loading section was moved from image preprocessing to the Dataset API
A few new Preprocessors were added:
Padding
CenterCrop
Convert
Grayscale
Normalizing
Here is an example of some of the new operations:
val preprocessing = preprocess {
 transformImage {
   centerCrop {
     size = 214
   }
   pad {
     top = 10
     bottom = 10
     left = 10
     right = 10
     mode = PaddingMode.Fill(Color.BLACK)
   }
   convert {
     colorMode = ColorMode.BGR
   }
 }
 transformTensor {
   normalize {
     mean = floatArrayOf(103.939f, 116.779f, 123.68f)
     std = floatArrayOf(57.375f, 57.12f, 58.395f)
   }
 }
}
Because of the removal of the loading section, the same preprocessing instance could now be used in several datasets:
val trainDataset = OnHeapDataset.create(File(datasetPath, "train"), labelGenerator, preprocessing)
val valDataset = OnHeapDataset.create(File(datasetPath, "val"), labelGenerator, preprocessing)
Standing on the shoulders of giants
We’d like to express our deep gratitude to Alexey Zinoviev for his great work developing the framework from minimum viable product to the current state, efforts towards creating a community, skillful release management, and competent marketing support.
His passion for democratizing AI and his continuous work to improve the ability of Kotlin and Java developers to use ML/DL models deserves great respect and inspires us to continue our work.
We’d also like to express our gratitude to Veniamin Viflyantsev, who’s invested a lot of time and effort into changing the architecture of the api module. Many of his changes are now part of this release.
Our team has expanded! Julia Beliaeva (author of the new version of Image Preprocessing DSL) and Nikita Ermolenko have joined us on a permanent basisWe wish them good luck and look forward to new releases!
Learn more and share your feedback
We hope you enjoyed this brief overview of the new features in KotlinDL 0.4! For more information, including the up-to-date Readme file, visit the project’s home on GitHub. Be sure to check out the KotlinDL guide, which contains detailed information about the library’s basic and advanced features and covers many of the topics mentioned in this blog post in more detail.
If you’ve previously used KotlinDL, use the changelog to find out what has changed and how to upgrade your projects to the stable release.
We’d be very thankful if you’d report any bugs you find to our issue tracker. We’ll try to fix all of the critical issues in the 0.4.1 release.
You’re also welcome to join the #kotlindl channel in Kotlin Slack (get an invite here). In this channel, you can ask questions, participate in discussions, and get notifications about the new preview releases and models in ModelHub.