Kotlin Mega Tutorial
A Productive and Pragmatic Language
A programming language is usually designed with a specific purpose in mind. This purpose can be anything from serving a specific environment (e.g, the web) to a certain paradigm (e.g. functional programming). In the case of Kotlin the goal is to build a productive and pragmatic language, that has all the features that a developer needs and makes easy to use them.
Kotlin was initially designed to work with other JVM languages, but it is now evolved to be much more: it also works in the browser and as a native application.
This is what Dmitry Jemerov, development lead at JetBrains said about their choice of creating Kotlin:
We’ve looked at all of the existing JVM languages, and none of them meet our needs. Scala has the right features, but its most obvious deficiency is very slow compilation
For a more in-depth comparison between Scala and Kotlin you can see our article: Kotlin vs Scala: Which Problems Do They Solve?
Why not keeping using Java? Java is a good language but has a series of issues because of its age and success: it needs to maintain backward compatibility with a lot of old code and it suffers from old design principles.
Kotlin is multi-paradigm, with support for object-oriented, procedural and functional programming paradigms, without forcing to use any of them. For example, contrary to Java, you can define functions as top-level, without having to declare them inside a class.
In short, Kotlin was designed to be a better Java, that takes all the best practices and add a few innovations to make it the most productive JVM language out there.
A Multi-platform Language from the Java World
It is no secret that Kotlin comes from the Java world. JetBrains, the company behind the language has long experience in developing tools for Java and they specifically thought about the issues in developing with Java. In fact, one of the core objectives of Kotlin is creating code that is compatible with an existing Java code base. One reason is because the main demographics of Kotlin users are Java developers in search of a better language. However, it is inter-operable also to support working with both languages. You can maintain old code in Java e create a new project in Kotlin without issues.
It has been quite successful in that and this is the reason because Google has chosen to officially support Kotlin as a first-class language for Android development.
The main consequence is that, if you come from the Java world, you can immediately start using Kotlin in your existing Java projects. Also, you will found familiar tools: the great IntelliJ IDEA IDE and build tools likes Gradle or Maven. If you have never used Java that is still good news: you can take advantage of a production ready infrastructure.
However, Kotlin is not just a better Java that also has special support for Android. You can also use Kotlin in the browser, working with existing JavaScript code and even compile Kotlin to a native executable, that can take advantage of C/C++ libraries. Thanks to native executables you can use Kotlin on an embedded platform.
So, it does not matter which platform you use or which language you already know, if you search for a productive and pragmatic language Kotlin is for you.
A Few Kotlin Features
Here there are a quick summary of Kotlin features:
- 100% interoperable with Java
- 100% compatible with Java 6 and so can you can create apps for most Android devices
- Runs on the JVM, it can be transpiled to JavaScript and can even run native, with interoperability with C and Objective-C (macOs and iOS) libraries
- There is no need to end statements with a semicolon
;. Blocks of code are delimited by curly brackets{ } - First-class support for constant values and immutable collections (great for parallel and functional programming)
- Functions can be top-level elements (i.e., there is no need to put everything inside a class)
- Functions are first-class citizens: they can be passed around just like any other type and used as argument of functions. Lambda (i.e., anonymous functions) are greatly supported by the standard library
- There is no keyword
static, instead there are better alternatives - Data classes, special classes designed to hold data
- Everything is an expression:
if,for, etc. they can all return values - The
whenexpression is like a switch with superpowers
Table of Contents
The companion repository for this article is available on GitHub
Basics of Kotlin
- Variables and Values
- Types
- Nullability
- Kotlin Strings are Awesome
- Declaring and Using Functions
- Classes
- Data Classes
- Control Flow
- The Great when Expression
- Dealing Safely with Type Comparisons
- Collections
- Exceptions
- A Simple Kotlin Program
Advanced Kotlin
Setup
As we mentioned, you can use Kotlin on multiple platforms and in different ways. If you are still unsure if you want to develop with Kotlin you can start with the online development environment: Try Kotlin. It comes with a few exercises to get the feel of the language.
In this setup section, we are going to see how to setup the most common environment to build a generic Kotlin application. We are going to see how to setup IntelliJ IDEA for Kotlin development on the JVM. Since Kotlin is included in all recent versions of IntelliJ IDEA you just have to download and install the IDE.
You can get the free Community edition for all platforms: Windows, MacOS and Linux.
Basic Project
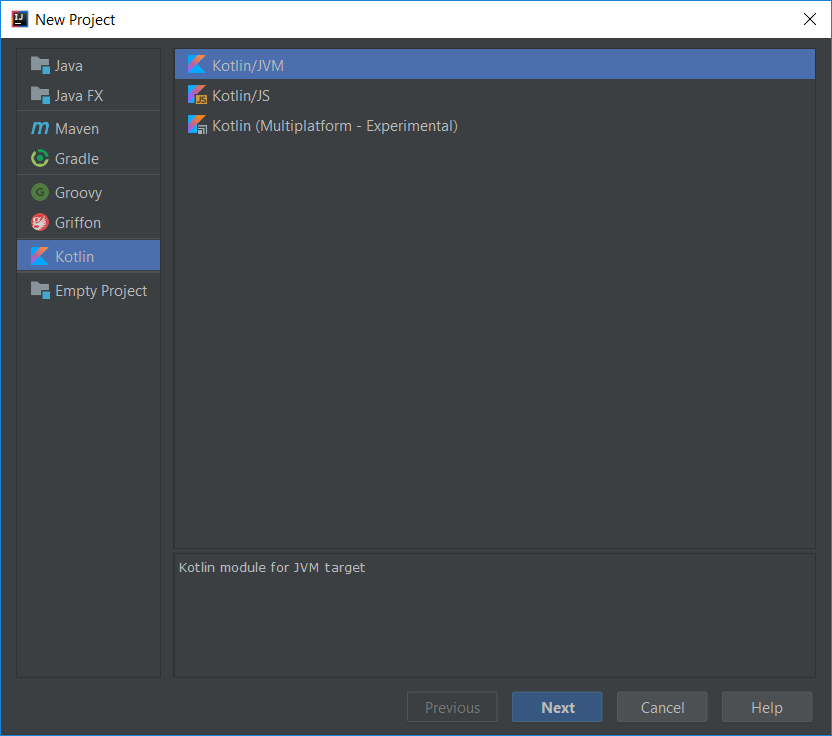
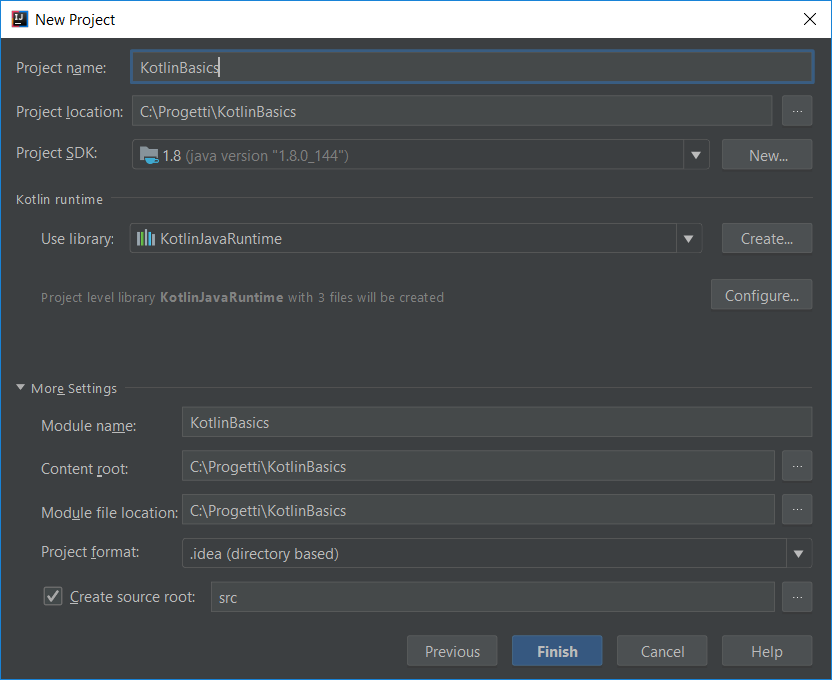
You can create a new Kotlin project very easily, just launch the wizard and choose the template.

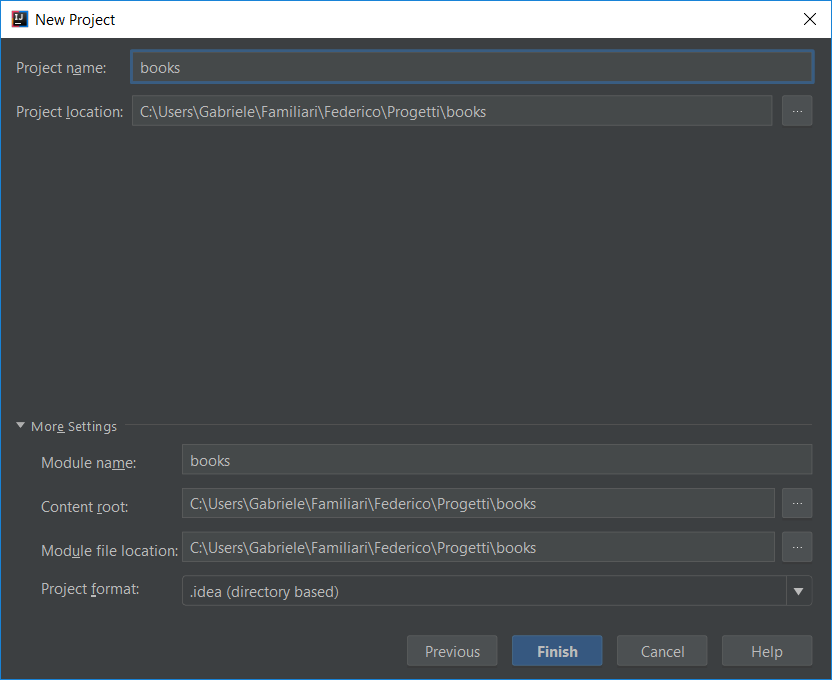
Then you have to fill the details of your project, the only required value is the Project name, you can leave the other settings to their default value.

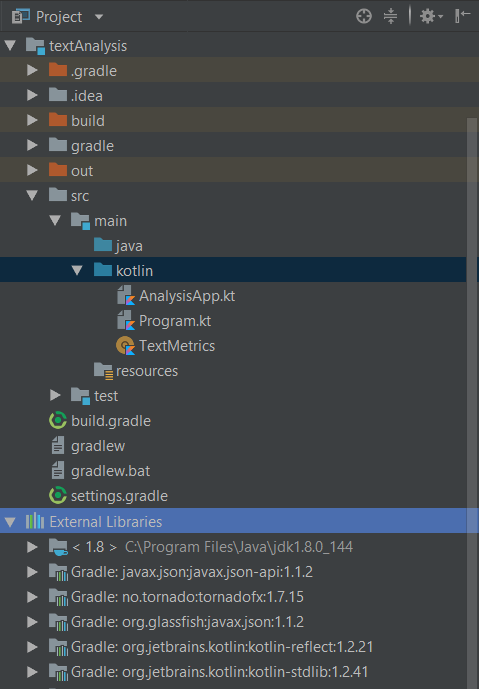
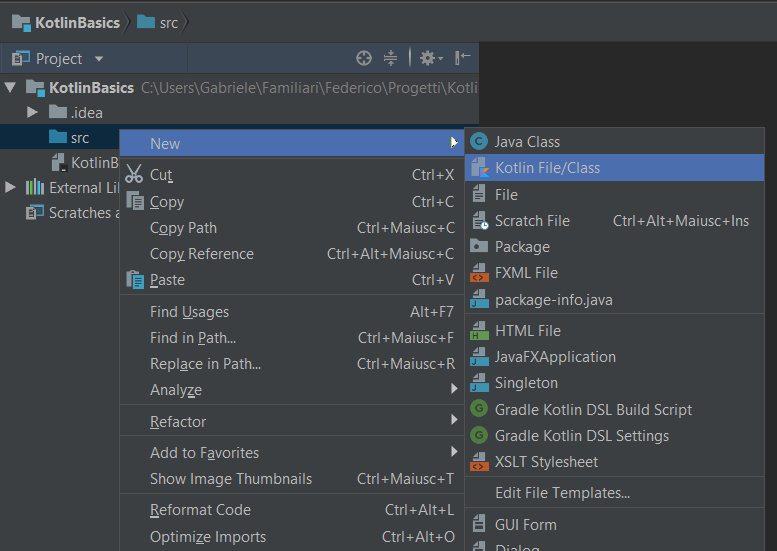
Now that you have a project you can look at its structure and create a Kotlin file inside the src folder.

This is the basic setup, which is good for when you need to create a pure Kotlin project with just your own code. It is the ideal kind of project for your initial Kotlin programs, since it is easier and quicker to setup.
Gradle Project
In this section we are going to see how to create a Gradle project. This is the kind of project you are going to use the most with real projects, since it easily allows to mix Java and Kotlin code, both your own code and libraries from other people. That is because Gradle facilitates download and use existing libraries, instead of having to download them manually.
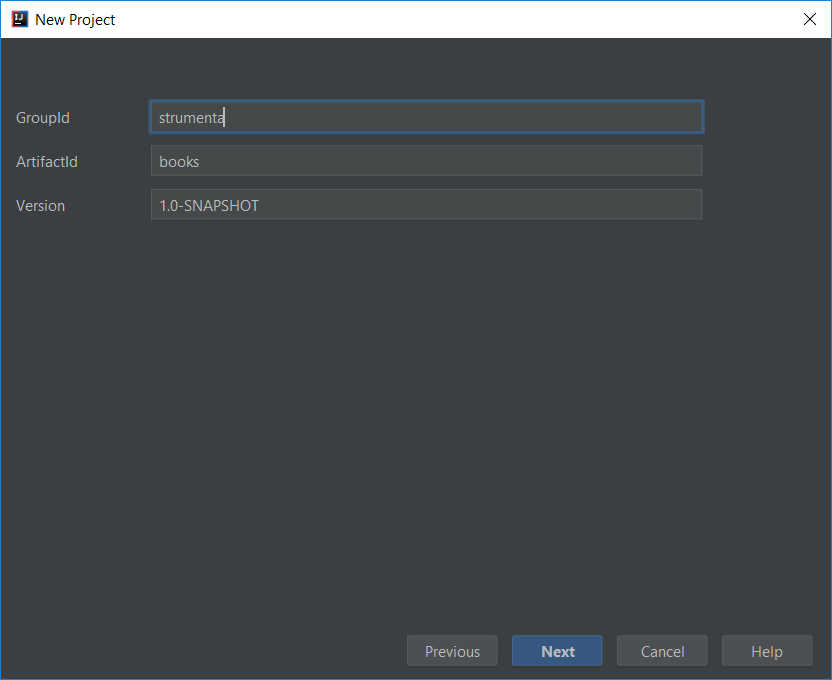
You can create a new Gradle project quite easily, just launch the wizard, choose the Gradle template and select Kotlin (Java) in the section Additional Libraries and Frameworks.

Then you have to fill the naming details of your project, needed for every Gradle project. You have to indicate a name for your organization (GroupId) and for the specific project (ArtifactID). In this example we choose the names strumenta (i.e., the company behind SuperKotlin) for our organization and books for our project.

Then you have to specify some Gradle settings, but you can usually just click Next for this stage.

Finally, you have to fill the details of your project, the only required value is the Project name, you can leave the other settings to their default value. The value should already be filled, with the ArtifactId value chose in one of the preceding steps.
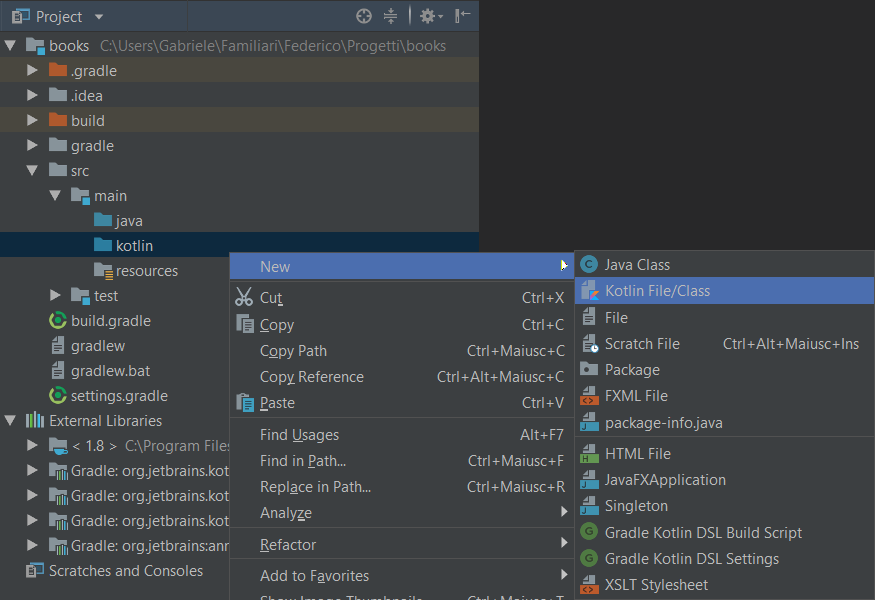
Now that you have a project you can look at its structure and create a Kotlin file inside the src/main/kotlin folder. Given that you can mix Java and Kotlin code there are two folders: one for each language. The structure of a Java project is peculiar: in a Java project, the hierarchy of directories matched the package structure (i.e., the logical organization of the code). For example, if a Java file is part of a package com.strumenta.books it will be inside the folders com/strumenta/books.
With Kotlin you do not have to respect this organization, although it is the recommended if you plan to use both Java and Kotlin. Instead if you just use Kotlin you should use whatever structure your prefer.

Adding Kotlin Code
Inside the new Kotlin file you can create the main routine/function. IntelliJ IDEA comes with a template, so you simply need to write main and press tab to have it appear.

When you code is ready, you can compile it and run the program with the proper menu or clicking the icon next to main function.

And that is all you need to know to setup and start developing with Kotlin.
Basics of Kotlin
In this section we explain the basic elements of Kotlin. You will learn about the basic elements needed to create a Kotlin program: definining variables, understanding the type system, how Kotklin supports nullability and how it deals with strings. You will learn how to us the builing blocks like control flow expressions, functions, classes and how to define the special Kotlin classes known as data classes. Finally, we will put everything together to create a simple program.
Variables and Values
Kotlin is a multi-paradigm language, which includes good support for functional programming. It is a completely functional language like Haskell, but it has the most useful features of functional programming. An important part of this support is that constant values are first class citizens of Kotlin, just like normal variables.
Constants are called value and are declared using the keyword val.
val three = 3
This is as simple as declaring a variable, the difference, of course, is that to declare a variable you use the keyword var.
var number = 3
If you try to reassign a value you get a compiler error:
Val cannot be reassigned
This first-class support for values is important for one reason: functional programming. In functional programming the use constant values allow some optimizations that increase performance. For instance, calculations can be parallelized since there is a guarantee that the value will not change between two parallel runs, given that it cannot change.
As you can see, in Kotlin there is no need to end statements with a semicolon, a newline is enough. However, adding them is not an error: it is no required, but it is allowed. Though remember that Kotlin is not Python: blocks of code are delimited by curly braces and not indentation. This is an example of the pragmatic approach of the language.
Note: outside this chapter, when we use the term variable we usually also talk about value, unless explicitly noted.
Types
Kotlin is statically-typed language, which means that types of any variable must be determined at compilation time. Up until now, we have declared variables and values without indicating any type, because we have provided an initialization value. This initialization allows the Kotlin compiler to automatically infer the type of the variable or value.
Obviously, you can explicitly assign a type to a variable. This is required, if you do not provide an initialization value.
val three: Int = 3
In this example, the value three has the type Int.
Whether you explicitly indicate the type of a value or not, you always have to initialize it, because a value cannot be changed.
The types available in Kotlin are the usual ones: Char, String, Boolean, several types of numbers.
There are 4 types of natural numbers: Byte, Short, Int, Long.
| Type | Bit Width |
| Byte | 8 |
| Short | 16 |
| Int | 32 |
| Long | 64 |
A Long literal must end with the suffix L.
There are also two types for real numbers: Float and Double.
| Type | Bit Width | Example Literal |
| Float | 32 | 1.0f |
| Double | 64 | 1.0 |
Float and Double literals use different formats, notice the suffix f for float.
Since Kotlin 1.1 you can use underscore between digits, to improve readability of large numeric literals.
For example, this is valid code.
var large = 1_000_000
A Type is Fixed
Even when you are not explicitly indicating the type, the initial inferred type is fixed and cannot be changed. So, the following is an error.
var number = 3
// this is an error
number = "string"
This remains true even if there is a type that could satisfy both the initial assignment and the subsequent one.
var number = 1
// this is an error
number = 2.0
In this example number has the type Int, but the second assignment has the type Double. So, the second assignment is invalid, despite the fact that an Int value could be converted to a Double. So, if number was a Double it could accept integer numbers.
In fact, to avoid similar errors, Kotlin is quite strict even when inferring the type to literals. For example, an integer literal will always just be an integer literal and it will not be automatically converted to a double.
var number = 1.0
// this is an error
number = 2
In the previous example the compiler will give you the following error, relative to the second assignment:
The integer literal does not conform to the expected type Double
However, complex expressions, like the following one, are perfectly valid.
var number = 1.0
number = 2 + 3.0
This works because the whole addition expression is of type Double. Even though the first operand of the addition expression is an Int, that is automatically converted to Double.
Kotlin usually prefers a pragmatic approach, so this strictness can seem out of character. However, Kotlin has another design principle: to reduce the number of errors in the code. This is the same principle that dictates the Kotlin approach to nullability.
Nullability
In the last few years best practices suggest being cautious in using null and nullable variables. That is because using null references is handy but prone to errors. It is handy because sometimes there is not a meaningful value to use to initialize a variable. It is also useful to use a null value to indicate the absence of a proper value. However, the issue is that sometimes the developer forgets to check that a value is valid, so you get bugs.
Tony Hoare, the inventor of the null reference call it its billion-dollar mistake:
I call it my billion-dollar mistake. It was the invention of the null reference in 1965. At that time, I was designing the first comprehensive type system for references in an object oriented language (ALGOL W). My goal was to ensure that all use of references should be absolutely safe, with checking performed automatically by the compiler. But I couldn’t resist the temptation to put in a null reference, simply because it was so easy to implement. This has led to innumerable errors, vulnerabilities, and system crashes, which have probably caused a billion dollars of pain and damage in the last forty years.
That is why in Kotlin, by default, you must pay attention when using null values. Whether it is a string, an array or a number, you cannot assign a null value to a variable.
var text: String = "Test"
text = "Changing idea"
// this is an error
text = null
The last assignment will make the compiler throw an error:
Null can not (sic) be a value of a non-null type String
As this error indicates, you cannot use null with standard types, but there is a way to use null values. All you have to do is indicating to the compiler that you want to use a nullable type. You can do that by adding a ? at the end of a type.
var text: String = null // it does not compile
var unsafeText: String? = null // ok
Nullability Checks
Kotlin takes advantage of the nullability or, at the opposite, the safeness of types, at all levels. For instance, it is taken into consideration during checks.
val size = unsafeText.length // it does not compile because it could be null

if (unsafeText != null) {
  val size = unsafeText.length // it works, but it is not the best way
}
When using nullable type you are required to check that the variable currently has a valid value before accessing it. After you have checked that a nullable type is currently not null, you can use the variable as usual. You can use as if it were not nullable, because inside the block it is safe to use. Of course, this also looks cumbersome, but there is a better way, that is equivalent and more concise.
val size = unsafeText?.length // it works
The safe call operator (?.) guarantees that the variable will be accessed only if unsafeText it is not null. If the variable is null then the safe call operator returns null. So, in this example the type of the variable size would be Int?.
Another operator related to null-values is the elvis operator (?:). If whatever is on the left of the elvis operator is not null then the elvis operator returns whatever is on the left, otherwise it returns what is on the right.
val len = text?.length ?: -1
This example combines the safe-call operator and the elvis operator:
- if text is not null (safe-call) then on the left there will be the length of the string text, thus the elvis operator will return
text.length - if text is
null(safe-call) then on the left there will benull, then the elvis operator will return-1.
Finally, there is the non-null assertion operator (!!). This operator converts any value to the non-null corresponding type. For example, a variable of type String? becomes of a value of type String. If the value to be converted is null then the operator throws an exception.
// it prints the length of text or throws an exception depending on whether text is null or not
println(text!!.length)
This operator has to be used with caution, only when you are absolutely certain that the expression is not null.
Kotlin Strings are Awesome
Kotlin strings are powerful: they come with plenty of features and a few variants.
Strings are immutable, so whenever you are modifying a new string you are actually creating a new one. The elements of a string can be accessed with the indexing operator ([]).
var text:String = "Kotlin is awesome"
// it prints K
println(text[0])
You can escape some special characters using a backslash. The escape sequences supported are: t, b, n, r, ', ", \ and $. You can use the Unicode escape sequence syntax to input any character by referencing its code point. For example, u0037 is equivalent to 7.
You can concatenate strings using the + operator, as in many other languages.
var text:String = "Kotlin"
// it prints "Kotlin is awesome"
println(text + " is awesome")
However, there is a better way to concatenate them: string templates. These are expressions that can be used directly inside a string and are evaluated, instead of being printed as they are. These expressions are prefixed with a $. If you want to use arbitrary expression, you have to put them inside curly braces, together with the dollar sign (e.g., ${4 + 3}).
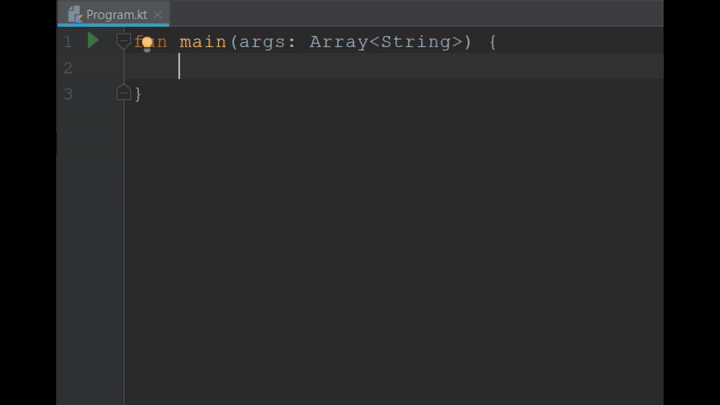
fun main(args: Array<String>) {
    val who: String = "john"
    // simple string template expression
    // it prints "john is awesome"
    println("$who is awesome")
    // arbitrary string template expression
    // it prints "7 is 7"
    println("${4 + 3} is 7")
}
This feature is commonly known as string interpolation. It is very useful, and you are going to use it all the time.
However, it is not a panacea. Sometimes you have to store long, multi-line text, and for that normal strings are not good, even with templates. In such cases you can use raw strings, delimited by triple double quotes """.
val multiline = """Hello,
    I finally wrote this email.
    Sorry for the delay, but I didn't know what to write.
    I still don't.
    So, bye $who."""
Raw strings support string templates, but not escape sequences. There is also an issue due to formatting: given that the IDE automatically indent the text, if you try to print this string you are going to see the initial whitespace for each line.

Luckily Kotlin include a function that deals with that issue: trimMargin. This function will remove all leading whitespace up until the character you used as argument. It will also remove the character itself. If you do not indicate any character, the default one used is |.
val multiline = """Hello,
        |I finally wrote the email.
        |Sorry for the delay, but I didn't know what to write.
        |I still don't.
        |So, bye $who.""".trimMargin()
This will create a string without the leading whitespace.
Declaring and Using Functions
To declare a function, you need to use the keyword fun followed by an identifier, parameters between parentheses, the return type. Then obviously you add the code of the function between curly braces. The return type is optional. If it is not specified it is assumed that the function does not return anything meaningful.
For example, this is how to declare the main function.
fun main(args: Array<string>) {
    // code here
}
The main function must be present in each Kotlin program. It accepts an array of strings as parameter and returns nothing. If a function returns nothing, the return type can be omitted. In such cases the type inferred is Unit. This is a special type that indicates that a function does not return any meaningful value, basically is what other languages call void.
So, these two declarations are equivalent.
fun tellMe(): Unit {
    println("You are the best")
}
// equivalent to the first one
fun tell_me() {
    println("You are the best")
}
As we have seen, functions can be first-class citizens: in Kotlin classes/interfaces are not the only first-level entities that you can use.
If a function signature indicates that the function returns something, it must actually return something with the proper type using the return keyword.
fun tellMe(): String {
    return "You are the best"
}
The only exception is when a function return Unit. In that case you can use return or return Unit, but you can also omit them.
fun tellNothing(): Unit {
    println("Don't tell me anything! I already know.")
    // either of the two is valid, but both are usually omitted
    return
    return Unit
}
Function parameters have names and types, types cannot be omitted. The format of an argument is: name followed by colon and a type.
fun tell(who: String, what: String): String {
    return "$who is $what"
}
Function Arguments
In Kotlin, function arguments can use names and default values. This simplifies reading and understanding at the call site and allows to limit the number of function overloads. Because you do not have to make a new function for every argument that is optional, you just put a default value on the definition.
fun drawText(x: Int = 0, y: Int = 0, size: Int = 20, spacing: Int = 0, text: String)
{ [..] }
Calling the same function with different arguments.
// using default values
drawText("kneel in front of the Kotlin master!")

// using named arguments
drawText(10, 25, size = 20, spacing = 5, "hello")
Single-Expression Functions
If a function returns a single expression, the body of the function is not indicated between curly braces. Instead, you can indicate the body of the function using a format like the assignment.
fun number_raised_to_the_power_of_two(number: Int) = number * number
You can explicitly indicate the type returned by a single-expression function. However, it can also be omitted, even when return something meaningful (i.e. not Unit) since the compiler can easily infer the type of the expression returned.
Classes
Classes are essentially custom types: a group of variables and methods united in a coherent structure.
Classes are declared using the keyword class followed by a name and a body.
class Info {
    [..]
}
How do you use a class? There is no keyword new in Kotlin, so to instantiate an object you just call a constructor of the object.
val info = Info()
Properties
You cannot declare fields directly inside a class, instead you declare properties.
class Info {
    var description = "A great idea"
}
These properties look and behave suspiciously like simple fields: you can assign values to them and access their values just like any other simple variable.
val info = Info()
// it prints "A great idea"
println(info.description)
info.description = "A mediocre idea"
// it prints "A mediocre idea"
println(info.description)
However, behind the scenes the compiler converts them to properties with a hidden backing field. I.e., each property has a backing field that is accessible through a getter and a setter. When you assign a value to a property the compiler calls the setter. and when you read its value the compiler calls a getter to obtain it. In fact, you can alter the default behavior of a property and create a custom getter and/or setter.
Inside these custom accessors you can access the backing field using the identifier field. You can access the value passed to the setter using the identifier value. You cannot use these identifiers outside the custom accessors.
class Info {
    var description = "A great idea"
    var name: String = ""
        get() = ""$field""
        set(value) {
            field = value.capitalize()
        }
}
Let’s see the property name in action.
info.name = "john"
// it prints "John" (quotes included)
println(info.name)
Kotlin offers the best of both worlds: you can automatically have properties, that can be used as easily as simple fields, but if you need soem special behavior you can also create custom accessors.
Constructors
If the class has a primary constructor it can be into the class header, following the class name. It can also be prefixed with the keyword constructor. A primary constructor is one that is always called, either directly or eventually by other constructors. In the following example, the two declarations are equivalent.
// these two declarations are equivalent
class Info (var name: String, var number: Int) { }
class Info constructor (var name: String, var number: Int) { }
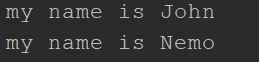
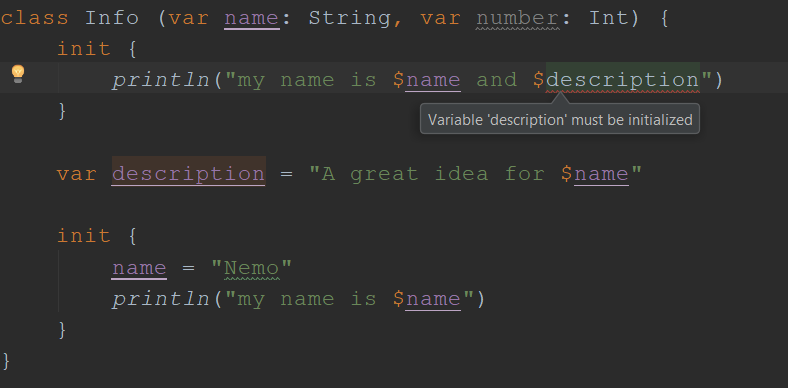
You cannot include any code inside the primary constructor. Instead, if you need to do any initialization, you can use initializer blocks. There can be many initializer blocks; they are executed in the order in which they are written. This means that they are not all executed before the initialization of the object, but right where they appear.
class Info (var name: String, var number: Int) {
    init {
        println("my name is $name")
    }

    var description = "A great idea for $name"

    init {
        name = "Nemo"
        println("my name is $name")
    }
}
// into the main function
fun main(args: Array<String>) {
    val info = Info("John", 5)
}
When the program executes it will prints the two strings in the order in which they appear.

If you try to use the description property in an initializer blocks that is before the property is defined you will get an error.

A class can also have secondary constructors, which can be defined with the keyword constructor. Secondary constructors must eventually call the primary constructor: they can do that directly or through another secondary constructor.
class Info (var name: String, var number: Int) {

    constructor(name: String) : this(name, 0) {
        this.name = name.capitalize()
    }
}
There are a couple of interesting things going on in this example: we see how to call a primary constructor and an important difference between primary and secondary constructors. To call a primary constructor you use the this keyword and supply the argument to the constructor after the constructor signature. The important difference between secondary and primary constructors is that the parameters of primary constructors can define properties while the parameters of a secondary constructor are always just parameters.
If the parameters of a primary constructor are also properties they will be accessible throughout all the lifecycle of the object, just like normal properties. While, if they are simple parameters, they are obviously accessible only inside the constructor, just like any other parameter of a function.
You can automatically define a property with a parameter of a primary constructor simply putting the keywords val or var in front of the parameter.
In this example, the primary constructor of the first class defines properties, while the second does not.
// class with primary constructor that defines properties
class Info (var name: String, var number: Int)

// class with primary constructor that does not define properties
class Info (name: String, number: Int)
Inheritance
A class can inherit from another base class to get properties and functions of the base class. This way you can avoid repetition and build an hierarchy of classes that goes from the most generic to the most precise. In Kotlin, a class can only inherits from one other base class.
If a class does include an explicit base class, it implicitly inherits from the superclass Any.
// it implicitly inherits from Any
class Basic
The class Any has only a few basic methods, like equals and toString.
A derived class must call a constructor of the base class. This call can happen in different ways and it is reflected in the syntax of a class. The syntax to make a class derive from another requires to add, after the name of the derived class, a colon and a reference to the base class. This reference can be either the name of the class or a constructor of the base class.
The difference depends on whether the derived class has a primary constructor or not. If the derived class has no primary constructor, it needs to call a constructor of the base class in its secondary constructors, otherwise it can call it directly in its primary constructor.
Let’s see a few examples to clarify this statement.
// the derived class has no primary constructor
class Derived : Base {
    // calling the base constructor with super()
    constructor(p: Int) : super() {

    }
}

// the derived class has a primary constructor
class Derived(p: Int) : Base(p)
You cannot use super (used to call the base constructor) inside the code of the constructor. In other words, super is not a normal expression or function.
Notice that if the derived class has a primary constructor you must call the constructor of the base class there. You cannot call it later in a secondary constructor. So, there are two alternatives, but there is no choice: you have to use one or the other depending on the context.
Create a Base Class and Overriding Elements
Kotlin requires an explicit syntax when indicating classes that can be derived from.
This means that this code is wrong.
class NotABase(p: Int)

class Derived(p: Int) : NotABase(p)
It will show the following error:
This type is final, so it cannot be inherited from
You can only derive from a class if the class is explicitly marked as open.
open class Base(p: Int)

class Derived(p: Int) : Base(p)
You also need an explicit syntax when a class has elements that can be overridden. For example, if you want to override a method or a property of a base class. The difference is that you have both to use the modifier open on the element of the base class and the modifier override on the element of the derived class. The lack of either of these two modifiers will result in an error.
open class Base(p: Int) {
    open val text = "base"

    open fun shout() {}
}

class Derived(p: Int) : Base(p) {
    override val text = "derived"

    override fun shout() {}
}
This approach makes for a clearer and safer design. The official Kotlin documentation says that the designers chose it because of the book Effective Java, 3rd Edition, Item 19: Design and document for inheritance or else prohibit it.
Data Classes
Frequently the best way to group semantically connected data is to create a class to hold it. For such a class, you need a a few utility functions to access the data and manipulate it (e.g., to copy an object). Kotlin includes a specific type of class just for this scope: a data class.
Kotlin gives all that you typically need automatically, simply by using the data keyword in front of the class definition.
data class User(val name: String, var password: String, val age: Int)
That is all you need. Now you get for free:
- getters and setters (these only for variable references) to read and write all properties
component1()..componentN()for all properties in the order of their declaration. These are used for destructuring declarations (we are going to see them later)equals(),hashCode()andcopy()to manage objects (ie. compare and copy them)toString()to output an object in the human readable formName_of_the_class(Name_of_the_variable=Value_of_the_variable, [..])"
For example, given the previous data class User
val john = User("john","secret!Shhh!", 20)

// it prints "john"
println(john.component1())
// mostly used automagically in destructuring declaration like this one
val (name, password, age) = john
// it prints 20
println(age)
// it prints "User(name=john, password=secret!Shhh!, age=20)"
println(john)
It is a very useful feature to save time, especially when compared to Java, that does not offer a way to automatically create properties or compare objects.
There are only a few requirements to use a data class:
- the primary constructor must have at least one parameter
- all primary constructor parameters must be properties (i.e., they must be preceded by a
varorval)
Control Flow
Kotlin has 4 control flow constructs: if, when, for and while. If and when are expressions, so they return a value; for and while are statements, so they do not return a value. If and when can also be used as statements, that is to say they can be used standalone and without returning a value.
If
An if expression can have a branch of one statement or a block.
var top = 0
if (a < b) top = b

// With else and blocks
if (a > b) {
    top = a
} else {
    top = b
}
When a branch has a block, the value returned is the last expression in the block.
// returns a or b
val top = if (a > b) a else b

// With blocks
// returns a or 5
var top = if (a > 5) {
    println("a is greater than 5")
    a
} else {
    println("5 is greater than a")
    5
}
Given that if is an expression there is no need for a ternary operator (condition ? then : else), since an if with an else branch can fulfill this role.
For and Ranges
A for loop iterates through the elements of a collection. So, it does not behave like a for statement in a language like C/C++, but more like a foreach statement in C#.
The basic format of a for statement is like this.
for (element in collection) {
    print(element)
}
To be more precise, the Kotlin documentation says that for iterates through everything that provides an iterator, which means:
- has a member- or extension-function iterator(), whose return type
- contains a member or extension-function next(), and
- contains a member or extension-function hasNext() that returns Boolean.
The Kotlin for can also behave like a traditional for loop, thanks to range expressions. These are expressions that define a list of elements between two extremes, using the operator .. .
// it prints "1 2 3 4 "
for (e in 1..4)
    print("$e ")
Range expressions are particularly useful in for loops, but they can also be used in if or when conditions.
if (a in 1..5)
    println("a is inside the range")
Ranges cannot be defined in descending order using the .. operator. The following is valid code (i.e., the compiler does not show an error), but it does not do anything.
// it prints nothing
for (e in 4..1)
    print("$e ")
Instead, if you need to define an iteration over a range in descending order, you use downTo in place of the ...
// it prints "4 3 2 1 "
for (e in 4 downTo 1)
    print("$e ")
There are also other functions that you can use in ranges and for loops: step and until. The first one dictates the amount you add or subtract for the next loop; the second one indicates an exclusive range, i.e., the last number is not included in the range.
// it prints "6 4 2 "
for (e in 6 downTo 1 step 2)
    print("$e ")

// it prints "1 6 "
for (e in 1..10 step 5)
    print("$e ")

// it prints "1 2 "
for (e in 1 until 3)
    print("$e ")
While
The while and do .. while statements works as you would expect.
while (a > 0) {
    a--
}

do {
    a--
    print("i'm printing")
} while (a > 0)
The when statement is a great feature of Kotlin that deserves its own section.
The Great when Expression
In Kotlin when replaces and enhances the traditional switch statement. A traditional switch is basically just a statement that can substitute a series of simple if/else that make basic checks. So, you can only use a switch to perform an action when one specific variable has a certain precise value. This is quite limited and useful only in a few circumstances.
Instead when can offer much more than that:
- can be used as an expression or a statement (i.e., it can return a value or not)
- has a better and safer design
- can have arbitrary condition expressions
- can be used without an argument
Let’s see an example of all of these features.
A Safe and Powerful Design
First of all, when has a better design. It is more concise and powerful than a traditional switch.
when(number) {
    0 -> println("Invalid number")
    1, 2 -> println("Number too low")
    3 -> println("Number correct")
    4 -> println("Number too high, but acceptable")
    else -> println("Number too high")
}
Compared to a traditional switch, when is more concise:
- no complex case/break groups, only the condition followed by
-> - it can group two or more equivalent choices, separating them with a comma
Instead of having a default branch, when has an else branch. The else branch branch is required if when is used as an expression. So, if when returns a value, there must be an else branch.
var result = when(number) {
    0 -> "Invalid number"
    1, 2 -> "Number too low"
    3 -> "Number correct"
    4 -> "Number too high, but acceptable"
    else -> "Number too high"
}
// with number = 1, it prints "when returned "Number too low""
println("when returned "$result"")
This is due to the safe approach of Kotlin. This way there are fewer bugs, because it can guarantee that when always assigns a proper value.
In fact, the only exception to this rule is if the compiler can guarantee that when always returns a value. So, if the normal branches cover all possible values then there is no need for an else branch.
val check = true

val result = when(check) {
    true -> println("it's true")
    false -> println("it's false")
}
Given that check has a Boolean type it can only have to possible values, so the two branches cover all cases and this when expression is guaranteed to assign a valid value to result.
Arbitrary Condition Branches
The when construct can also have arbitrary conditions, not just simple constants.
For instance, it can have a range as a condition.
var result = when(number) {
    0 -> "Invalid number"
    1, 2 -> "Number too low"
    3 -> "Number correct"
    in 4..10 -> "Number too high, but acceptable"
    !in 100..Int.MAX_VALUE -> "Number too high, but solvable"
    else -> "Number too high"
}
This example also shows something important about the behavior of when. If you think about the 5th branch, the one with the negative range check, you will notice something odd: it actually covers all the previous branches, too. That is to say if a number is 0, is also not between 100 and the maximum value of Int, and obviously the same is true for 1 or 6, so the branches overlap.
This is an interesting feature, but it can lead to confusion and bugs, if you are not aware of it. The compiler solves the ambiguity by looking at the order in which you write the branches. The construct when can have branches that overlap, in case of multiple matches the first branch is chosen. Which means that is important to pay attention to the order in which you write the branches: it is not irrelevant, it has meaning and can have consequences.
The range expressions are not the only complex conditions that you can use. The when construct can also use functions, is expressions, etc. as conditions.
fun isValidType(x: Any) = when(x) {
    is String -> print("It's a string")
    specialType(x) -> print("It's an acceptable type")
    else -> false
}
The Type of a when Condition
In short, when is an expressive and powerful construct, that can be used whenever you need to deal with multiple possibilities.
What you cannot do, is using conditions that return incompatible types. In a condition, you can use a function that accepts any argument, but it must return a type compatible with the type of the argument of the when construct.
For instance, if the argument is of type Int you can use a function that accepts any number of arguments, but it must returns an Int. It cannot return a String or a Boolean.
var result = when(number) {
    0 -> "Invalid number"
    // OK: check returns an Int
    check(number) -> "Valid number"
    // OK: check returns an Int, even though it accepts a String argument
    checkString(text) -> "Valid number"
    // ERROR: not valid
    false -> "Invalid condition"
    else -> "Number too high"
}
In this case, the false condition is an example of an invalid condition, that you cannot use with an argument of type Int.
Using when Without an Argument
The last interesting feature of when is that you can use it without an argument. In such case it acts as a nicer if-else chain: the conditions are Boolean expressions. As always, the first branch that matches is chosen. Given that these are boolean expression, it means that the first condition that results True is chosen.
when {
    number > 5 -> print("number is higher than five")
    text == "hello" -> print("number is low, but you can say hello")
}
The advantage is that a when expression is cleaner and easier to understand than a chain of if-else statements.
If you want to know more about when you can read a whole article about it: Kotlin when: A switch with Superpowers.
Dealing Safely with Type Comparisons
To check if an object is of a specific type you can use the is expression (also known as is operator). To check that an object is not of a certain typee you can use the negated version !is.
if (obj is Double)
    println(obj + 3.0)

if (obj !is String) {
    println(obj)
}
If you need to cast an object there is the as operator. This operator has two forms: the safe and unsafe cast.
The unsafe version is the plain as. It throws an exception if the cast is not possible.
val number = 27
// this throws an exception because number is an Int
var large = number as Double
The safe version as? instead returns null in case the cast fails.
val number = 27
var large: Double? = number as? Double
In this example the cast returns null, but now it does not throw an exception. Notice that the variable that holds the result of a safe cast must be able to hold a null result. So, the following will not compile.
val number = 27
// it does not compile because large cannot accept a null value
var large: Double = number as? Double
The compile will show the following error:
Type mismatch: inferred type is Double? but Double was expected
On the other hand, is perfectly fine to try casting to a type that it cannot hold null. So, the as? Double part of the previous example is valid code. In other words, you do not need to write as? Double?. As long as the variables that holds the result can accept a null, you can try to cast to any compatible type. The last part is important, because you cannot compile code that tries to cast to a type that it cannot be accepted.
So, the following example is an error and does not compile.
var large: Double? = number as? String
The following does, but large is inferred to be of type String?.
var large = number as? String
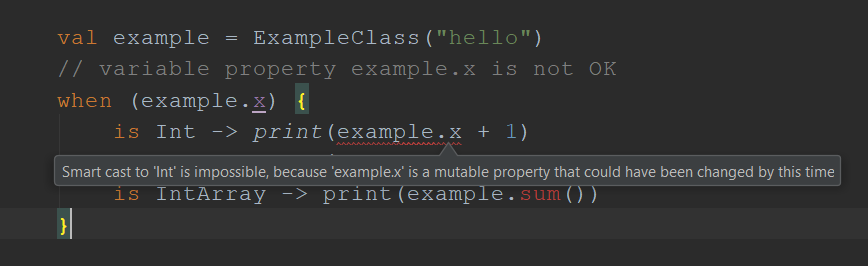
Smart Casts
Kotlin is a language that takes into account both safety and the productivity, we have already seen an example of this attitude when looking at the when expression. Another good example of this approach are smart casts: the compiler automatically inserts safe casts if they are needed, when using an is expression. This saves you from the effort of putting them yourself or continually using the safe call operator (?.).
A smart cast works with if, when and while expressions. That is an example with when.
when (x) {
    is Int -> print(x + 1)
    is String -> print(x.length + 1)
    is IntArray -> print(x.sum())
}
If it were not for smart casts you would have to do the casting yourself or to use the safe call operator. That is how you would have to write the previous example.
when (x) {
    is Int -> {
        if (x != null)
            print(x + 1)
    }
    is String -> print(x?.length + 1)
    is IntArray -> print(x?.sum())
}
Smart casts works also on the right side of an and (&&) or or (||) operator.
// x is automatically cast to string for x.length > 0
if (x is String && x.length > 0) {
    print(x.length)
}
The important thing to remember is that you cannot use smart casts with variable properties. That is because the compiler cannot guarantee that they were not modified somewhere else in the code. You can use them with normal variables.
Collections
Kotlin supports three standard collections: List, Map and Set:
- List is a generic collection of elements with a precise order
- Set is a generic collection of unique elements without a defined order
- Map is a collection of pairs of key-value pairs
A rather unique feature of Kotlin is that collections comes both in a mutable and immutable form. This precise control on when and which collections can be modified is helpful in reducing bugs.
Collections have a standard series of functions to sort and manipulate them, such as sort, or first. They are quite obvious and we are not going to see them one by one. However, we are going to see the most powerful and Kotlin-specific functions later in the advanced section.
Lists
val numbers: MutableList<Int> = mutableListOf(1, 2, 3)
val fixedNumbers: List<Int> = listOf(1, 2)
numbers.add(5)
numbers.add(3)
println(numbers) // it prints [1, 2, 3, 5, 3]
A list can contain elements of the same type in the order in which they are inserted. It can contain identical elements. Notice that there is no specific syntax to create a list, a set or a map, you need to use the appropriate function of the standard library. To create a MutableList you use mutableListOf, to create an immutable List you use listOf.
Sets
val uniqueNumbers: MutableSet<Int> = mutableSetOf(1,3,2)
uniqueNumbers.add(4)
uniqueNumbers.add(3)
println(uniqueNumbers) // it prints [1, 3, 2, 4]
A set can contain elements of the same type in the order in which they are inserted, but they must be unique. So, if you try again an element which is already in the set, the addition is ignored.
Notice that there is no specific syntax to create a list, a set or a map, you need to use the appropriate function of the standard library. To create a MutableSet you use mutableSetOf, to create an immutable Set you use setOf.
There are also other options to create a set, such as hashSetOf or sortedSetOf. These functions may have different features (e.g., the elements are always sorted) or be backed by different elements (e.g., an HashMap).
Maps
val map: MutableMap = mutableMapOf(1 to "three", 2 to "three", 3 to "five")
println(map[2]) // it prints "three"
for((key, value) in map.entries) {
    println("The key is $key with value $value")
}
// it prints:
// The key is 1 with value three
// The key is 2 with value three
// The key is 3 with value five
A map is like an associative array: each element is a pair made up of a key and an associated value. The key is unique for all the collection. Notice that there is no specific syntax to create a list, a set or a map, you need to use the appropriate function of the standard library. To create a MutableMap you use mutableMapOf, to create an immutable Map you use mapOf.
You can easily iterate through a map thanks to the property entries which returns a collection of keys and values.
Immutable and Read-Only Collections
Kotlin does not distinguish between an immutable collection and a read-only view of a collection. This means, for instance, that if you create a List from a MutableList you cannot change the list directly, but the underlying list can change anyway. This could happen if you modify it through the MutableList. This holds true for all kinds of collections.
val books: MutableList<String> = mutableListOf("The Lord of the Rings", "Ubik")
val readOnlyBooks: List<String> = books
books.add("1984")
// it does not compile
readOnlyBooks.add("1984")
// however...
println(readOnlyBooks) // it prints [The Lord of the Rings, Ubik, 1984]
In this example you cannot add directly to the list readOnlyBooks, however if you change books then it would also change readOnlyBooks.
Exceptions
An exception is an error that requires special handling. If the situation cannot be resolved the program ends abruptly. If you can handle the situation you have to catch the exception and solve the issue.
The Kotlin syntax for throwing and catching exceptions is the same as Java or most other languages.
Throw Expression
To throw an exception you use the expression throw.
// to throw an exception
throw Exception("Error!")
You can throw a generic exception, or create a custom exception that derives from another Exception class.
class CustomException(error: String) : Exception(error)

throw CustomException("Error!")
In Kotlin throw is an expression, so it can return a value of type Nothing. This is a special type with no values. It indicates code that will never be reached. You can also use this type directly, for example as return type in a function to indicate that it never returns.
fun errorMessage(message: String): Nothing {
    println(message)
    throw Exception(message)
}
This type can also come up with type inference. The nullable variant of this type (i.e., Nothing?) has one valid value: null. So, if you use null to initialize a variable whose type is inferred the compiler will infer the type Nothing?.
var something = null // something has type Nothing?
Try Expression
To catch an exception you need to wrap the try expression around the code that could launch the exception.
try {
    // code
}
catch (e: Exception) {
    // handling the exception
}
finally {
    // code that is always executed
}
The finally block contains code that is always executed no matter what. It is useful to make some cleaning, like closing open files or freeing resources. You can use any number of catch block and one finally block, but there should be at least one of either blocks. So, there must be at least one between finally and catch blocks.
try {
    // code
}
catch (e: CustomException) {
    // handling the exception
}
If you want to catch only an expection of a certain type you can set it as argument of catch. In this code we only catch exceptions of type CustomException.
try {
    // code
}
catch (e: Exception) {
    // handling all exceptions
}
If you want to catch all exceptions you can use the catch with the argument of type Exception, which is the base class of all exceptions. Alternatively you can use the finally block alone.
try {
    // code
}
finally {
    // code that is always executed
}
Try is an expression, so it can return a result. The returned value is the last expression of the try or catch blocks. The finally block cannot return anything.
val result: String = try { getResult() } catch (e: Exception) { "" }
In this example we wrap the call to a function getResult() in a try expression. If the function returns normally we initialize the value result with the value returned by it, otherwise we initialize it with an empty string.
A Simple Kotlin Program
Up until now we have seen the basics of Kotlin: how to define functions and classes, the control flow constructs available, etc. In this chapter we are going to put all of this together to create a simple Kotlin program. This program will convert a bunch of CSV files in a bunch of JSON files.
Setting Up
We do not need any external library in this project, so we are going to create a simple Kotlin project with the name CSVtoJSON. We only need to create a Kotlin file inside the src folder and we are ready to work. We choose the name Program for our file, but you can choose any name you want.
Inside this file we need to add an import for a Java module, since Kotlin reuse the standard Java library to access a file.
import java.io.File
Getting a List of CSV Files
Now that everything is ready, we can start working on the main function.
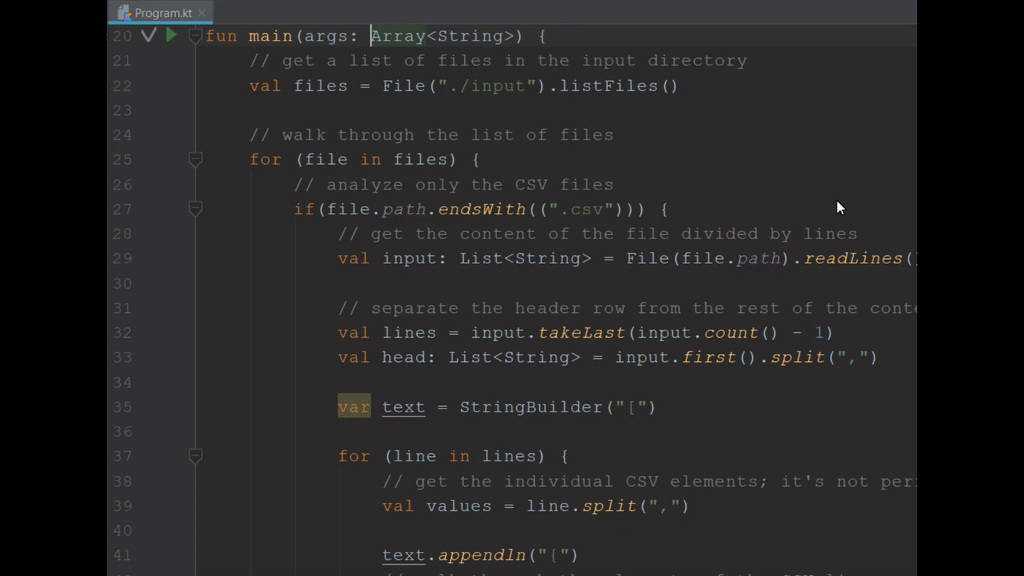
fun main(args: Array<String>) {
    // get a list of files in the input directory
    val files = File("./input").listFiles()

    // walk through the list of files
    for (file in files) {
        // analyze only the CSV files
        if (file.path.endsWith((".csv"))) {
            // get the content of the file divided by lines
            val input: List = File(file.path).readLines()

            // separate the header row from the rest of the content
            val lines = input.takeLast(input.count() - 1)
            val head: List = input.first().split(",")

            [..]
        }
    }
}
This the first part of the function, where we collect the files in the input directory, filter only the ones that are CSV files and read the contents of each file. Once we have the lines of each CSV files we separate the first line, that contains the header, from the rest of the content. Then we get the names of the columns from the header line.
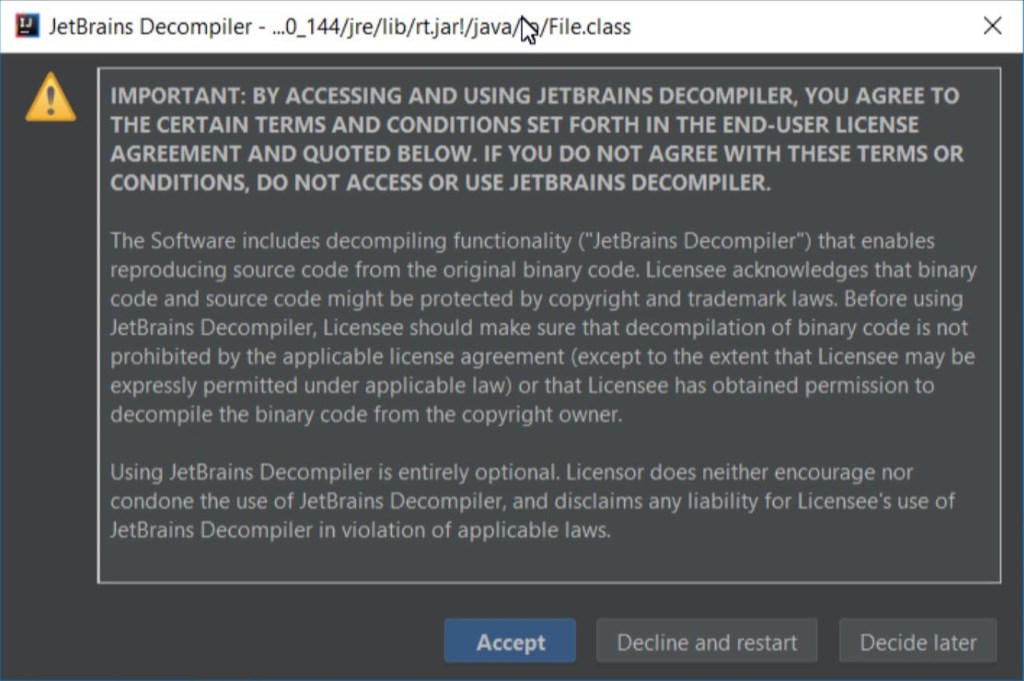
The code is quite easy to understand. The interesting part is that we can easily mix Java classes with normal Kotlin code. In fact, parts like the class File and the field path are defined elsewhere in Java, while the functions endsWIth and readLines are Kotlin code. You can check that with IntelliJ IDEA, by trying to look at the implementation code, just like we do in the following video.

You can access Kotlin code directly, by right-clicking on a piece of Kotlin code and going to the implementation voice in the menu. Instead since Java is distributed as compiled code, you can only see after it has been decompiled.
Given that the Java code is available only through the decompilation, the first time you try to access it you would see a warning like this one.
Convert CSV data to JSON
Once that we have got the content of the CSV file, we need to transform it in the corresponding JSON data.
The following code corresponds to the [..] part in the previous listing.
            var text = StringBuilder("[")

            for (line in lines) {
                // get the individual CSV elements; it's not perfect, but it works
                val values = line.split(",")

                text.appendln("{")
                // walk through the elements of the CSV line
                for (i in 0 until values.count()) {
                    // convert the element in the proper JSON string
                    val element = getElement(values[i].trim())
                    // write the element to the buffer
                    // pay attention to how we write head[i]
                    text.append("t"${head[i]}": $element")

                    // append a comma, except for the last element
                    if(i != values.count() - 1)
                        text.appendln(",")
                    else
                        text.appendln()
                }

                text.append("},")
            }

            // remove the last comma
            text.deleteCharAt(text.length-1)
            // close the JSON array
            text.appendln("]")

            val newFile = file.path.replace(".csv",".json")
            File(newFile).writeText(text.toString())
}
For each file we create a StringBuilder variable to contain the text. The cycle to transform the format from CSV to JSON is simple:
- we loop through each line
- for each line, we create a list of elements by splitting the line for each comma we found
- we use each element of the list as a value of the JSON field, we pick as name the element of the header of the CSV file in the corresponding position
The rest of the code deals with ensuring to add the right delimiters for JSON and writing the new JSON file.
All that remains to see is the function getElement, that we use to convert the CSV element in the proper JSON version.
fun isNumeric(text: String): Boolean =
        try {
            text.toDouble()
            true
        } catch(e: NumberFormatException) {
            false
        }

fun getElement(text: String) : String {
    when {
        // items to return as they are
        text == "true" || text == "false" || text == "null" || isNumeric(text) -> return text
        // strings must be returned between double quotes
        else -> return ""$text""
    }
}
We need to convert a CSV element in the corresponding JSON element: simple strings have to be put between double quotes, while numbers and special values (i.e., boolean constants and null) can be written as they are. To check whether an element is a number we create the function isNumeric.
To convert a string into a number there is no other way that trying to do that and catching the resulting exception, if the conversion fails. Since in Kotlin try is an expression, we can use the expression syntax for the function isNumeric. If the conversion succeeds, we know that the text is a number, so we return true otherwise we return false.
And that is pretty much our simple program.
We hope that you can see how clear and easy to use is Kotlin: it smooths the hard edges of Java and get a you a concise language that is fun to use.
Advanced Kotlin
Now we can move to the advanced parts of Kotlin, where we learn how to take advantage of its most powerful features. How to use functions at their fullest with higher-order functions and lambdas. We explain what are and how to use generic types and the powerful features around them available in Kotlin. Finally, we take a look at a few interesting niceties of Kotlin and how to create a real world Kotlin program.
Higher-order Functions
In Kotlin functions are first-class citizens: they can be stored in variables and passed around just like any other value. This makes possible to use higher-order functions: functions that accepts argument and/or return functions as a result. In particular, a lambda is a function literal: an anonymous function that is not declared but is used directly as an expression.
Basically, a lambda is a block of code that can be passed around just like any other literal (e.g., just a like a string literal "a string"). The combination of these features allows Kotlin to support basic functional programming.
Function Types
The core of the functional support are function types: anonymous types that corresponds to the signature of a function (i.e., parameters and the return type). They can be used just like any other type.
Their syntax is a list of parameters between parentheses, followed by an arrow and the return type.
var funVar: (String) -> Unit
In this example the variable funVar can hold any function that has the corresponding signature. That is to say any function that accepts a String as argument and returns Unit (i.e., no value).
fun tell(text: String) {
    println(text)
}

fun main(args: Array<String>) {
    var funVar: (String) -> Unit

    funVar = ::tell
}
For example, you could assign directly a function using a callable reference to that particular element. The syntax is name_of_the_class::name_of_the_function. In the previous example tell is a top-level function so the class is absent. If you wanted to reference a functon like toDouble of the String class, you would use String::toDouble.
When you define a function type you always have to explicitly indicate the return type. When declaring normal functions that return Unit you can omit the return type, but not with function types. Also, you have to put the parentheses for the parameters, even when the function type does not accept any parameter.
// wisdom has no arguments and gives back nothing meaningful
val wisdom: () -> Unit = {
    println("Life is short, but a string can be long")
}
Of course, if the compiler can infer the type correctly, you can omit the type altogether. This is true for all types, even function types. So, we could have written the previous example even in this way, because the compiler can understand that the lambda has no parameter and returns nothing.
val wisdom = {
    println("Life is short, but a string can be long")
}
Lambdas
You could also directly assing a lambda to funVar. The syntax of a lambda reflects the syntax of a function type, the difference is that you have to set the name of the arguments of the lambda and you do not need to set the return type.
var funVar: (String) -> Unit = { text: String -> println(text) }
In this example we put the equivalent of the function tell as the body of the lambda. Whatever way you use to assign a function to the variable funVar, once you do that, you can use it just like any other normal function.
// it prints "Message"
funVar("Message")
This code prints the message just like as if you called the function tell directly.
You could also call a lambda directly, supplying the argument.
// it prints 15
println({ x: Int -> x * 3 }(5))
Here we directly call the lambda with argument 5, so that the result of our lambda (15) is passed as argument to the function println.
Conventions
Lambda are so useful that Kotlin has a couple of interesting conventions to simplify their use.
The first one is the implicit parameter it.
If both these conditions are true:
- the compiler already knows the signature of the lambda, or can figure it out
- the lambda has only one argument
Then you can omit declaring the parameter of the lambda and use the implicit parameter it.
var simpleFun: (Int) -> Int = { it + 2 }
// this is equivalent to the following declaration
// var simpleFun: (Int) -> Int = {i: Int -> i + 2 }

println(simpleFun(2))
Notice that you can also declare the parameter yourself explicitly. This is a better choice if you have nested lambda.
The second convention applies only if a lambda is passed as argument of the last parameter of a function. In such cases you can write the lambda outside the parentheses. If the lambda is the only argument of the function, you can omit the parentheses altogether.
Let’s start with a function.
fun double(number: Int = 1, calculation: (Int) -> Int) : Int {
    return calculation(number) * 2
}
The function double has as parameters an Int and a function. The parameter Int has a default value of 1. The function has one parameter of type Int and return a value of type Int. The function double returns whatever is returned by the lambda calculation multiplied by 2.
val res_1 = double(5) {
    it * 10
}

val res_2 = double {
    it * 2
}

println(res_1) // it prints 100
println(res_2) // it prints 4
In the first case, we supply to double both an argument for number (i.e., 5) and a lambda for calculation. For the second one, we just supply a lambda because we take advantage of the default argument of number. In both cases we write the lambda outside the parentheses, in the second case we can omit the parentheses altogether.
Lambda and Collections
Lambdas are very useful with collections and in fact they are the backbone of the advanced manipulation of collections.
map and filter
The basic function to manipulate collection is filter: this functions accepts as argument a lambda and returns a new collection. The lambda is given as argument an element of the collection and returns a Boolean. If the lambda returns true for an element, that element is added to the new collection, otherwise is excluded.
val li = listOf(1, 2, 3, 4)
// it prints [2,4]
 println(li.filter( i: Int -> i % 2 == 0 }))
In this example, the filter function returns all even numbers.
The function map creates a new collection created by applying the lambda supplied to map to each element of the collection.
val li = listOf(1, 2, 3, 4)
// we use the it implicit parameter
println(li.map { it * 2 }) // it prints [2, 4, 6, 8]
In this example, the map function doubles each element of the collection.
data class Number(val name: String, val value: Int)

val li = listOf(Number("one", 1), Number("two", 2), Number("three", 3))
// it prints [one, two, three]
println(li.map { it.name })
You are not forced to create a new collection of the same type of the original one. You can create a new collection of any type. In this example we create a list of String from a list of Number.
find and groupBy
The function find returns the first element of the collection that satisfies the condition set in the lambda. It is the same function as firstOrNull, which is a longer but also clearer name.
val list = listOf(1, 2, 3, 4)
println(list.find({ it % 2 == 0 })) // it prints 2

val set = setOf("book", "very", "short")
println(set.find {it.length < 4}) // it prints "null"
println(set.find {it.length > 4}) // it prints "short"
In this example we use the find function on a list and a set. For the list, it returns only the first element that satisfy the condition, even though there is more than one. For the set, it returns null a first time, and the element that satisfies the condition, the second time.
Given that any elements after the first that satisfy the condition is ignored it is better to use as condition of find an element that identifies only one element. It is not necessary, but it is better for clarity. If you are just interested in any element that satisfies the condition it is more readable to use the function firstOrNull directly.
val list = listOf(1, 2, 3, 4)
// equivalent to the previous example, but clearer
println(list.firstOrNull({ it % 2 == 0 })) // it prints 2
The function groupBy allows to divide a collection in more groups according to the condition indicated.
data class Number(val name: String, val value: Int)

val list = listOf(Number("one", 3), Number("two", 3), Number("three", 5))
// it prints
// {3=[Number(name=one, value=3), Number(name=two, value=3)],
//  5=[Number(name=three, value=5)]}
println(list.groupBy { it.value })

val set = setOf(1, 2, 3, 4)
// it prints
// {false=[1, 3], true=[2, 4]}
println(set.groupBy({ it % 2 == 0 }))
In the first example we use groupBy to group the elements of a list according to one property of the element. In the second one we divide the elements of a set depending on whether they are odd or even numbers.
The condition of groupBy can be any complex function. In theory you could use whatever condition you want. The following code is pointless, but valid code.
val rand = Random()
val set = setOf(1, 2, 3, 4)
// it may print {2=[1, 3, 4], 1=[2]}
println(set.groupBy { rand.nextInt(2) + 1 })
fold
The method fold collapses a collection to a unique value, using the provided lambda and a starting value.
val list = listOf(5, 10)
// it prints 15
println(list.fold(0, { start, element -> start + element }))
// it prints 0
println(list.fold(15, { start, element -> start - element }))
In the previous example, the first time we start with 0 and added all elements until the end. In the second case, with start with 15 and subtracted alle elements. Basically, the provided value is used as argument for start in the first cycle, then start becomes the value returned by the previous cycle.
So, in the first case the function behaves like this:
- start = 0, element = 5 -> result 5
- start = 5, element = 10 -> result 15
It is natural to use the function with numeric collections, but you are not restricted to using them.
val reading = setOf("a", "short", "book")
// it prints "Siddharta is a short book"
println(reading.fold("Siddharta is ", { start, element -> start + "$element "}))
flatten and flatMap
The function flatten creates one collection from a supplied list of collections.
val list = listOf(listOf(1,2), listOf(3,4))
// it prints [1,2,3,4]
println(list.flatten())
Instead flatMap use the provided lambda to map each element of the initial collection to a new collection, then it merges all the collections into one collection.
data class Number(val name: String, val value: Int)

val list = listOf(Number("one", 3), Number("two", 3), Number("three", 5))
// it prints [3, 3, 5]
println(list.flatMap { listOf(it.value) } )
In this example, we create one list with all the values of the property value of each element of type Number. These are the steps to arrive to this result:
- each element is mapped to a new collection, with these three new lists
- listOf(3)
- listOf(3)
- listOf(5)
- then the these three lists are merged in one list, listOf(3,3,5)
Notice that the initial collection does not affect the kind of collection that is returned. That is to say, even if you start with a set you end up with a generic collection.
val set = setOf(Number("one", 3), Number("two", 3), Number("three", 5))

// it prints [3, 3, 5]
println(set.flatMap { setOf(it.value) } )
Luckily this, and many other problems, can be easily solved thanks to the fact that you can concatenate lists and functions.
val set = setOf(Number("one", 3), Number("two", 3), Number("three", 5))

// it prints [3, 5]
println(set.flatMap { setOf(it.value) }.toSet() )
You can combine the function we have just seen, and many others, as you wish.
val numbers = listOf("one", "two", "three", "four", "five")
// it prints [4, 5]
println(numbers.filter { it.length > 3 }.sortedBy{ it }.map { it.length }.toSet())
In this example:
- we filter all element which have length of at list 3
- then we sort the elements
- then we create a new collection by mapping each element to its length
- finally we create a set, which has only unique elements
Generic Types
Why We Need Generic Types
If you already know what generic types are, you can skip this introduction.
A language with static typing, like Kotlin, is safer to use than one with dynamic typing, such as JavaScript. That is because it eliminates a whole class of bugs related to getting the type of a variable wrong.
For example, in JavaScript you may think that a certain variable is a string, so you try to access its field length. However, it is actually a number, because you mixed the type of the element returned from a function. So, all you get is an exception, at runtime. With a language like Kotlin, these errors are caught at compilation time.
The downside is that development takes a bit longer and it is a bit harder. Imagine that you are trying to sum two elements. With a language with dynamic typing that is easy: just check if the two elements are numbers and then sum them.
With a language with static typing this is harder: you cannot sum elements of different types, even if you can do the sum, you do not really know what type the function returns. For example, if you sum two Int the type returned must be Int, but if the elements are Double the type returned must be of that type.
On the other hand, these kinds of constraints are exactly the reason because static typing is safer to use, so we do not want to renounce to them.
There is a solution that can save both safety and power: generic types.
How to Define Generic Types in Kotlin
Generic types are types that can be specified when you create of an object, instead of when you define a class.
class Generic<T>(t: T) {
        var value = t
}

val generic = Generic<Int>(5)
// generic types can be inferred, just like normal types
val doubleGeneric = Generic(5.5)
When you use a generic types you are saying to the compiler that some variables (one or more) will be of a type that will be specified later. Even if you do not know which one exactly is yet, the compiler can perform the usual checks to ensure that the rules for type compatibility are respected. For example, if you sum two elements you can say that the elements wll be both of type T, so the type returned by the sum function will be also of type T.
You can also use them in functions, you have to put the generic type name (es. T) after the keyword fun and before the name of the function.
fun <T> genericFunction(obj: T): List<T>
{
    return listOf(obj)
}

val item = genericFunction("text")
Constraining a Generic Type
These are the basics, but Kotlin does not stop there. It has a quite sophisticated support for defining constraints and conditions on generic types. The end results is that generic types are powerful but also complex.
You can limit a generic type to a specific class or one of its subclasses. You can do it just by specifying the class after the name of the generic type.
// the type Number is predefined by Kotlin
fun <T : Number> double(value: T): Double {
    // accepts T of type Number or its subclasses
    return value.toDouble() * 2.0
}

// T is of type double
val num_1 : Double = double(5.5)
// T is of type int
val num_2 : Double = double(5)
// T is of type float
val num_3 : Double = double(5.5f)

// it does not compile
val error = double("Nope")
In this example, the num_n values are all of type Double, even though they functions accepted T of different types. The last line does not compile because it contains an error: String is not a subclass of Number.
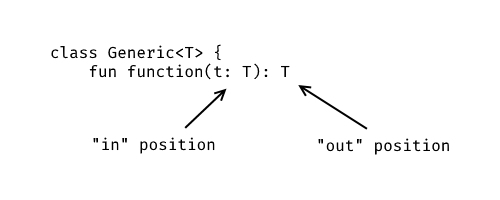
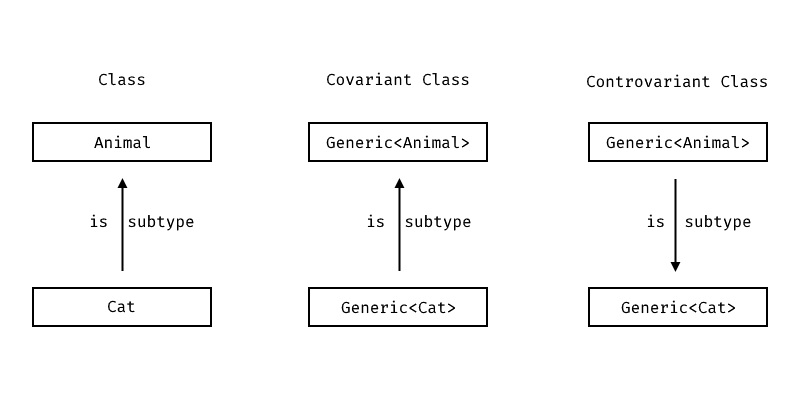
Variance
The concept of variance refers to the relation between generic types with argument types that are related. For instance, given that Double is a subclass of Number, is List<Double> a subclass of List<Number>? At first glance you may think that the answer should be obvious, but this is not the case. Let’s see why.
Imagine that we have a function that read elements from an immutable List.
<code>fun read(list: List<Number>) {
    println(list.last())
}
What will happen if we tried using it with lists with different type arguments?
val doubles: MutableList<Double> = mutableListOf(5.5, 4.2)
val ints: MutableList<Int> = mutableListOf(5, 4)
val numbers: MutableList<Number> = mutableListOf(3, 2.3)

read(doubles) // it prints 4.2
read(ints) // it prints 4
read(numbers) // it prints 2.3
There is no issue at all, everything works fine.
However, things change if we have a function that adds elements to a list.
fun add(list: MutableList<number>) {
   list.add(33)
}
What will happen if we tried using it with lists with different type arguments? The compiler will stop us most of the times.
val doubles: MutableList<Double> = mutableListOf(5.5, 4.2)
val ints: MutableList<Int> = mutableListOf(5, 4)
val numbers: MutableList<Number> = mutableListOf(3, 2.3)

add(doubles) // this is an error
add(ints) // this is an error
add(numbers) // this works fine
We cannot safely add elements to a list which has a type argument of a subtype because we do not know the actual type of the elements of the list. In short, the issue is that we could have a list of Double and we cannot add Int to this list, or vice versa. That is because this would break type safety and we would have a list with argument of types different from the one we expect.
So, it is generally safe to read elements from a List with elements of a subtype, but not add to it. This kind of complex situations can rise with all generic classes. Let’s see what can happen.
Covariance
A generic class is covariant if it is a generic class for which it is true that if A is a subclass of B, then Generic<A> is a subclass of Generic<B>. That is to say the subtype is preserved.
For example, if a List of Int is a subtype of a List of Number then List is covariant.
To define a covariant class you use the modifier out before the name of the generic type.
class Covariant<out T> {
     fun create() : T
}
Declaring a class as covariant allows to pass to a function arguments of a certain generic type, or any compatible subtype, and to return argument of a compatible subytpe.
open class Animal

// T is covariant and also constrained to be a subtype of Animal
class Group<out T : Animal> { /* .. */}

fun feed(animals: Group<Animal>) { // <- notice that is Group<Animal>
    /* .. */
}

class Cat : Animal() { /* .. */ }

fun feedCats(cats: Group<Cat>) { // <- it is Group<Cat>
    feed(cats) // <- if T wasn't covariant this call would be invalid
    // that's because Group<Cat> would not be a subtype of Group<Animal>
}
This example contains three classes: Animal and Cat are normal classes, while Group<T> is a generic class. The covariance is declared for Group<T> and that is what allows its use in functions that use this type.
We can pass an object of type Group<Cat> to the function feed() only because we have declared T to be covariant. If you omitted the out modifier you would receive an error message about an incompatible type:
Type mismatch: inferred type is Group<Cat> but Group<Animal> was expected
Covariance Is Not Free
Having covariance is useful, but it is not a free lunch. It is a promise that you make that variables of the generic type will be used only in certain ways that guarantees to respect covariance.

In practical terms it means that if you want to declare a type parameter T as covariant you can only use it in out position. So, all the methods that use it, inside the generic class, can only produce elements of that type and not consume it. Of course, this restriction only applies to methods inside that specific generic class. You can use the whole generic class normally as argument of other functions.
For example, the following is valid code.
class Group<out T : Animal> {
    fun buy() : T {
        return Animal() as T
    }
}
However, this is not.
class Group<out T : Animal> {
    // error: you cannot do it if T is covariant
    fun sell(animal: T) { /* .. */ }
}
If you try to use a type declared as coviarant you will see this error message:
Type parameter T is declared as ‘out’ but occurs in ‘in’ position in type T
Contravariance
A generic class is contravariant if it is a generic class for which it is true that if A is a subclass of B, then Generic<B> is a subclass of Generic<A>. That is to say the subtype is reversed.
This image shows the subtype relations between different classes.

To define a contravariant class you use the modifier in before the name of the generic type.
class Contravariant<in T> {
     fun read(e: T)
}
As you can imagine, to declare a type parameter as contravariant you need to respect the opposite restriction than the one for a covariant class. You can only use the type in a in position for the methods of the class.
Let’s see an example of a contravariant class:
open class Animal

class Dog : Animal()

// T is contravariant and constrained to be a subclass of Animal
class Pack<in T : Animal> {
    fun sell(animal: T) { // <- notice that is in position
        /* .. */
    }
}

fun sellDog(dog: Dog) : Pack<Dog> {
    return Pack<Animal>() // <- if T wasn't contravariant this call would be invalid
    // that's because Pack<Animal> would not be a subtype of Pack<Dog>
}
This example contains three classes: Animal and Dog are normal classes, while Pack<T> is a generic class. The contravariance is declared for Pack<T> and that is what allows its use in functions that use this type.
We can return object of type Pack<Animal> in the function sellDog() only because we have declared T to be contravariant. If you omitted the in modifier you would receive an error message about an incompatible type:
Type mismatch: inferred type is Pack<Animal> but Pack<Dog> was expected
A Few Niceties
In this chapter we cover a few nice features of Kotlin.
Extension Methods
You can define methods that seem to extend existing classes.
fun String.bePolite() : String {
    return "${this}, please"
}
var request = "Pass the salt"
// it prints "Pass the salt, please"
println(request.bePolite())
However, this is just syntactic sugar: these methods do not modify the original class and cannot access private members.
Alternatives to Static
Kotlin has much to offer, but it lacks one thing: the static keyword. In Java and other languages is used for a few different reasons, each of these has a Kotlin alternative:
- to create utility functions
- Kotlin has extensions methods, that allows to easily extend a class
- Kotlin allows to use first-level functions, outside of a class
- global fields or methods for all objects of a class
- Kotlin has the keyword
object
- Kotlin has the keyword
We have already seen the first two solutions, so let’s how the keyword object solve the need for static fields for a class.
A Singleton is Better than Static
Kotlin allows to define an object simply by using the keyword object instead of class.
object Numbers {
    var allNumbers = mutableListOf(1,2,3,4)
    fun sumNumbers() : Int { /* .. */ }
    fun addNumber(number: Int) { /* .. */ }
}
In practical terms, using object is equivalent to using the Singleton pattern: there is only one instance of the class. In this example this means that Numbers can be used as an instance of the class Numbers.
fun main(args: Array<String>) {
    println(Numbers.sumNumbers()) // it prints 10
    Numbers.addNumber(5)
    println(Numbers.sumNumbers()) // it prints 15
}
If you need something to store information about the relationship between different instances of a class or to access the private members of all instances of a class you can use a companion object.
class User private constructor(val name: String) {
    // the constructor of the class is private
    companion object {
        // but the companion object can access it
        fun newUser(nickname: String) = User(nickname)
    }
}
// you can access the companion object this way
val mark = User.newUser("Mark")
Companion objects are ideals for the factory method pattern or as alternative to static fields.
Infix Notation
Using the infix keyword on the declaration of a function you can use it with infix notation: there is no need to use parentheses for the parameter. This notation can only be used with functions that accept one argument.
infix fun String.screams(text: String): String
{
    return "$this says aloud $text"
}

val mike = "Michael"
val strongHello = mike screams "hello"

// it prints "Michael says aloud hello"
println(strongHello)
This notation makes the code more readable and gives the impression that you can create custom keywords. It is the reason because you can use ranges like the following one, using until:
for (e in 1 until 3)
    print("$e ")
It is also a nice example of the power of the language itself. Kotlin is quite light as a language and a lot of its features are in the standard library, which means that even you can create powerful and elegant code with ease.
Destructuring Declarations
Destructuring declarations are a feature of Kotlin that allows to decompose an object in its constituent parts
val (x, y) = a_point
The variables defined in this way (x and y in this example) are normal variables. The magic is in the class of the object (a_point in this example).
It seems that it is possible to return more than one result from a function, but this is not true. This is just syntactic sugar. The compiler transforms the previous call in the following code.
val x = a_point.component1()
val y = a_point.component2()
This is another example of the power of intelligent conventions in Kotlin. To make destructuring declarations work for your classes you need to define componentN functions preceded by the keyword operator.
class point(val x: Int, val y: Int) {
    operator fun component1() = x
    operator fun component2() = y
}
They are quite useful with Map collections, for which they are already defined the proper componentN functions.
for ((key, value) in a_map) {
   // ..
}
They can be used with all collections, to get their elements.
val (a, b, c) = listOf(1, 2, 3)
    println("a=$a, b=$b, c=$c")
If you are not interested in a certain element, you can use _ to ignore it.
val (_, y) = a_point
The necessary componentN functions are defined automatically for data classes. This favors the use of a common Kotlin pattern: defining a data class to be used to return values from a function.
For example, you can create a data class that contains both the status of the operation (i.e., success/failure) and the result of the operation.
data class Result(val result: Int, val status: Status)

fun operation(): Result {
    /* .. */
    return Result (result, status)
}

// now you can use it like this
val (result, status) = operation()
Using Kotlin for a Real Project
We have seen a complete picture of Kotlin: everything from basics to understanding lambdas. In this section we are going to put all of this together to create a simple, but realistic Kotlin program. This program has a graphical UI that allows the user to calculate some metrics of a text: its readability and the time it takes to read it.
Setting Up
We are going to need an external library for the UI of this project, so we are going to setup a Gradle project. Once you have followed the instructions you will have a project that will look like the following. We named our project textAnalisys and created thre Kotlin files:
AnalysisAppwhich contains the UIProgramfor the main application codeTextMetricsfor the library methods to calculate the metrics

The first thing that you have to do is open the build.gradle file and add the TornadoFX dependency. This is a Kotlin library that simplifies using the JavaFX framework, the default framework to create UI for desktop apps.
[..]
repositories {
    mavenCentral()
}

dependencies {
    compile "org.jetbrains.kotlin:kotlin-stdlib-jdk8:$kotlin_version"
    compile "no.tornado:tornadofx:1.7.15"
}

compileKotlin {
    kotlinOptions.jvmTarget = "1.8"
}
compileTestKotlin {
    kotlinOptions.jvmTarget = "1.8"
}
Most of the text will be already there, we just added the depedency TornadoFX inside the dependencies block.
Once you have added the library you should build the gradle, by right clicking on the file build.gradle. If everything works correctly you will see the TornadoFX library in your project inside the External Libraries section.

Calculating the Text Metrics
Now that everything is ready, let’s see the TextMetrics.kt file, which contains the code that calculate metrics.
The file contains an object TextMetrics with two public functions: one to calculate the time needed to read the text, the other one to calculate how hard it is to read the text. We create an object instead of a class, because the metrics are independents and there is no need to store information about the text.
Time to Read a Text
object TextMetrics {

    // for the theory behind this calculation
    // see http://iovs.arvojournals.org/article.aspx?articleid=2166061
    fun timeToRead(text: String) : Double =
           text.count { it.isLetterOrDigit() }.toDouble() / 987
To calculate the time needed to read the text we simply count the numbers of meaningful characters (i.e., we exclude punctuation and whitespace) and divide the result by 987. The number comes from a research that studided this method to calculate the time needed to read a text. The number is valid for texts written in the English language.
This code is very concise thank to two Kotlin features: the expression syntax to define function and the simplified syntax for passing lambdas. The function String::count accepts a lambda that is applied to each character of the string, so all we need to do is to put a check that matches only meaningful characters.
Readability of a Text
// Coleman–Liau index
    fun readability(text: String) : Double {
        val words = calculateWords(text).toDouble()
        val sentences = calculateSentences(text).toDouble()
        val letters = text.count { it.isLetterOrDigit() }.toDouble()

        // average number of letters per 100 words
        val l = letters / words * 100
        // average number of sentences per 100 words
        val s = sentences / words * 100

        val grade = 0.0588 * l - 0.296 * s - 15.8

        return if(grade > 0) grade else 0.0
    }
To calculate the difficulty of the text we use the Coleman-Liau index, one of the readability measurements out there. We choose this test because it works on individual letters and words, which are easy to calculate. Some other tests instead use syllables or rely on a database of simple words which are harder to calculate.
Basically, this test looks up how long are the words and how long are the sentences. The longer the sentences are and the longer the words are the harder is the text.
This test outputs a number that corresponds to the years of schooling necessary to understand the text. This test works only for documents written in the English Language.
The code itself is easy to understand, the only thing we need to ensure is that the grade returned is higher than 0. It could be less if the text is particularly short.
Calculating the Number of Senteces
private fun calculateSentences(text: String) : Int {
    var index = 0
    var sentences = 0
    while(index < text.length) {
        // we find the next full stop
        index = text.indexOf('.', index)
        // if there are no periods, we end the cycle
        if (index == -1) index = text.length

        when {
            // if we have reached the end, we add a sentence
            // this ensures that there is at least 1 sentence
            index + 1 >= text.length -> sentences++
            // we need to check that we are not at the end of the text
            index + 1 < text.length
                    // and that the period is not part of an acronym (e.g. S.M.A.R.T.)
                    && index > 2
                    && !text[index - 2].isWhitespace() && text[index - 2] != '.'
                    // and that after the period there is a space
                    // (i.e., it is not a number, like 4.5)
                    && text[index + 1].isWhitespace()
            -> sentences++
        }

        index++
    }

    return sentences
}
Calculating the number of sentences, in English, it is not hard, but requires a bit of attention. Basically, we need to find all periods and check that they are not part of either an acronym or a number with a fractional part. Since each text contain at least one sentence, we automatically add one when we reach the end of the text given as input.
Calculating the Number of Words
private fun calculateWords(text:String) : Int {
        var words = 1
        var index = 1
        while(index < text.length) {
            if(text[index].isWhitespace()) {
                words++
                while(index + 1 < text.length && text[index + 1].isWhitespace()) index++
            }

            index++
        }

        return words
    }
} // end of the object TextMetrics
To calculate the numbers of words is even simpler: we just need to find the whitespace and count it. The only thing that we have to check is to not count a series of spaces as more than one word. To avoid this error, when we find a space we keep advancing until we find the next not-space character.
The Graphical Interface
The library that we use for the graphical interface is TornadoFX. This library uses the MVC pattern: the model stores the business logic; the view takes care of showing the information; the controller glue the two of them and ensure that everything works correctly.
All the code for the Tornado application is inside the file AnalysisApp.kt.
The Controller
Let’s start with seeing the controller.
import javafx.geometry.Pos
import tornadofx.*
import javafx.scene.text.Font

class MainController(): Controller() {
    fun getReadability(text: String) = when(TextMetrics.readability((text))) {
            in 0..6 -> "Easy"
            in 7..12 -> "Medium"
            else -> "Hard"
        }

    fun getTimeToRead(text: String): Int {
        val minutes = TextMetrics.timeToRead(text).toInt()

        return if (minutes > 0) minutes else 1
    }
}
The controller provides two functions that we use to convert the raw information provided by the TextMetrics object in a more readable form. For the readability, we translate the number relative to a grade in a simpler textual scale. This is necessary because unless you are still in school probably you do not remember what grades means. Do you remember to which grade corresponds grade 10? So, we create a simple conversion:
- if it is less than high school it is easy
- high school is medium
- everything post high-school is hard
We also simplify the time to read seen by the user: we round up the time to the nearest minute. That’s because the calculation cannot really be that precise. The scientific research behind the calculation does not really allows such granularity. Furthermore, there are factors beyond our control that could skew the number. For instance, the real time depend on the actual reading speed of the user. So, if we gave a precise number it could be misleading. The round up number instead is generally correct, or at the very least better represents the imprecise nature of the calculation.
The View
In the same file we put the view.
class MainView: View() {
    val controller: MainController by inject()

    var timeToRead = text("")
    var readability = text("")
    var textarea = textarea("")
This first part is interesting for one reason: the way we initialize the property controller. We do it with the delegation pattern, using the kewyord by followed by a delegate class. A delegate class is a class that follows a specific format and can be used when you need to perform complex operations to initialize a property. In this case, the inject class is provided by TornadoFX and it finds (or creates) for you an instance of the class specified.
This pattern is also useful for lazy initialization: imagine that you have to initialize a property, but initialization is costly or is dependent on something else. Traditionally you would have to initialize the property to null and then set the proper value later. Instead with Kotlin you can use the standard delegate lazy. This delegate accepts a lambda: the first time you access the property the lambda is executed and the value returned is stored, the next time it will simply return the stored value.
The rest of the code contains properties to store the elements of the UI that we are going to see now.
The Root Element
override val root = vbox {
        prefWidth = 600.0
        prefHeight = 480.0
        alignment = Pos.CENTER
        text("Text Analysis") {
            font = Font(28.0)
            vboxConstraints {
                margin = insets(20.0)
            }
        }
        textarea = textarea("Write your text here") {
            selectAll()
            vboxConstraints {
                margin = insets(20.0)
            }
        }
        textarea.isWrapText = true
        hbox {
            vboxConstraints {
                alignment = Pos.BASELINE_CENTER
                marginBottom = 20.0
            }
            label("Time to Read") {
                hboxConstraints {
                    marginLeftRight(20.0)
                }
            }
            timeToRead = text("No text submitted")
            label("Readability") {
                hboxConstraints {
                    marginLeftRight(20.0)
                }
            }
            readability = text("No text submitted")
        }
The root property is a requirement for a TornadoFX app, it contains the content of the view. In our program we assign its value using a Type-Safe Builder. It is a feature of Kotlin that allows to create easily with a beautiful DSL-like interface things like UI or data formats files. Basicaly anything that has a complex hierarchical structure. Everybody can create a type-safe builder in Kotlin, but they are a bit complex to design, so we did not have the chance to see before. However, as you can see they are very easy to use. In this case, we use the one provided by TornadoFX to create the UI of our app.
Without a type-safe builder you would be forced to use configuration files or an awkward series of function calls. Instead with a type-safe builder is you can create quickly what you need, and the end result is easy to understand at a glance.
Our view consists of a:
- a vertical box (the initial
vbox) the contains- a title (the first
text) - a box that will contain the text inputted by the user (
textarea), which is also saved in the property textarea - a horizontal box (
hbox) that contains- two pairs of a label and a simple text. The two texts are stored in the properties readability and timeToRead
- a title (the first
The code itself is quite easy (thanks to lambdas and type-safe builders), there are only a few terms to understand.
A vertical box stacks the elements vertically, while an horizontal box stacks them horizontally. The hboxConstraints and vboxConstraints contains restrictions on the layouts of the corresponding elements.
The selectAll functions ensures that the default text (i.e., Write you text here) is pre-selected. This allow the user to easily delete it with one click or press of the delete button.
The only element that remains is the button that is used by the user to start the analysis of the text. The following code is still inside the initial vbox we have just seen, that is assigned to the property root.
        button("Analyze Text") {
            action {
                if(textarea.text.isNotEmpty()) {
                    readability.text = controller.getReadability(textarea.text)
                    timeToRead.text = "${controller.getTimeToRead(textarea.text)} minutes"
                }
            }
        }
    } <-- vbox ends here
}
The button definition contains an action, a lambda, that is executed when the user clicks the button itself. The action gathers the text in the textarea and calls the functions in the controller, then it assigns the results to the proper properties (i.e., the text elements inside the hbox). If there is no text the action does not change anything.
The Main Program
The main program is contained inside the Program.kt file.
import javafx.application.Application
import tornadofx.App

class AnalysisApp: App(MainView::class)

fun main(args: Array<string>) {
    Application.launch(AnalysisApp::class.java, *args)
}
The file is very short because we just need to do two things:
- to create our app class, assigning to it the view
- launch the TornadoFX application with our app class
The end result is a nice graphical application.

Summary
We have learned a lot today, everything you need to know to use Kotlin in real projects. From the basics needed to define variables and functions to the more advanced features, like lambdas.
We have seen the Kotlin way, safety, conciseness and ease of use, that permeates all the language: from strings that supports interpolation to the great attention to the issues of nullability.
There is a lot of learn about Kotlin. The next steps are keeping reading this website:
- continue learning how to use Kotlin in the browser or to create native applications
- learn how to use coroutines, a Kotlin features to simplify working with asynchronous programming
- understanding how to use the Javalin web framework with Kotlin
- continue with 100+ Resources To Learn Kotlin The Right Way
And whenever you get a bit lost in Kotlin, you can find your way looking at the official reference.
The companion repository for this article is available on GitHub
The post Kotlin Mega Tutorial appeared first on SuperKotlin.