Shared Library in Kotlin Multiplatform

Here is the second post from our series about Kotlin Multiplatform focused on mobile app development. Check out the first steps into Kotlin Multiplatform, we always want to share with you our experience in development and we hope this kind of series will help you to build your first Multiplatform application in Kotlin.
The purpose of this post is to show you how to integrate your common module into two different mobile platforms. We will also review the problems and solutions we found while using this development approach. From the UI layer to automated testing, or some troubles we found while coding.
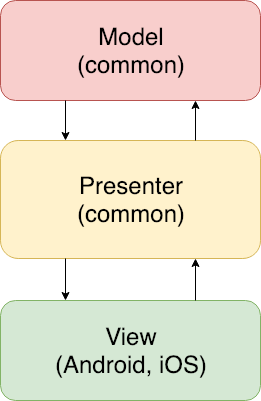
If you want to read more about this Architecture, you can read GUI Architecture by Martin Fowler.
Shared Library goals
Sharing code between platforms by using the same library can be a formidable but we first need to have clear our goals:
- To share as much code as possible, that is, to avoid re-implementing the same things for every platform we want to support.
- To have the ability to provide the dependencies once for every platform without needing to build the dependencies twice.
- We don’t want to solve dependency inversion using different dependency injectors or providers for each platform. Ideally, we want only one dependency injector.
- To be able to replace dependencies in tests.
- Write tests as we are used to: UI testing, integration testing, etc…
Implementing the UI layer
Now, when we thought about which architecture should we use for our task, we had it clear: for our first attempt we’d use Model View Presenter.

MVP was created to improve the way UI tests are written. The creators of the pattern needed to write automated tests for the UI layer without any real GUI involved as the subject under test. That’s why they decided to move all the presentation logic to the classes named “presenters”.
Applying this pattern, and moving the UI behavior inside our shared library, will help us a lot to achieve our goal. All the code related to the UI rendering (but the actual drawing part, coupled to the native platforms) will be moved to our shared library. This will help us define a public view contract every platform will have to implement. Therefore, we will simplify every platform implementation because we will have to only think about how the UI will show the already defined behavior.
Platform-specific infrastructure
The first problems you will face will be related to the infrastructure code. You will want to request information from any data source, like network or a local database. Perhaps, you just want to print some logs that you will need to see in both, Android and iOS. For this kind of problems, we need to declare expected features we want to implement in every platform. At the same time, platform-specific code will declare its actual implementation of those expected features. These keywords are very well explained in the official documentation.
Luckily, we won’t have to write this code twice. Most of the things we will require are already done in libraries that implement the solution in the multiple platforms Kotlin Native support.
Here is a set of libraries that have support for kotlin multiplatform:
Real life
Multiplatform projects are an experimental feature in Kotlin 1.2 and 1.3. All of the language and tooling features described in this document are subject to change in future Kotlin versions.
We want you to know we had problems with 1.3.30 Kotlin versions. These are some of the issues we found while creating a shared library with Kotlin Multiplatform.
- Native tests worked but it would randomly skip some tests.
- Our shared library wasn’t refreshed sometimes after updating its code. This made us thought we couldn’t rely on the iOS code we were running.
- Compile time is a problem. The average compile time now is about 5 minutes.
Another example of the issues we found is related to the Kotlin version upgrade. We found that, once Kotlin 1.3.40 was released, and after updating our project to use it, the app stopped compiling. One of the key problems with this is that if you have many dependencies like we did they may have not updated to the very last version of Kotlin, and therefore, when you do, there might be inconsistencies until they decide to support it. Besides, remember to always upgrade the gradle wrapper.
Dealing with iOS and XCode
You will most probably find a lot of issues when working with iOS. If you find yourself being able to make your Android app but not yours iOS one, here are some tips we got from first-hand experience.
Using static objects or fields will use the frozen modifier in iOS. That means they will be immutable. If you have some mutable variable in a static context, then you won’t be able to replace it in runtime, otherwise you’ll get an `InvalidMutabilityException` exception. You can read how mutability works in Kotlin Native in this document, and see an example of how we use it to replace dependency implementations at runtime in the Karumi KotlinMultiplatformApp Github repository.
As we have mentioned before we use the library Ktor client for HTTP requests and they have some old issues that are still present like issue #1165: Ktor client cannot catch offline exceptions and issue #887: InvalidMutabilityException on HttpRequestPipeline when your HttpClient object is on a static context and you try to make a POST/PUT request. You will find nasty crashes while your Android app will work perfectly.
Automated testing
Last but not least, we wanted to know if the current testing stack could be used like we are used to in any other Android or iOS project. Here are some thoughts about the testing strategy for any Mobile Multiplatform app.
As we knew, we can’t really make sure our iOS code works even though it does in Android. That’s why we wanted to do integration testing in every platform and make sure we are not breaking things. For that we had to go as deep as possible on our stack.
We needed a service locator to provide us dependencies, and more importantly, to replace instances in tests. We haven’t found any Multiplatform project meeting these requirements yet. If you know of any, please drop a comment.
The following snippet is an example of how to handle Mutability in our service locator using AtomicReference. InjectionModule is the place where we save our dependencies to be replaced using Swift and Kotlin. You can see the complete code in our github repository.
object GalleryInjector {
  private val galleryInjector = AtomicReference<InjectionModule?>(null)
  private val defaultInjector = InjectionModule()

  operator fun invoke(): InjectionModule =
    galleryInjector.value ?: defaultInjector

  fun config(injector: InjectionModule) {
    galleryInjector.value = injector.freeze()
  }
}
The problem here is we need to use mockito or mockk and we can’t use it in Swift. That’s why we have to create some stubs manually in Kotlin in order to use them in iOS tests.
Here is how we replace them in Android Tests.
val apiClient = mock<PhotosApiClient> {
      onBlocking { getPhotos() } doThrow NullPointerException()
    }

GalleryInjector.config(PhotoListStub(apiClient))
And here is how we replace them in iOS.
let injectionModule = TestModule(apiClient: PhotoApiClientStub(photos: photos, withErrors: false))
        GalleryInjector().config(injector: injectionModule)
We decided not to write native tests for presenters and that was only because we didn’t know we could create unit tests, translate them to Swift and run them in a native environment. That’d save us a lot of duplicated tests.
Final thoughts
Kotlin Multiplatform is an awesome solution to create a common library for our projects. This approach unlocks an interesting feature, to create rich models and share most of the app behavior between platforms. Based on this solution we can minimize the amount of code we need to create our apps.
There is an interesting detail about the compiler you should keep in mind when you find yourself having problems with iOS builds. You can see the generated Swift code to try to understand what is wrong with your Kotlin native code, or at least, how the generated code works.
Remember, Kotlin Multiplatform is experimental for now and it has a lot of bugs. It is not production ready, but it brings a new world when talking about how to share code between different platforms.
You can see the full source code used on this blog post on Github, you can see how to build the complete stack including integration tests to your project.
We will keep working on the project, talking about databases, network requests, and automated testing… If you want to know more about Kotlin Multiplatform, just drop a comment below with the topics you are more interested in!