
Amper – Improving the Build Tooling User Experience
Time and time again people adopting Kotlin have told us that they find dealing with build systems challenging. While many projects use wizards to configure environments so they’re ready for developers to get started, these also need to be maintained. New modules, platforms, dependencies, and other changes happen, which often leads to developers spending more time fighting the build system and the IDE than actually focusing on the work they need to do. With Kotlin becoming a truly multiplatform language, this is emphasized even further with folks who are new to the JVM ecosystem.
For some time now, we’ve been working on a series of experiments internally at JetBrains to try and see how we could make this experience better for developers – not just from the perspective of defining projects, but also by providing better tooling support. These efforts are in sync with the other initiatives we’re working on in regards to Kotlin Multiplatform.
Today, we’re excited to share one such project, Amper, publicly. Before proceeding, however, a disclaimer – it’s still very much experimental, and our main goal for opening it up is to validate the ideas behind it and get your feedback.
What is Amper?
Amper is a tool for project configuration. Its goal is to improve the project configuration user experience and toolability, that is, the support inside the IDE, while also providing a smooth out-of-the box experience.
We’re currently looking at various aspects, including the configuration of projects for the purpose of building, packaging, publishing, and more. At its current stage, however, the focus is primarily on configuring projects for the purpose of building.
While the current use case is Kotlin and Kotlin Multiplatform, Amper also supports Java and Swift (as a requirement for multiplatform). However, the same approach to configuration could work for other languages and technology stacks in the future.
Amper is implemented as a Gradle plugin and uses YAML for its project configuration format. The goal right now is to validate the user experience, which is why we have chosen to build on a well-tested build tool like Gradle, providing a configuration layer on top of it.
In regards to using YAML, some of you may be wondering, why not Kotlin? While the decision on this markup language is not final, we do want to take a declarative approach. We believe that this not only allows for a more simplified configuration that is less error-prone, but it also helps us in terms of providing better tooling. And again, for the sake of sharing this experiment with you and validating ideas behind it, we’ve taken the simplest approach. Whether or not we’ll end up with a restrictive subset of Kotlin as the frontend language is yet to be decided. For now, our focus is on validating our ideas.
Show me the code!
Let’s take a very basic JVM “Hello, World!” project with the following directory structure in IntelliJ IDEA 2023.3:

The main.kt and MyTest.kt files are just regular Kotlin files with nothing special in them. The interesting part is module.yaml, which is the Amper manifest file. For the above project structure, it would simply be:
# Produce a JVM application

product: jvm/app
That’s it. The Kotlin and Java toolchains, test framework, and other necessary functionality is configured and available straight out of the box. You can build it, run it, write and run tests, and more. For more detailed information, check out the full example.

Now, let’s look at a Compose Multiplatform project with Android, iOS, and desktop JVM apps, with the following project structure in Fleet:
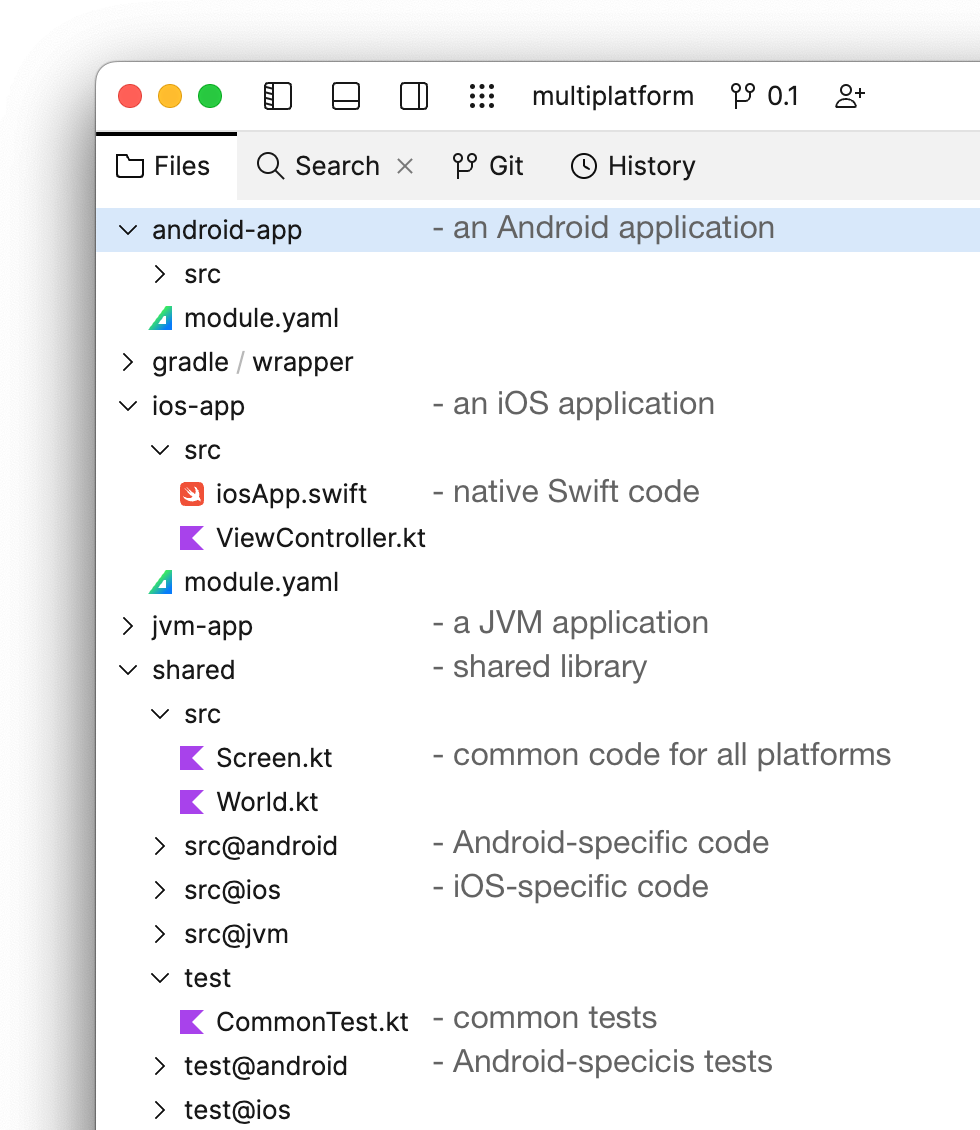
Notice how the src/ folder contains Kotlin and Swift code together. It could, of course, also be Kotlin and Java.
Another aspect to highlight is the shared module with the common code in the src folder and the platform-specific code folders src@ios and src@android (learn more about project layouts).
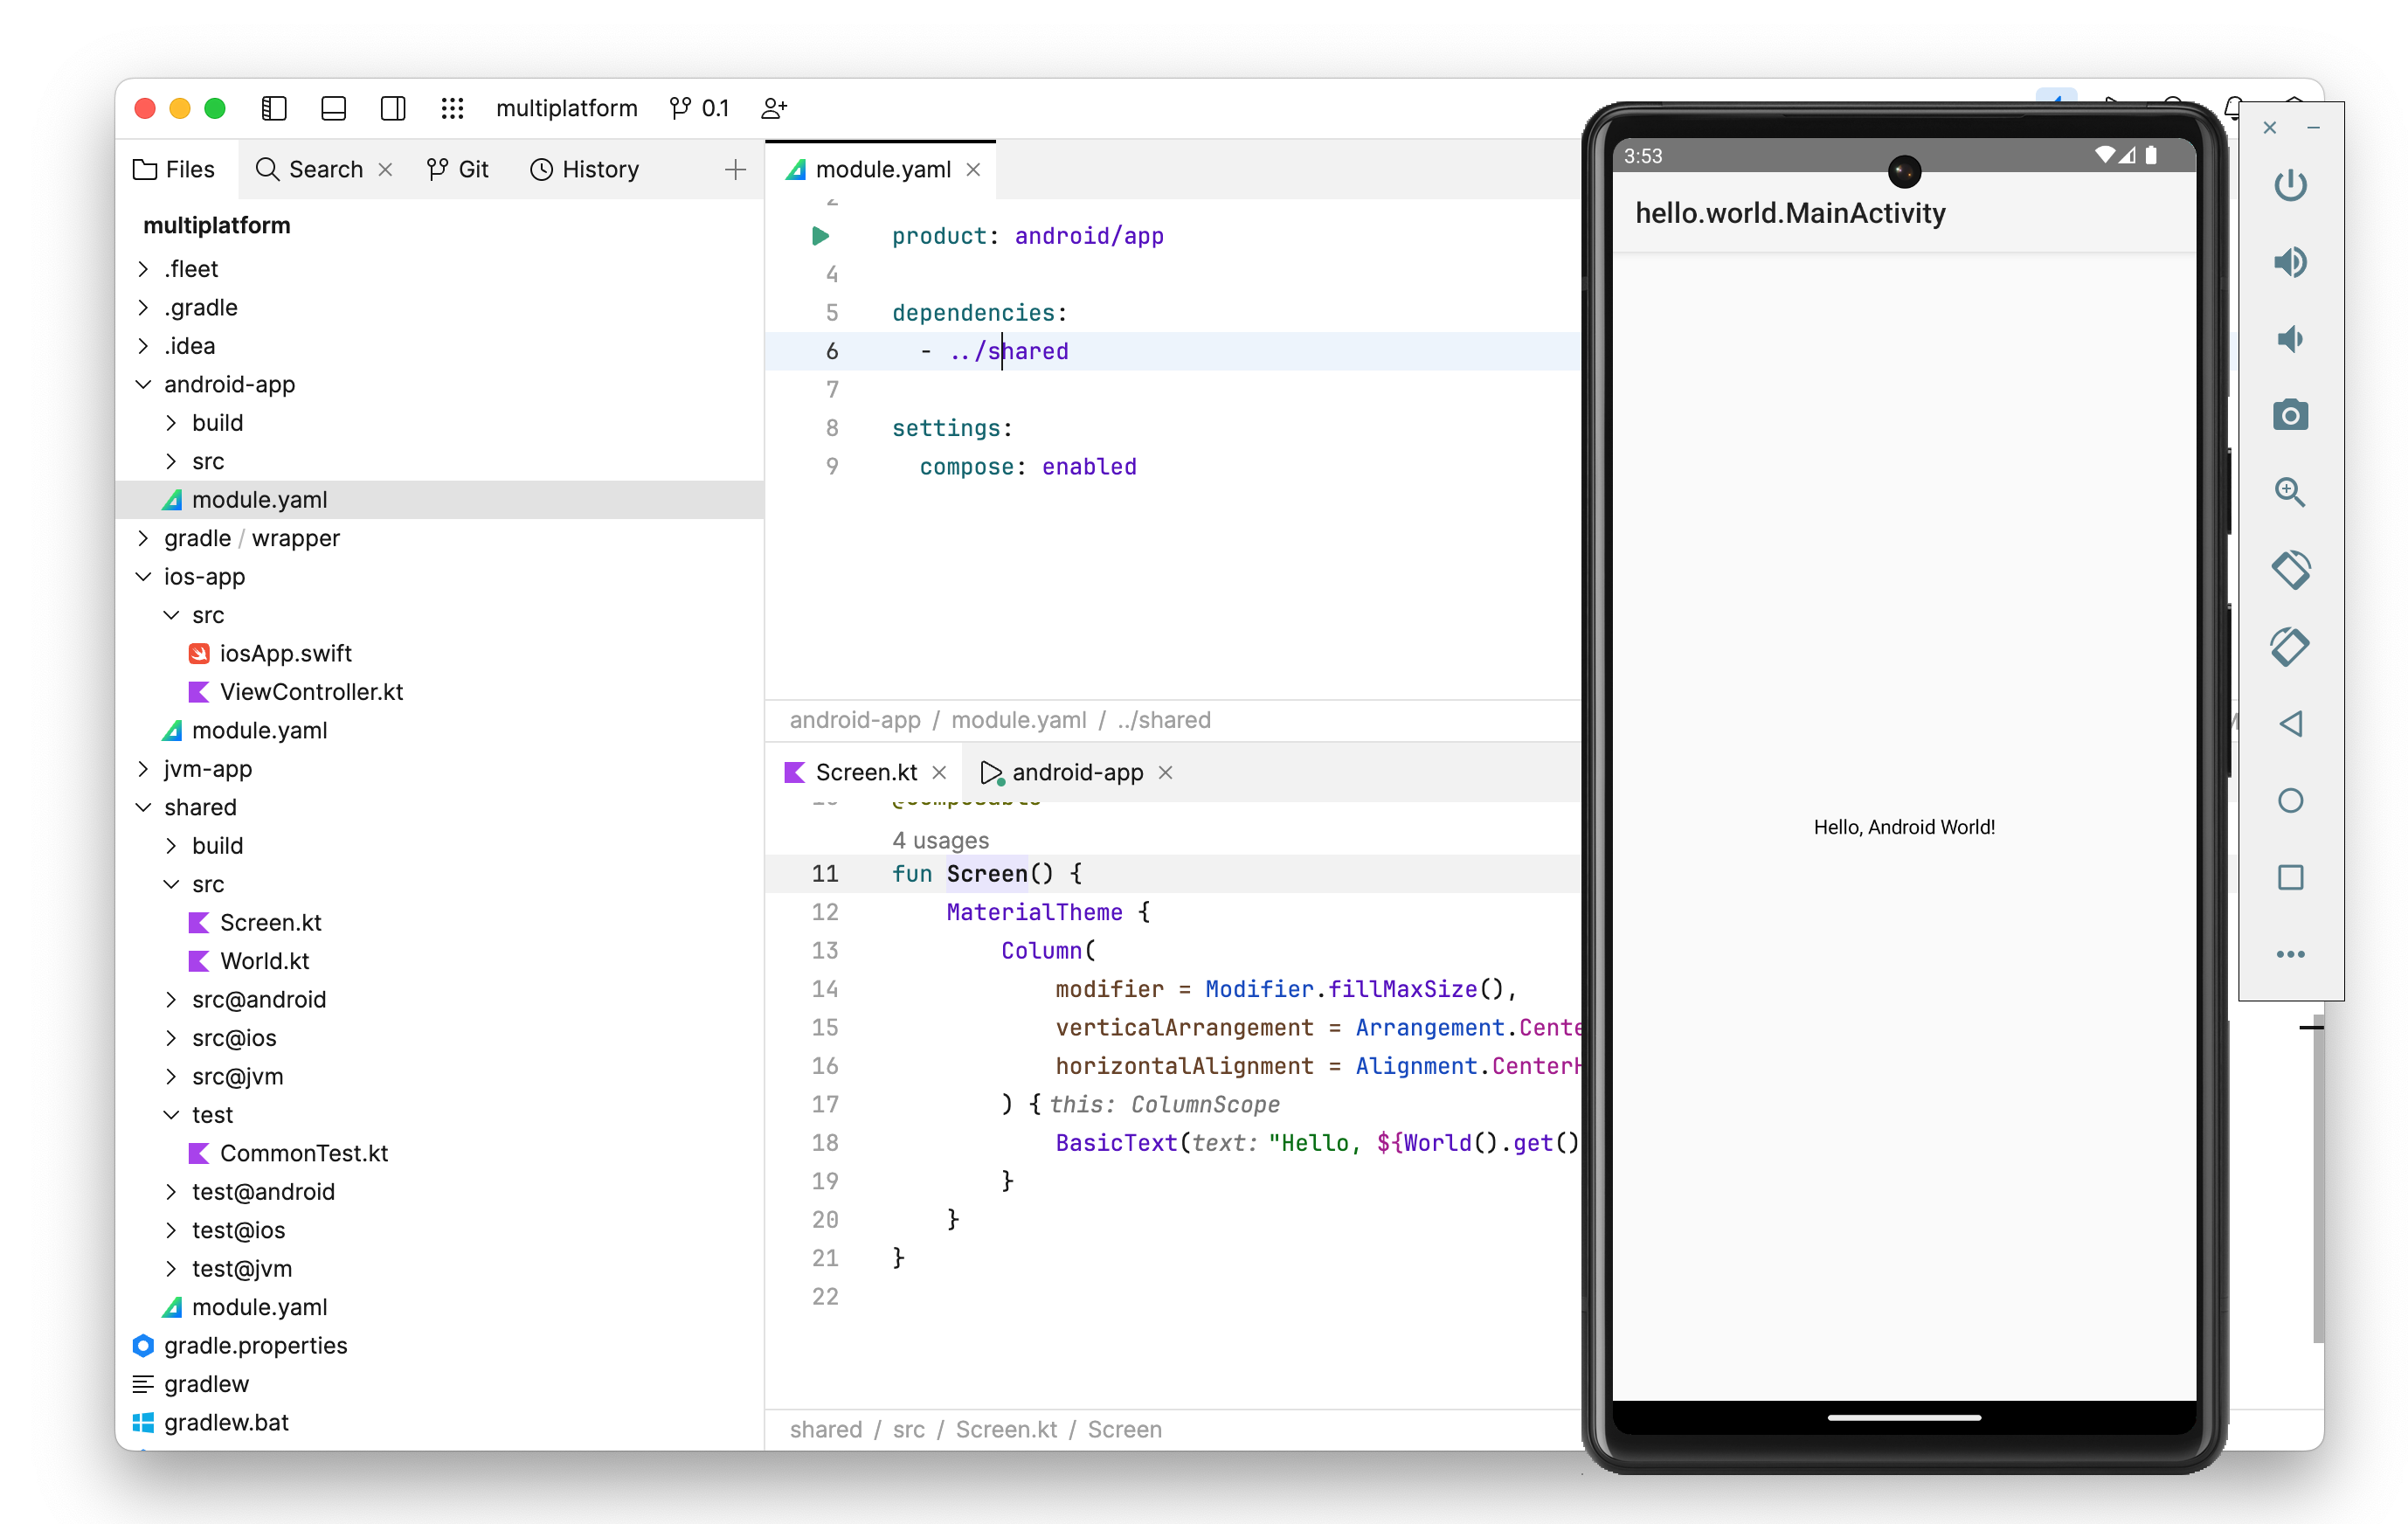
Here’s how the ios-app/module.yaml manifest file looks:
# Produce an iOS application

product: ios/app

# Depend on the shared library module:

dependencies:

  - ../shared

settings:

  # Enable Compose Multiplatform framework

  compose: enabled
This is pretty straightforward: It defines an iOS application with a dependency on a shared module and enables the Compose Multiplatform framework. A more interesting example would be shared/module.yaml:
# Produce a shared library for the JVM, Android, and iOS platforms:

product:

  type: lib

  platforms: [jvm, android, iosArm64, iosSimulatorArm64, iosX64]

# Shared Compose dependencies:

dependencies:

  - org.jetbrains.compose.foundation:foundation:1.5.0-rc01: exported

  - org.jetbrains.compose.material3:material3:1.5.0-rc01: exported

# Android-only dependencies

dependencies@android:

  # integration compose with activities

  - androidx.activity:activity-compose:1.7.2: exported

  - androidx.appcompat:appcompat:1.6.1: exported

# iOS-only dependencies with a dependency on a CocoaPod

#   note that CocoaPods dependencies are not yet implemented in the prototype

dependencies@ios:

  - pod: 'FirebaseCore'

    version: '~> 6.6'

settings:

  # Enable Kotlin serialization

  kotlin:

    serialization: json

  # Enable Compose Multiplatform framework

  compose: enabled
A couple of things are worth mentioning. First, note the platform-specific dependencies: sections with the @<platform> qualifier. The platform qualifier can be used both in the manifest and also in the file layout. The qualifier organizes the code, dependencies, and settings for a certain platform.
Second, the dependencies: section allows not only Kotlin and Maven dependencies, but potentially also platform-specific package managers, such as CocoaPods, Swift Package Manager, and others based on the feedback we receive.
Naturally, these examples show only a limited set of Amper features. Check out the project on GitHub and look at the documentation, tutorial, and example projects to get more insight into Amper’s design and functionality.
What it currently supports
Amper currently supports creating applications targeting the JVM, Android, iOS, macOS, and Linux platforms. You can create applications based on both Kotlin (single and multiplatform) and Java.
Given that Amper is using Gradle as the backend, support for custom tasks, the ability to publish libraries to Maven, CocoaPods support, and the ability to package desktop apps are all provided via configuring the Gradle build-files directly.
How to try it
There are multiple ways to try Amper.
- In IntelliJ IDEA 2023.3 as of build 233.11555, for JVM and Android projects.
- In Fleet as of build 1.26.104, for the JVM, Android, and Kotlin Multiplatform projects.
- Using Gradle to build Amper projects from the CLI or CI/CD.
Check out the setup instructions.
We’ve also prepared some samples, as well as a tutorial. In addition you can find more detailed documentation that covers different aspects of Amper.
We need your feedback
The project is at a stage where we desperately need your feedback. We’d love for you to give it a try and tell us whether it is simpler for defining projects or what use cases you’d need it to cover. Any feedback you may have is more than welcome. Please feel free to submit your suggestions and ideas using our issue tracker, as comments in this post, or by joining our public Slack channel and posting them there.
A few final words
We’ve prepared an FAQ below which should answer some of the questions you may have. However, we wanted to explicitly address a few points.
First and foremost, we are fully committed to supporting technologies such as Maven and Gradle in IntelliJ IDEA and Fleet. This project does not change our commitment to these technologies, and we continue to work very closely with our partners on this front.
Second, at its current stage, Amper is not a standalone build tool. While we have many ideas as to how we would like to drive the product forward, we also need to validate the things we’re currently working on before developing Amper further.
We hope other questions you may have are addressed in the FAQ. If not, please feel free to ask us in the comments, and we’ll do our best to answer them.


