Kotlin for Interviews — Part 4: Iteration
Part 4 of a series on Kotlin data structures, collection functions, math, common algorithms, and more for tackling technical interviews

Part 4 of a series on Kotlin data structures, collection functions, math, common algorithms, and more for tackling technical interviews
Part 4 of a series on Kotlin data structures, collection functions, math, common algorithms, and more for tackling technical interviews
Part 4 of a series on Kotlin data structures, collection functions, math, common algorithms, and more for tackling technical interviews
Part 4 of a series on Kotlin data structures, collection functions, math, common algorithms, and more for tackling technical interviews
Part 4 of a series on Kotlin data structures, collection functions, math, common algorithms, and more for tackling technical interviews
Part 3 of a series on Kotlin data structures, collection functions, math, common algorithms, and more for tackling technical interviews
Part 1 of a series on Kotlin data structures, collection functions, math, common algorithms, and more for tackling technical interviews

Cheatsheet for a series on Kotlin data structures, collection functions, math, common algorithms, and more for tackling technical…


In Karumi, we are always looking for technologies and tools that help us and help our clients to produce, evolve, and maintain their products with the highest quality and robustness in mind. Most of the time, we have to develop some mobile clients that will consume an already established backend API; or develop both the backend services and the clients using them.
One tool that has been hanging in our belt for the last couple of years is OpenAPI, previously known as Swagger and we are more than pleased with it, so now, it’s my turn to convince you about why you should be using it if you work at any side of an API.
This first blog post is the beginning of a series that will guide you in defining, offering, and consuming an API built from scratch.
OpenAPI is a specification that defines a standard that can be used to describe RESTful APIs in an agnostic language manner that helps programmers to understand and modify it.
Based on that specification, several tools will help you to automatically generate the code that exposes that service, the code consuming it, and even the documentation about it.
The feature that got our attention to invest time in OpenAPI was the ability to generate the API clients automatically, so we don’t have to bother anymore about model changes and parsing issues for an updated response. Instead of that, once the specification is modified, we run our client generator, and our project is ready to be using the latest changes offered.
You may end up changing some parts of your code to adopt that new client changes, but that’s something you would have to do anyway.
If your API client is generated automatically out of your project, it can be integrated, handled, and consumed like any other third party dependency. Besides that, it avoids all the usual boilerplate you have to program in every project.
OpenAPI can generate the code for most of the programming languages out there, so once you’ve defined the API, you can build in a matter of seconds the client for iOS and Android, to name some platforms.
Once you describe your API (that means endpoints, objects, path, etc.) using one single file, you could convert that description into a specific implementation; it does not matter if it’s server-side or client-side. That code will be a product of that description, once you change it there, all the “artifacts” produced out of that file could be regenerate to be used.
That avoids API integration failures like errors parsing invalid responses due to a misalignment between the back-end-offered API and the client-consumed API.
Suppose you decide to go all the way down with OpenAPI and produce the API integration automatically for both the backend and the clients; you will be forced to define your API before implementing anything about it, in any of the sides of it, obtaining a 100% framework biases-free API.
What does it mean? It means that the API definition will be the product of a well-thought process instead of just returning the models the backend already have around. This will force both sides to adapt themselves to work with the API being defined; this approach will put in a 50/50 relationship the client/server weight to describe how they communicate.
Another benefit of having the API definition first is that you can implement both sides without interacting with each other. As you know, there is a contract that is being respected at both sides of the API. If you are implementing a mobile client, you can even develop your tests using HTTP stubs to respond with responses that will be the same as the server will respond.
The OpenAPI definition file can be described in JSON or YAML, being both quite easy to read as a human and easy to modify if required. This is quite important. It’s way easier to discuss how to make some changes over an easy-to-read document than discuss those changes over a specific programming language or framework.
There is something worse than having no documentation, and that is having out-of-date documentation. As a side-effect of the single point of truth, if you whole API specification is kept in just one format, and several tools can automatically process it, and one of that tools is the documentation generator, so your API documentation (even if it is just for internal usage) won’t be outdated ever again.
OpenAPI is the current defacto industry standard for API definition, so offering your API using this specification guarantees that any other company will be able to use your services out-of-the-box without any extra setup. That could seem uninteresting for a lot of companies that create their API to be closed, but this technology does not force you to open anything, it will help you to have your API specified using a well-known tool so it can be published if required.
What if I need a specific implementation for my client/server, and it’s not present in the current languages? No problem at all, you can define your own template.
OpenAPI under the hood will use a templating-engine to transform any custom template into some source code. This isn’t as easy as invoking it for Kotlin or Scala, but you can create your generation without substantial modification in the generator.
In the next blog post, we will define a basic API to show how this technology work, and we will generate the API interface for a Spring Boot server and an iOS client that will consume it.
Photo by Neven Krcmarek on Unsplash

One of the biggest complaints you can find between iOS developers is that sometimes, the feedback loop you have when you are doing some fine-tuning of the UI is long. It produces a new Swift compilation, creates a new binary, then the app gets deployed to the simulator, once that’s done, the system will start the app, and then you will be able to navigate to the right screen to check if those small changes are ok.
Sounds familiar?
Meanwhile, you can see your colleges developing websites or React Native apps that they get feedback almost immediately, and they can even modify the UI with a designer in “real-time.”
Feel any envy yet?
What if I tell you that in iOS, we can achieve something similar to that with almost no effort? Would you believe me?
In Karumi, we’ve been playing a bit with a tool that will help us to hot-swap our code so we can shrink our feedback loop duration to just a couple of seconds.
This tool created by John Holdsworth will be the one doing all the magic under the hood; it will be checking which files are being changed, compile them, and dynamically insert that code in your running app. Let’s create a tiny example so we can test how this works.
First, we need to install this app from the AppStore and run it.
So, let’s create a brand new iOS project, a “Single View App” with Swift and Storyboards, nothing fancy.
Although Injection III has no issues with Storyboards and xibs, I do ( 😬 ), so let’s get rid of the main storyboard and modify our ViewController to contain a label center on the screen.
Now it’s time to setup Injection III to be able to edit our label in real-time.
First, we have to load a bundle into our app that will help us with the method swizzling. In our AppDelegate we will add the following lines:
func application(_ application: UIApplication,
                     didFinishLaunchingWithOptions launchOptions: [UIApplication.LaunchOptionsKey: Any]?) -> Bool {
         ...
    #if DEBUG
        Bundle(path: "/Applications/InjectionIII.app/Contents/Resources/iOSInjection.bundle")?.load()
     #endif
        ...
    return true
}
then, once the Injection III app is running, we have to open our project in it so it can track any changes in our files.
Re-run your app, and you should see something like:
💉 Injection connected 👍
💉 Watching /Users/Fran/Development/HotSwapp/**
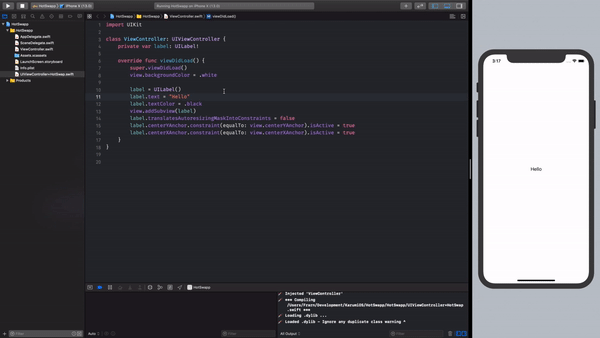
That means that your app is ready to handle code injection at runtime, let’s give it a go. Without stopping the app, change the label text color and save it.
Your Xcode output will display something like:
💉 *** Compiling /Users/Fran/Development/HotSwapp/HotSwapp/ViewController.swift ***
💉 Loading .dylib ...
objc[7606]: Class _TtC8HotSwapp14ViewController is implemented in both /Users/Fran/Library/Developer/CoreSimulator/Devices/5625C398-4862-4C4E-A5AF-E51A78D1113F/data/Containers/Bundle/Application/BDCBDDA4-A09B-4D72-8048-C24FF1193279/HotSwapp.app/HotSwapp (0x101d72a10) and /Users/Fran/Library/Containers/com.johnholdsworth.InjectionIII/Data/eval101.dylib (0x104b19278). One of the two will be used. Which one is undefined.
💉 Loaded .dylib - Ignore any duplicate class warning ^
💉 Injected 'ViewController'
But your app label keeps having the same color, what’s going on?
Your app has a new code, but you have to respond to that change. Create a new file, called it UIViewController+HotSwap.swift and add this content:
import UIKit

#if DEBUG
    extension UIViewController {
        @objc func injected() {
            for subview in view.subviews {
                subview.removeFromSuperview()
            }
            if let sublayers = self.view.layer.sublayers {
                for sublayer in sublayers {
                    sublayer.removeFromSuperlayer()
                }
            }

            viewDidLoad()
        }
    }
#endif
What this method is doing is removing all views and layers from your view controller and will invoke the viewDidLoad method again. Stop your app, and rerun it, now it will show the new color.
Now, change the label color and save it.
🎉🎉🎉
Without stopping it, replace one of the constraints to adjust the label to the left border. Once you save it, in one second, the UI will be reflecting that change.
Now imagine that instead of this app, how this could improve your development speed in some scenarios with a big app, with thousands of lines of code with a lot of third parties dependencies.

After using this for a few weeks, we would like to share with you what we’ve learned about this so you can get up to speed without making the same mistakes we did.
Photo by Jean Gerber on Unsplash

One of the biggest complaints you can find between iOS developers is that sometimes, the feedback loop you have when you are doing some fine-tuning of the UI is long. It produces a new Swift compilation, creates a new binary, then the app gets deployed to the simulator, once that’s done, the system will start the app, and then you will be able to navigate to the right screen to check if those small changes are ok.
Sounds familiar?
Meanwhile, you can see your colleges developing websites or React Native apps that they get feedback almost immediately, and they can even modify the UI with a designer in “real-time.”
Feel any envy yet?
What if I tell you that in iOS, we can achieve something similar to that with almost no effort? Would you believe me?
In Karumi, we’ve been playing a bit with a tool that will help us to hot-swap our code so we can shrink our feedback loop duration to just a couple of seconds.
This tool created by John Holdsworth will be the one doing all the magic under the hood; it will be checking which files are being changed, compile them, and dynamically insert that code in your running app. Let’s create a tiny example so we can test how this works.
First, we need to install this app from the AppStore and run it.
So, let’s create a brand new iOS project, a “Single View App” with Swift and Storyboards, nothing fancy.
Although Injection III has no issues with Storyboards and xibs, I do ( 😬 ), so let’s get rid of the main storyboard and modify our ViewController to contain a label center on the screen.
Now it’s time to setup Injection III to be able to edit our label in real-time.
First, we have to load a bundle into our app that will help us with the method swizzling. In our AppDelegate we will add the following lines:
func application(_ application: UIApplication,
                     didFinishLaunchingWithOptions launchOptions: [UIApplication.LaunchOptionsKey: Any]?) -> Bool {
         ...
    #if DEBUG
        Bundle(path: "/Applications/InjectionIII.app/Contents/Resources/iOSInjection.bundle")?.load()
     #endif
        ...
    return true
}
then, once the Injection III app is running, we have to open our project in it so it can track any changes in our files.
Re-run your app, and you should see something like:
💉 Injection connected 👍
💉 Watching /Users/Fran/Development/HotSwapp/**
That means that your app is ready to handle code injection at runtime, let’s give it a go. Without stopping the app, change the label text color and save it.
Your Xcode output will display something like:
💉 *** Compiling /Users/Fran/Development/HotSwapp/HotSwapp/ViewController.swift ***
💉 Loading .dylib ...
objc[7606]: Class _TtC8HotSwapp14ViewController is implemented in both /Users/Fran/Library/Developer/CoreSimulator/Devices/5625C398-4862-4C4E-A5AF-E51A78D1113F/data/Containers/Bundle/Application/BDCBDDA4-A09B-4D72-8048-C24FF1193279/HotSwapp.app/HotSwapp (0x101d72a10) and /Users/Fran/Library/Containers/com.johnholdsworth.InjectionIII/Data/eval101.dylib (0x104b19278). One of the two will be used. Which one is undefined.
💉 Loaded .dylib - Ignore any duplicate class warning ^
💉 Injected 'ViewController'
But your app label keeps having the same color, what’s going on?
Your app has a new code, but you have to respond to that change. Create a new file, called it UIViewController+HotSwap.swift and add this content:
import UIKit

#if DEBUG
    extension UIViewController {
        @objc func injected() {
            for subview in view.subviews {
                subview.removeFromSuperview()
            }
            if let sublayers = self.view.layer.sublayers {
                for sublayer in sublayers {
                    sublayer.removeFromSuperlayer()
                }
            }

            viewDidLoad()
        }
    }
#endif
What this method is doing is removing all views and layers from your view controller and will invoke the viewDidLoad method again. Stop your app, and rerun it, now it will show the new color.
Now, change the label color and save it.
🎉🎉🎉
Without stopping it, replace one of the constraints to adjust the label to the left border. Once you save it, in one second, the UI will be reflecting that change.
Now imagine that instead of this app, how this could improve your development speed in some scenarios with a big app, with thousands of lines of code with a lot of third parties dependencies.

After using this for a few weeks, we would like to share with you what we’ve learned about this so you can get up to speed without making the same mistakes we did.
Photo by Jean Gerber on Unsplash