Jetpack Compose: First Impressions and Learning Resources

Android’s current UI toolkit is over 10 years old now… Do stop me if you’ve heard this before 😉

As you most certainly already know, Jetpack Compose is the hot new thing for Android UI development. Its promise is to save us by making all the pain points of the old View system and XML layouts go away.

After many many preview versions, it got to beta status about a week ago. Here’s what it’s like to use Compose at the moment, and some of the best places to learn more about it.

The good

First of all, Compose is exciting. It makes a lot of basic UI work really simple, and you get to write it all in Kotlin, making use of all the language’s powerful features! The APIs have great discoverability in Android Studio, since all of it is just Kotlin code that you can access via code completion. This makes it truly easy to get started.

Kotlin’s type safety also works wonders in Compose. No passing in dp values instead of pixels, or mixing up vertical and horizontal alignment options. Everything is strongly typed, and the compiler safeguards you from making many, many mistakes.

The declarative style and state management of Compose is great as well. Writing down what you want to appear based on state is not only clear and explicit, but also a blessing after the problematic state management of the View system.

Given how much effort is going into developing and marketing Compose, it’s almost certainly the future of Android UI development. That being said, the XML system will probably never fully go away. Just like the Java to Kotlin shift, it will take a couple years until the new standard really kicks in, and we’ll occasionally still find ourselves interacting with code from the before times.

So… Get on board soon, just don’t expect all of the old system to disappear overnight. I’d certainly still suggest learning the old XML based system to anyone starting Android Development today — unless they’re somehow very certain that they’ll never work on an existing project.

Jetpack Compose comes with some cool Android Studio tooling as well. Flutter users will probably already be familiar with the handy Surround with shortcuts that let you wrap pieces of code in a new widget, and the same makes an appearance in Studio now.

Select some code, invoke Surround with (Ctrl+Alt+J on Windows, ⌥⌘J on macOS), and then hit R for a Row, C for a Column, or W for an arbitrary widget.

Another quick tip: creating a new Composable will immediately add a parameter list and a body to it, and then place your cursor inside its parameter list, to let you immediately add modifiers and other parameters.

If you don’t want to add any parameters, you can hit Tab to quickly skip to defining its content.

The bad

Now, let’s see the bad part, continuing with the tooling theme. To run Compose, you’ll have to run the latest Canary version of Android Studio. This version has… Some issues.

From my personal experience of a few days:

  • IDE Previews (which would be a really nice feature for Compose) sometimes don’t load at all, or don’t update as changes are made (even after rebuilding). Re-running either the full app or just deploying a @Preview to a device was faster than using the IDE preview feature 100% of the time.
  • The debugger never connected to either an emulator or a physical device when running Compose apps. Still didn’t manage to solve this, though I heard others had more success.
  • Logcat doesn’t show app names when running apps, making it difficult to filter the logs for the current app.
  • When running the emulator in a tool window inside the IDE, the emulator tab occasionally doesn’t appear in the preview version of Studio. I had times when I used the emulator tab inside another project in a stable Android Studio instead… I eventually gave in and reverted to using an emulator in a separate window.
  • Sometimes Studio just froze up entirely, and its process had to be killed and restarted. This happened about once a day or so.

I heard some similar anecdotal stories from others, including excessive resource usage when using Compose compared to other projects. These were occasionally fixable by restarting, invalidating caches, restarting adb, and similar “usual” debugging practices.

Another pain point of using Jetpack Compose can be that looking up how to do things is a bit hit-and-miss for the time being. For example, when you land on StackOverflow questions about it, you’ll often find answers that say “this is how to do it in dev11”, or “here’s the new API for this in alpha3”, but then none of those APIs will be present in the current beta version.

Of course, on one hand it’s nice that Compose went through a lot of iteration and they weren’t afraid to change and evolve APIs — that’s what the preview versions are for.

On the other, it makes for a somewhat unpleasant experience for developers trying to build things on the latest Compose version. Thankfully this situation will naturally improve over time, but we’ll have to wait a bit to get enough new, up-to-date answers in.

The resources

Since StackOverflow won’t be your best friend for learning Compose yet, where else can you go?

First, there’s Google’s official resources, which are a decent start:

  • Their best resource by far is the written documentation pages — get started with them here. These include a lot of helpful explanation and snippets for designing things in Compose, and also touch on more advanced topics like navigation, architecture, and interop with existing code.
  • There’s a lot of video content about Compose as well, under the #AndroidShow branding. I’ll recommend skipping most of this, especially the livestream and Q&A parts — they’re not really developer-focused, and contain a lot of hype and marketing.
    What contains a lot of value, however, are their screencasts about Compose features (which are also included in sections of the written docs). You can find these in this YouTube playlist.
  • If you’re new to Compose, the Beta overview video is also worth watching. For more longer-form introductory content, these videos from last year are all really helpful: Jetpack Compose, Thinking in Compose, Compose by example, and Compose for existing apps.
  • For hands-on practice, take a look at Google’s Compose Pathway that includes videos, articles, and code labs. This goes into significant detail in some parts — feel free to skip the things you’re not interested in learning deeply immediately, otherwise it’ll take a long time to get through it.
    I also found that some of the codelabs here were outdated (not using beta1 APIs yet), so be prepared to fiddle a bit with the code snippets provided, or to debug dependencies. Again, this is something that will be improved soon.

If you prefer reading, RayWenderlich team’s Jetpack Compose book has really solid, professional content in it, providing a complete tour for you to get started with: A nice exploration of the basic UI building blocks of Compose, as well as multiple example apps. (This, again, is slightly outdated, as its samples use alpha10. Fingers crossed that it gets a revision soon.)

For even more long-form video explanations, guidance, and demos, Exploring Jetpack Compose and Advanced Jetpack Compose by Filip Babić are both excellent.

To find quick snippets for how to perform basic things, the Compose Academy site can come in handy.

Finally, exploring Compose on your own is also a great way to learn about it. All of the APIs you use are just Kotlin code, so exploring through code completion, and jumping into the underlying implementation in Android Studio to read the source are super easy. The in-code documentation for most Compose APIs also tends to be excellent.

Conclusion

Are you excited and ready for Jetpack Compose? We know that we are, and you can look forward to more Compose content from us soon, including in our Android Chat SDK.

Tweet at us @getstream_io and tell us what you think about Compose, and what you found to be the most useful way to learn about it!

Originally published at https://getstream.io.

Click 👏 to say “thanks!” and help others find this article.

To be up-to-date with great news on Kt. Academy, subscribe to the newsletter, observe Twitter and follow us on Medium.

If you need a Kotlin workshop, check how we can help you: kt.academy.


Jetpack Compose: First Impressions and Learning Resources was originally published in Kt. Academy on Medium, where people are continuing the conversation by highlighting and responding to this story.

Continue ReadingJetpack Compose: First Impressions and Learning Resources

Our Android 2020 development stack

Our Android 2020 development stack

One of the questions we face when talking with Android developers all around the world is related to the tools we use 🤔 The selection of libraries and frameworks used by our Android team is one of the most interesting details in our development pipeline, so we will try to answer this question in this blog post 😃

Our Android 2020 development stack

When listing the libraries we use, we need to focus on various types of tools based on different topics: static analysis utilities, build tools, networking, persistence, permissions, user interface, core components, and testing. We have a bunch of tools we’ve used for years, and we will review them one by one.

Static analysis utilities & build tools:

These tools are really helpful for us. All they help us to go faster in our daily tasks by automating tasks or any other checks we want to do in our codebase 😍

  • Ktlint: Best Kotlin linter in town.
  • Android Lint: The best safeguard for your Android apps.
  • Lin: An awesome tool used to simplify the usage of the Android Linter created by @serchinastico. Really handy when we want to create custom rules!
  • Ribbonizer: Simple but powerful tool to add a ribbon to launcher icons.
  • Play publisher: Needed to automate our release process for internal and public releases.

Networking:

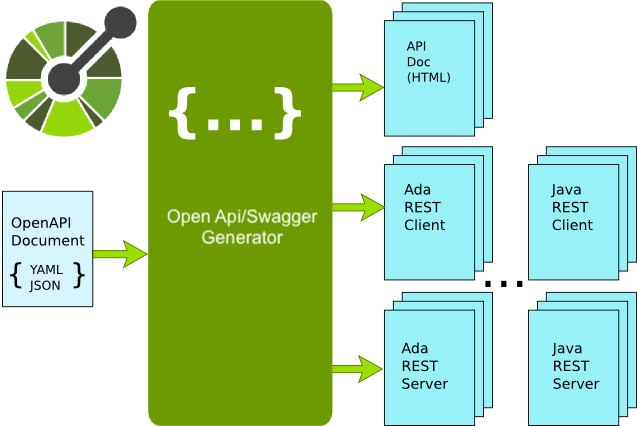
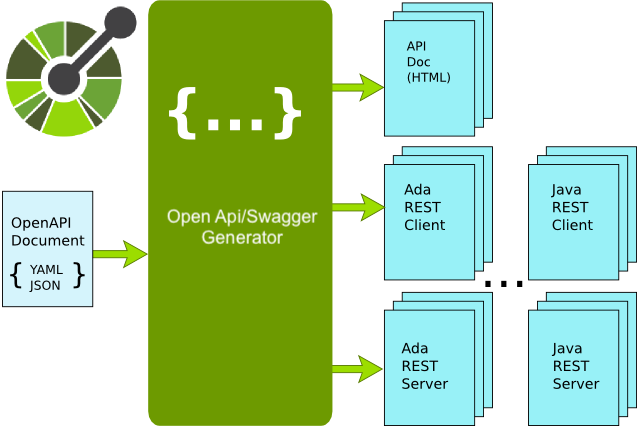
It’s been a while since we started using tools to generate our networking layer based on a Swagger or OpenAPI yaml file, so the libraries we use under the hood are not so relevant. For our latest project, we’ve used this gradle plugin to generate our API client. However, when there is no chance to generate the API client, and there is no way we can create an OpenAPI file, we use these libraries:

  • Retrofit: If you don’t know this library, you are going to love it! It generates a lot of code for you just from an interface 🤩
  • OkHTTP: The best HTTP client you are going to find. Simple, but powerful 🙂
  • Gson: We’ve been using this library for years! There are other alternatives if you want, but we have to admit we always use this one when using automatically generated code 😃
Our Android 2020 development stack

As the code generated is completely coupled to the libraries used by the generator and the models created by this tool, we always wrap it with an adapter to avoid coupling issues.

Persistence:

We all know how handy our loved shared preferences can be… However, when we need a database, we have two choices:

  • Room: Officially maintained by Google, this is one of the best choices when you need a database.
  • SQLDelight: Generates typesafe Kotlin APIs from SQL queries.

For years we used Realm, but nowadays, the tooling for SQLite is excellent now, so we moved to one of the previous alternatives.

Permissions:

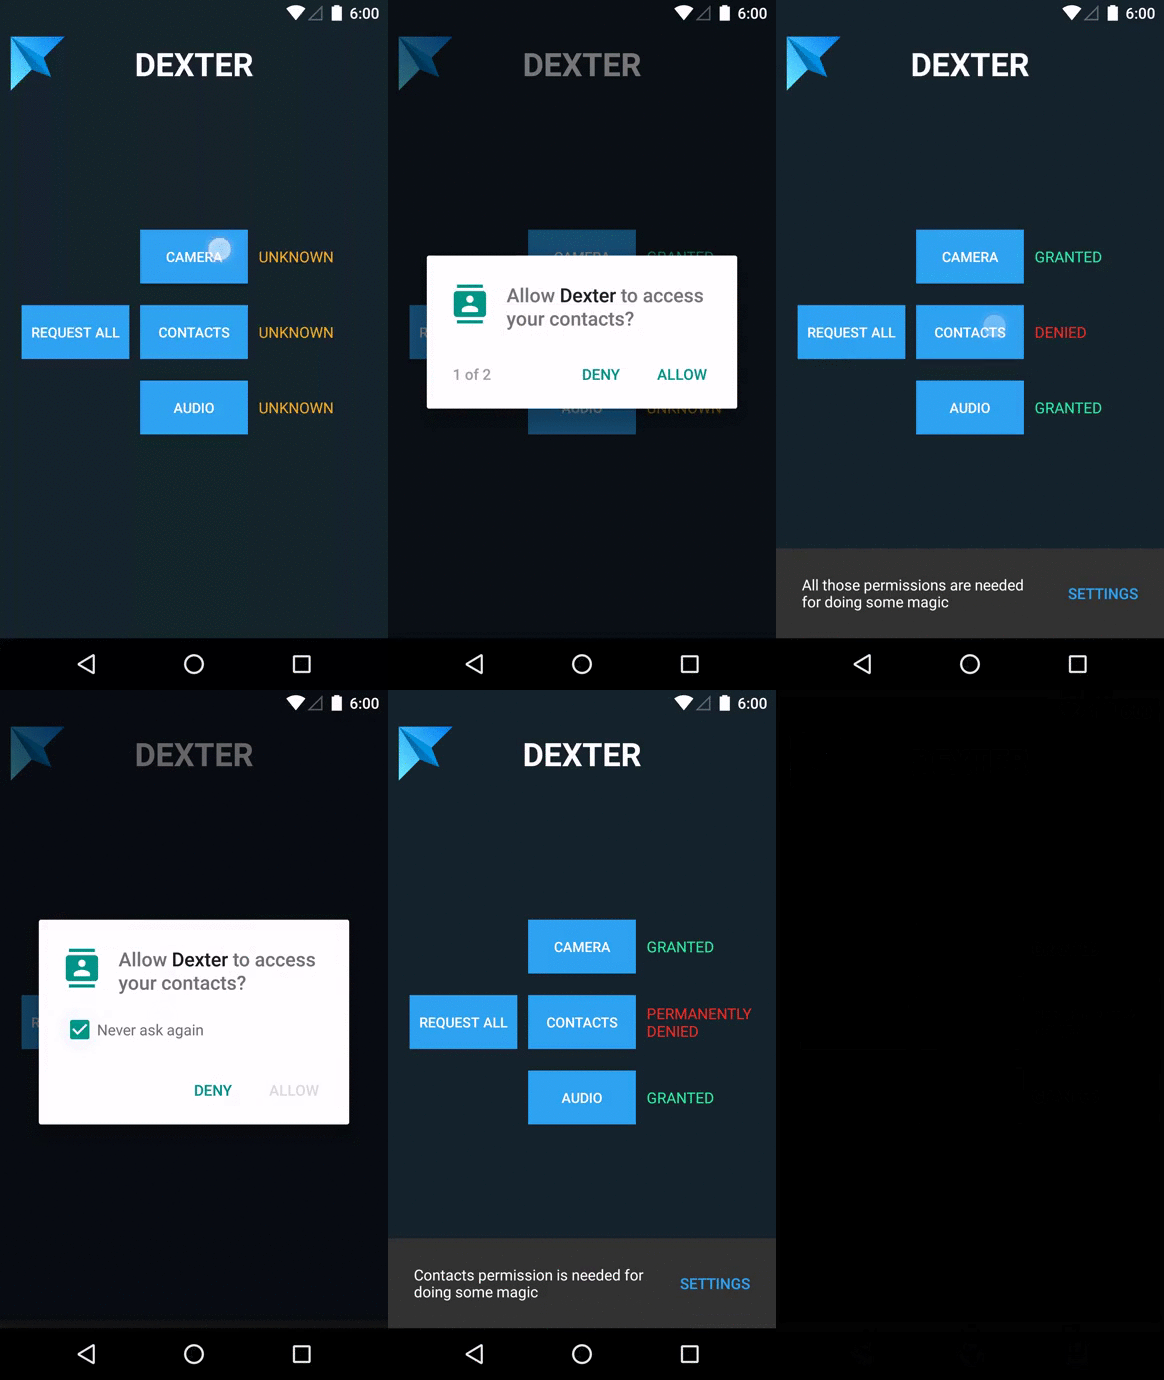
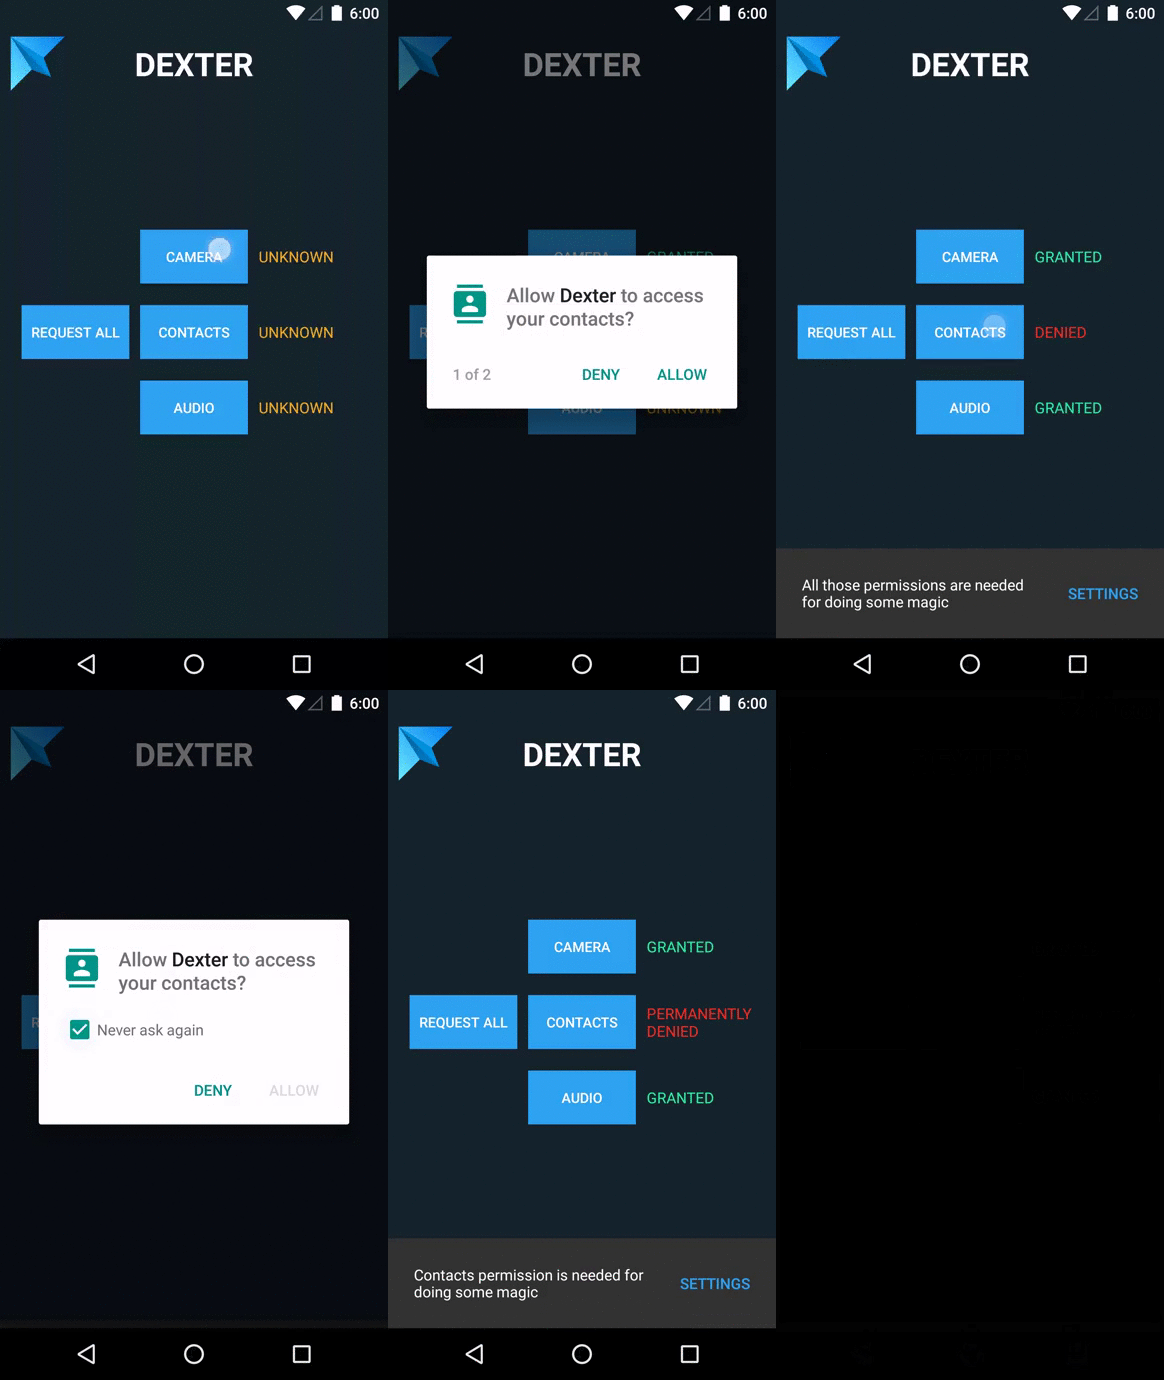
After years developing and maintaining a library to simplify the usage of permissions, we keep using Dexter! This library simplifies a lot the usage of the permissions API, letting you get the answer of a permission request in a callback instead of using the famous onActivityResult method.

Our Android 2020 development stack

User interface:

There is a bunch of libraries we use to build our applications user interface, so we are going to drop here just the most relevant ones:

  • Data Binding: The key to success when talking about the usage of MVVM four our presentation layer.
  • Lifecycle Observer: Handy when you want to listen for the events related to the component’s lifecycle without coupling the implementation to any concrete component.
  • Appcompat: Useful when we need to use components in old Android APIs.
  • ConstraintLayout: The best way to create a responsive layout.
  • Glide: Useful when you need to download and show images asynchronously.
  • Renderers: We’ve been using this library for years and is one of the best libraries to work with recycler view.
  • Calligraphy: Nice library if you want to use custom fonts and for some reason you had no idea this was supported since 2017 🙂 (Thanks random reddit user for pointing me this detail out)
  • Material Components: We try to use standard material components when possible, so this library is really helpful because there is a bunch of them already implemented.
  • Snacky: World-class library if you want to show a snackbar.
  • Lottie: Render After Effects animations natively on Android.

Core components and other useful libs:

There are always a bunch of libraries we need deep down in our architecture, and we them use in every project. Let’s talk about these:

  • Kotlin: Of course!!
  • Coroutines: Asynchronous programming with the best syntax in town.
  • Timber: A small and extensible logger.
  • Libphonenumber: When working with phone numbers in international formats, this library is the best option.
  • OneSignal: One of the best push notifications provider. Depending on the projects, we use the native support, but when possible we use OneSignal.
  • Kodein: For the last projects, we’ve used this dependency injector. However, we recommend you to choose your dependency injector based on your needs!
  • ThreeTenABP: Do you have to work with different regions for your dates? Take a look at this JSR-310 backport for Android.
  • Crashlytics: We’ve used this crash reporter for years, and we never regret.
  • Arrow: We tend to use more and more functional programming concepts in our software design, and we have to admit lenses, the core component, and the effects API are in all our Android projects.
  • Leakcanary: The best memory leak detection library.
Our Android 2020 development stack

Testing:

Prepare your speed face! This is going to be intense:

  • JUnit: Classic test runner.
  • Shot: Handy screenshot testing library.
  • Kotlin Snapshot: If you are looking for snapshot testing, this is your kotlin lib!
  • Kotlin Test: Because sometimes we need to use property based testing and this framework provides an awesome support.
  • Mockito: If you write unit tests, you’ll need a mocking library.
  • MockWebServer: Really handy when we want to write tests to ensure our API client is implemented properly.
  • Robolectric: Needed to run our instrumentation tests as fast as possible.
  • Espresso: Needed to be able to interact with the user interface in our UI tests!
  • Barista: Espresso’s best friend.
  • Jacoco: Needed to get a unified code coverage report.
  • Bitrise: The best CI & CD platform we’ve tested for mobile for now. Even when we prefer any platform we can configure using a yaml file like Travis CI. Bitrise’s emulator performance is way better in this platform than any other competitors.

For us, the key to success in our testing strategy is simple. We need to be able to replace any dependency using test doubles when required. To do this, we use the dependency injector from our UI tests, or we do it manually in our unit and integration tests 😃 If you’d like to know more about it, take a look at these blog posts and also remember to take a look at our testing training.

Our Android 2020 development stack

This is it! 👏 Nevertheless, I’m sure you are missing some libraries while ready this post 🤔 and we miss a bunch too! What about all these jetpack libraries we didn’t mention, and Google released months ago? We use them depending on the projects and the people involved in the project:

  • LiveData: When we use room, and we want to connect our UI with the database using an observable implementation, we use this library.
  • Navigation: It all depends on the developer responsible for the project. I don’t personally use it but, I’ll give it a go on my next project!
  • ViewModel: I use a custom implementation linked with the dependency injector and the lifecycle observer library. However, some of use this library.
  • WorkManager: We don’t always have to schedule tasks, but when we need to do something like this, this is the library we use.
  • CameraX: Used only when needed 📸

If you’d like to know more about these Jetpack Libraries remember we have some training about the most relevant components you can request us when needed.

Now we are over Android friends! I hope you enjoyed this 2020 libraries, frameworks, and tools review 😃 If you use a similar stack or you think there is any other library we should use,  please, let us know in the comments section! See you soon 🤘

Photos by the Google Andorid Team, the Arrow Team, the Open API Generator organization and Mindorks.

Continue ReadingOur Android 2020 development stack

Our Android 2020 development stack

Our Android 2020 development stack

One of the questions we face when talking with Android developers all around the world is related to the tools we use 🤔 The selection of libraries and frameworks used by our Android team is one of the most interesting details in our development pipeline, so we will try to answer this question in this blog post 😃

Our Android 2020 development stack

When listing the libraries we use, we need to focus on various types of tools based on different topics: static analysis utilities, build tools, networking, persistence, permissions, user interface, core components, and testing. We have a bunch of tools we’ve used for years, and we will review them one by one.

Static analysis utilities & build tools:

These tools are really helpful for us. All they help us to go faster in our daily tasks by automating tasks or any other checks we want to do in our codebase 😍

  • Ktlint: Best Kotlin linter in town.
  • Android Lint: The best safeguard for your Android apps.
  • Lin: An awesome tool used to simplify the usage of the Android Linter created by @serchinastico. Really handy when we want to create custom rules!
  • Ribbonizer: Simple but powerful tool to add a ribbon to launcher icons.
  • Play publisher: Needed to automate our release process for internal and public releases.

Networking:

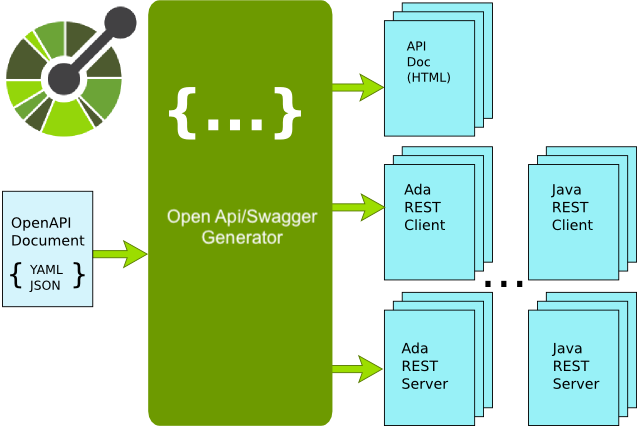
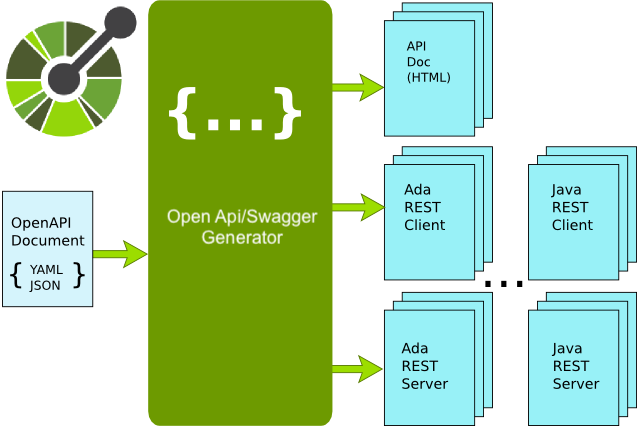
It’s been a while since we started using tools to generate our networking layer based on a Swagger or OpenAPI yaml file, so the libraries we use under the hood are not so relevant. For our latest project, we’ve used this gradle plugin to generate our API client. However, when there is no chance to generate the API client, and there is no way we can create an OpenAPI file, we use these libraries:

  • Retrofit: If you don’t know this library, you are going to love it! It generates a lot of code for you just from an interface 🤩
  • OkHTTP: The best HTTP client you are going to find. Simple, but powerful 🙂
  • Gson: We’ve been using this library for years! There are other alternatives if you want, but we have to admit we always use this one when using automatically generated code 😃
Our Android 2020 development stack

As the code generated is completely coupled to the libraries used by the generator and the models created by this tool, we always wrap it with an adapter to avoid coupling issues.

Persistence:

We all know how handy our loved shared preferences can be… However, when we need a database, we have two choices:

  • Room: Officially maintained by Google, this is one of the best choices when you need a database.
  • SQLDelight: Generates typesafe Kotlin APIs from SQL queries.

For years we used Realm, but nowadays, the tooling for SQLite is excellent now, so we moved to one of the previous alternatives.

Permissions:

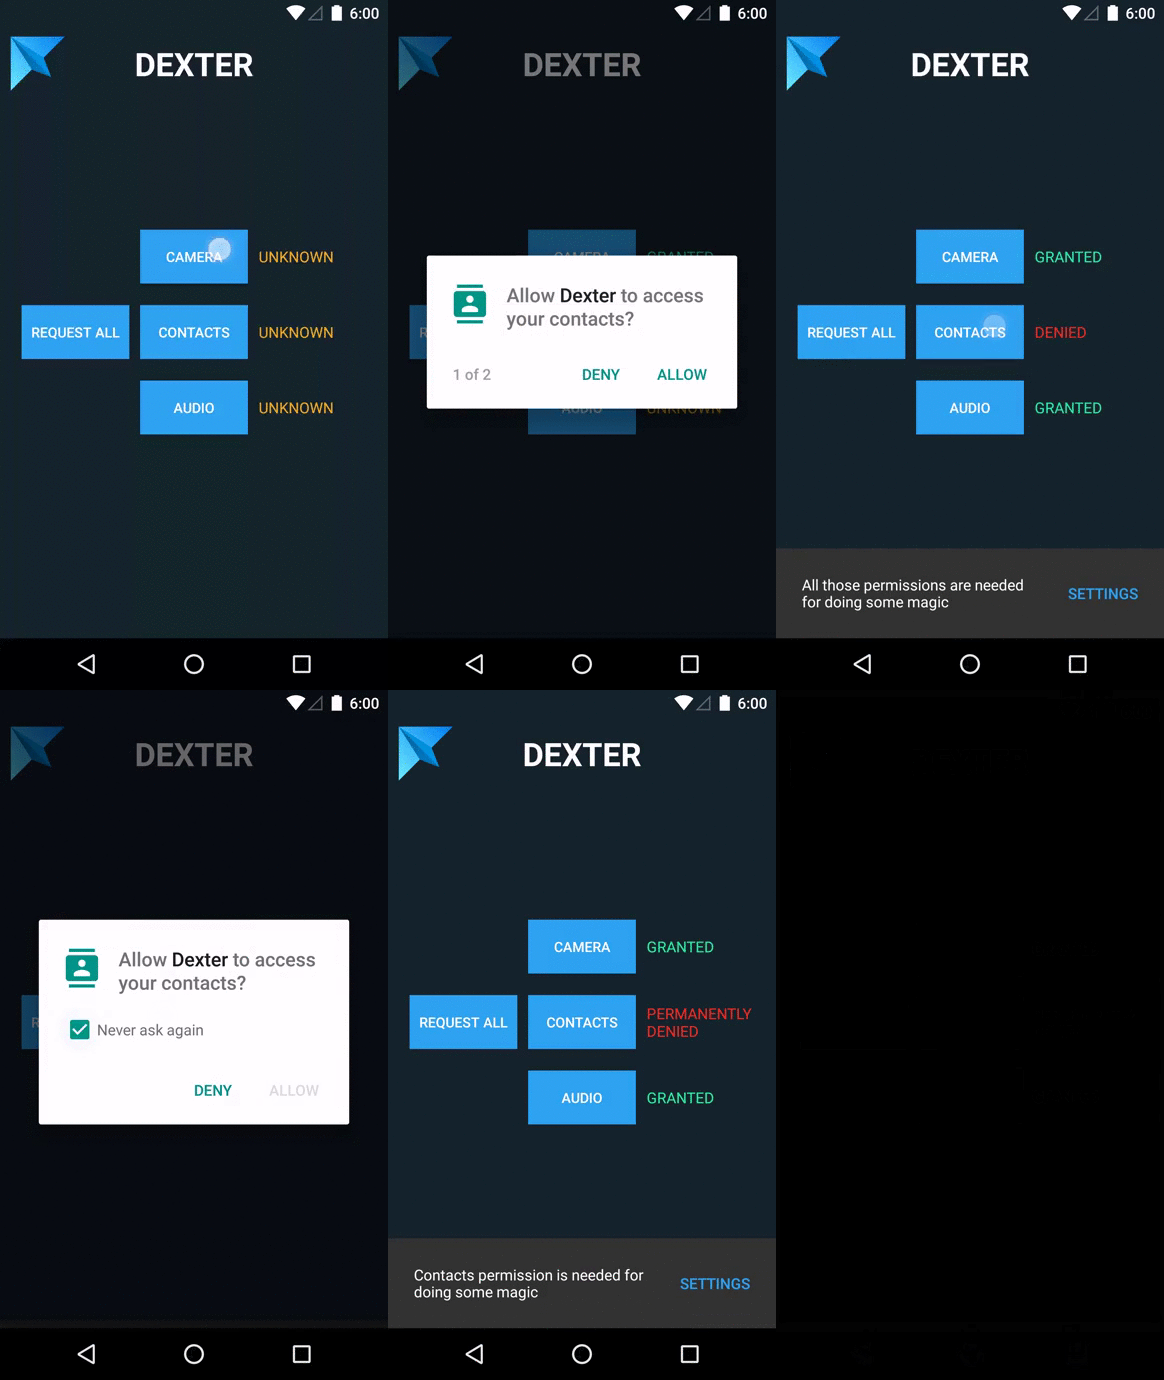
After years developing and maintaining a library to simplify the usage of permissions, we keep using Dexter! This library simplifies a lot the usage of the permissions API, letting you get the answer of a permission request in a callback instead of using the famous onActivityResult method.

Our Android 2020 development stack

User interface:

There is a bunch of libraries we use to build our applications user interface, so we are going to drop here just the most relevant ones:

  • Data Binding: The key to success when talking about the usage of MVVM four our presentation layer.
  • Lifecycle Observer: Handy when you want to listen for the events related to the component’s lifecycle without coupling the implementation to any concrete component.
  • Appcompat: Useful when we need to use components in old Android APIs.
  • ConstraintLayout: The best way to create a responsive layout.
  • Glide: Useful when you need to download and show images asynchronously.
  • Renderers: We’ve been using this library for years and is one of the best libraries to work with recycler view.
  • Calligraphy: Nice library if you want to use custom fonts and for some reason you had no idea this was supported since 2017 🙂 (Thanks random reddit user for pointing me this detail out)
  • Material Components: We try to use standard material components when possible, so this library is really helpful because there is a bunch of them already implemented.
  • Snacky: World-class library if you want to show a snackbar.
  • Lottie: Render After Effects animations natively on Android.

Core components and other useful libs:

There are always a bunch of libraries we need deep down in our architecture, and we them use in every project. Let’s talk about these:

  • Kotlin: Of course!!
  • Coroutines: Asynchronous programming with the best syntax in town.
  • Timber: A small and extensible logger.
  • Libphonenumber: When working with phone numbers in international formats, this library is the best option.
  • OneSignal: One of the best push notifications provider. Depending on the projects, we use the native support, but when possible we use OneSignal.
  • Kodein: For the last projects, we’ve used this dependency injector. However, we recommend you to choose your dependency injector based on your needs!
  • ThreeTenABP: Do you have to work with different regions for your dates? Take a look at this JSR-310 backport for Android.
  • Crashlytics: We’ve used this crash reporter for years, and we never regret.
  • Arrow: We tend to use more and more functional programming concepts in our software design, and we have to admit lenses, the core component, and the effects API are in all our Android projects.
  • Leakcanary: The best memory leak detection library.
Our Android 2020 development stack

Testing:

Prepare your speed face! This is going to be intense:

  • JUnit: Classic test runner.
  • Shot: Handy screenshot testing library.
  • Kotlin Snapshot: If you are looking for snapshot testing, this is your kotlin lib!
  • Kotlin Test: Because sometimes we need to use property based testing and this framework provides an awesome support.
  • Mockito: If you write unit tests, you’ll need a mocking library.
  • MockWebServer: Really handy when we want to write tests to ensure our API client is implemented properly.
  • Robolectric: Needed to run our instrumentation tests as fast as possible.
  • Espresso: Needed to be able to interact with the user interface in our UI tests!
  • Barista: Espresso’s best friend.
  • Jacoco: Needed to get a unified code coverage report.
  • Bitrise: The best CI & CD platform we’ve tested for mobile for now. Even when we prefer any platform we can configure using a yaml file like Travis CI. Bitrise’s emulator performance is way better in this platform than any other competitors.

For us, the key to success in our testing strategy is simple. We need to be able to replace any dependency using test doubles when required. To do this, we use the dependency injector from our UI tests, or we do it manually in our unit and integration tests 😃 If you’d like to know more about it, take a look at these blog posts and also remember to take a look at our testing training.

Our Android 2020 development stack

This is it! 👏 Nevertheless, I’m sure you are missing some libraries while ready this post 🤔 and we miss a bunch too! What about all these jetpack libraries we didn’t mention, and Google released months ago? We use them depending on the projects and the people involved in the project:

  • LiveData: When we use room, and we want to connect our UI with the database using an observable implementation, we use this library.
  • Navigation: It all depends on the developer responsible for the project. I don’t personally use it but, I’ll give it a go on my next project!
  • ViewModel: I use a custom implementation linked with the dependency injector and the lifecycle observer library. However, some of use this library.
  • WorkManager: We don’t always have to schedule tasks, but when we need to do something like this, this is the library we use.
  • CameraX: Used only when needed 📸

If you’d like to know more about these Jetpack Libraries remember we have some training about the most relevant components you can request us when needed.

Now we are over Android friends! I hope you enjoyed this 2020 libraries, frameworks, and tools review 😃 If you use a similar stack or you think there is any other library we should use,  please, let us know in the comments section! See you soon 🤘

Photos by the Google Andorid Team, the Arrow Team, the Open API Generator organization and Mindorks.

Continue ReadingOur Android 2020 development stack

Interface Builder Is Dead Long Live SwiftUI

But nothing happened! Why? Did I have done something wrong? Let’s debug it. So the code is valid, the debugger is telling me that I increment the variable.

Basically, I have to notify the view that the framework needs to call the body again. Does this mean that the framework will rebuild the UI every time I click the button? Probably not, one thing it’s the definition of your UI, and another is how the UIKit interprets and optimize your definition to render the changes.

How to update a Declarative UI?

@State is a wrapper around an Int that every time the value changes it notify the Host(the UIKit interpreter), and the framework will call body again to see if something changes it will interpret the new description and will draw the changes. That’s a bit different from what we are used to, instead of having instances of the elements and changing the value, we provide a description and tell the framework when it changed. That includes notifying when you want to toggle a button, change the content of a Textfield, or present an ActionSheet instead by calling a function and changing the state of UI elements in UIKit.

With this in mind, let’s see what the other benefits are. There is a live preview initialized by code if you are in macOS Catalina, the good thing is that you can simulate the various state of your App by passing the parameters that you want. So you can preview directly in XCode the multiple states of your App. No need anymore to fake navigation or go through your App, and you can set the views in any state in the preview. Now it’s not perfect, it needs to build the App, and in the Beta, it takes time to render or reload the UI, but still less than rebuilding the App and going through the different flows.

I recommend you to check out “Building Custom Views with SwiftUI” from WWDC2019 at least up to minute 23. It will help you understand how the layout is rendered and what sizes as each view and which position it will have. You will also use “.layoutPriority()” that seems more intuitive than the nightmare that content hugging and content compression resistance priorities are in UIKit.

What are the bad parts of SwiftUI?

View class is clutter with hundreds of methods and modifiers, that gives flexibility on building the framework but really a downside for discoverability. Even with compatibility with UIKit, that means you can use SwiftUI inside UIKit ViewControllers or the other way around, UIViews inside SwiftUI Components. This SDK will only be distributed starting with iOS 13, and it’s not backward compatible, so that means, you need to target update or new release of your App, past September 2020 to cover most of the ios 13 users as recommended by Apple. Today, you can’t do everything in SwiftUI, it’s not really important, it’s good enough, the bases are here to stay, and it will give Apple time to mature the API and the tools. Maybe it will never replace UIKit, and we will have to learn how to live with both.

To sum up, I feel that SwiftUI will allow iOS dev to produce better UI by being straightforward to “test” and verify the implementation. Is it ready yet for developers to start to learn? No, the API it’s still changing, and it’s a good thing, that’s what Beta is for. When will it be ready for prime time? If Apple keep is consistency, around XCode 11.2 or 11.3.

In the meanwhile you can check our example App, EndZone in github.

Continue ReadingInterface Builder Is Dead Long Live SwiftUI

End of content

No more pages to load