Kotlin Multiplatform at HMRC

Hello, my name is George Herbert and I am a lead developer currently working as part of the HMRC Mobile App team. HMRC is the UK’s tax, payments, and customs authority. The app helps users to access their Help to Save accounts, manage their tax credits, and review their personal tax situation among other features. The team comprises iOS, Android, and backend developers. We encourage all developers to try other disciplines within the team, which gives us a reasonable level of cross-skilling. My role within the team is being the lead developer of the backend microservices.

About the HMRC App

The HMRC app has been in existence since 2012 and started off as a simple tax calculator. During 2016 the team undertook a rebuild by refining existing functionality, as well as adding the ability for users to login and manage their personal tax affairs, such as their Help to Save account or their tax credits. This means they do not have to ring HMRC or fill in any forms. Currently, we have half a million users a month, with users returning on average 7 times a month. The app is aimed at personal tax users and, when compared to the equivalent web services, it accounts for 50% of total traffic in the personal tax space. One of the app’s most popular and long-standing features is the tax calculator. The calculation logic for this is shared with the web. The web and the mobile calculator combine for 5.7 million visits a year of which the mobile accounts for 2 million of those.

From a Kotlin perspective, the Android team has been working gradually to migrate the app. At the time of writing, 86% of the app is now written in Kotlin

Use of Kotlin Multiplatform

Around 18 months ago my Tech Lead called a meeting to discuss the use of Kotlin Multiplatform (KMP), among other technologies, to help simplify and consolidate business logic within the apps and service. It was agreed that the HMRC Mobile App team, in partnership with Capgemini, would investigate this open-source product as a possibility within the app by starting simple and then going from there.

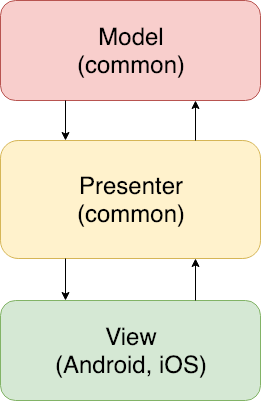
We wanted the user interface (UI) to be native as this was already built. We also felt building a core for business logic that could be shared, regardless of the choice of UI, would allow us to share this with the web more easily.

As mentioned, one of the main features in the app is the ability to calculate an estimate of your tax and take-home pay based on your salary, payment frequency and tax code. Updating the calculator every year required days of manual testing to ensure that everything worked as expected and had to be done for every platform! We identified this as an area that really needed an overhaul, to help with maintainability adding new tax bands each new tax year and reduce testing effort. The challenge was anything new still needed to support iOS, Android & web.

Screenshot of the HMRC app showing the resulting graph for take home salary and income tax for both Apple and Android
Results screen of the tax calculator within the HMRC App for iOS and Android

I am not an Android developer or even a Kotlin developer, my background is a Scala developer. I was keen to learn Kotlin and this seemed like a good opportunity. Within a couple of weeks, the tax-kalculator (see what we did there) was born: a Kotlin multiplatform library, with coverage of 98% and ready for use in the Android and iOS, and even the web version of the tax calculator. Adding new tax years now takes less than an hour and very minimal manual testing, thus saving us days of effort and time.

Over time, we have started to add other multiplatform aspects to the app such as a Help to Save calculator that will help forecast the amount of money you can save as part of the scheme. Going forward we are looking into more sophisticated uses for KMP that would help reduce duplication and improve the user experience across the platforms.

Getting to grips with KMP

As we began using KMP there were a few challenges we worked through as a team. The first was around setting the Gradle to support the platforms, as every example we looked at was slightly different and we were using Gradle.kts which was even more sparse when looking at an example. The issues around limited documentation, or outdated examples, is becomes less of a challenge as the popularity of KMP increases. Furthermore, as part of 1.4.0 the Gradle config has been simplified with the hierarchical project structure making this much easier and straight forward.

Man looking around for people in empty room
The struggle when looking for KMP examples, especially for gradle.kts

We faced a challenge with getting the framework for iOS in a state that could be consumed in our app without directly linking them in the Xcode build. One of the team’s iOS developers found a shell script that we added to our CI, that creates this and exports it to our GitHub. An example of this shell is on the repository for the project called package-ios.sh.

Finally, the iOS team faced the challenge of using multiple KMP projects in the same iOS app. This since been resolved in a newer version of KMP. As for the latter we temporarily (until the fix for this was added in 1.3.70) put all the KMP projects in one “super” library that contained all or KMP functionality just for iOS.

Summary

My advice is that if you want to try out KMP start small. For example, just write some business logic which is pure Kotlin and does not need platform-specific implementations, all the code should be in the commonMain. This makes the initial getting to grips with KMP simple as you don’t need to work with the actual and expects keywords. Once you are happy with the projects and their structures etc and they are working in your respective apps look to spread your wings into more challenging KMP (like consolidating your network logic and error handling for example).

I hope this has been interesting. If you have any questions about using KMP or either of our projects that are linked below, please feel free to message me on Twitter (@georgeherby).

Useful Links

HMRC KMP Libraries

Tax Kalculator

hmrc/tax-kalculator

Help to Save Kalculator

hmrc/help-to-save-kalculator

HMRC App

Play Store

HMRC – Apps on Google Play

App Store

‎HMRC

Something extra whilst your are here…

Recently the HMRC App team has open sourced its UI components for Android and iOS allowing anyone to build accessible apps with the same look and feel as the GOV.UK Design System.

Android Components

hmrc/android-components

iOS Components

hmrc/ios-components


Kotlin Multiplatform at HMRC was originally published in Kt. Academy on Medium, where people are continuing the conversation by highlighting and responding to this story.

Continue ReadingKotlin Multiplatform at HMRC

Why you should be using OpenAPI right now?

Why you should be using OpenAPI right now?

Why you should be using OpenAPI right now?

In Karumi, we are always looking for technologies and tools that help us and help our clients to produce, evolve, and maintain their products with the highest quality and robustness in mind. Most of the time, we have to develop some mobile clients that will consume an already established backend API; or develop both the backend services and the clients using them.

One tool that has been hanging in our belt for the last couple of years is OpenAPI, previously known as Swagger and we are more than pleased with it, so now, it’s my turn to convince you about why you should be using it if you work at any side of an API.

This first blog post is the beginning of a series that will guide you in defining, offering, and consuming an API built from scratch.

What’s OpenAPI?

OpenAPI is a specification that defines a standard that can be used to describe RESTful APIs in an agnostic language manner that helps programmers to understand and modify it.

Based on that specification, several tools will help you to automatically generate the code that exposes that service, the code consuming it, and even the documentation about it.

Why should I use OpenAPI?

Automatization.

The feature that got our attention to invest time in OpenAPI was the ability to generate the API clients automatically, so we don’t have to bother anymore about model changes and parsing issues for an updated response. Instead of that, once the specification is modified, we run our client generator, and our project is ready to be using the latest changes offered.
You may end up changing some parts of your code to adopt that new client changes, but that’s something you would have to do anyway.

If your API client is generated automatically out of your project, it can be integrated, handled, and consumed like any other third party dependency. Besides that, it avoids all the usual boilerplate you have to program in every project.

OpenAPI can generate the code for most of the programming languages out there, so once you’ve defined the API, you can build in a matter of seconds the client for iOS and Android, to name some platforms.

Single point of truth.

Once you describe your API (that means endpoints, objects, path, etc.) using one single file, you could convert that description into a specific implementation; it does not matter if it’s server-side or client-side. That code will be a product of that description, once you change it there, all the “artifacts” produced out of that file could be regenerate to be used.

That avoids API integration failures like errors parsing invalid responses due to a misalignment between the back-end-offered API and the client-consumed API.

Definition first.

Suppose you decide to go all the way down with OpenAPI and produce the API integration automatically for both the backend and the clients; you will be forced to define your API before implementing anything about it, in any of the sides of it, obtaining a 100% framework biases-free API.

What does it mean? It means that the API definition will be the product of a well-thought process instead of just returning the models the backend already have around. This will force both sides to adapt themselves to work with the API being defined; this approach will put in a 50/50 relationship the client/server weight to describe how they communicate.

Another benefit of having the API definition first is that you can implement both sides without interacting with each other. As you know, there is a contract that is being respected at both sides of the API. If you are implementing a mobile client, you can even develop your tests using HTTP stubs to respond with responses that will be the same as the server will respond.

100% Human readable with the documentation always up-to-date.

The OpenAPI definition file can be described in JSON or YAML, being both quite easy to read as a human and easy to modify if required. This is quite important. It’s way easier to discuss how to make some changes over an easy-to-read document than discuss those changes over a specific programming language or framework.

There is something worse than having no documentation, and that is having out-of-date documentation. As a side-effect of the single point of truth, if you whole API specification is kept in just one format, and several tools can automatically process it, and one of that tools is the documentation generator, so your API documentation (even if it is just for internal usage) won’t be outdated ever again.

Industry standard.

OpenAPI is the current defacto industry standard for API definition, so offering your API using this specification guarantees that any other company will be able to use your services out-of-the-box without any extra setup. That could seem uninteresting for a lot of companies that create their API to be closed, but this technology does not force you to open anything, it will help you to have your API specified using a well-known tool so it can be published if required.

Open-Closed principle down to the roots.

What if I need a specific implementation for my client/server, and it’s not present in the current languages? No problem at all, you can define your own template.
OpenAPI under the hood will use a templating-engine to transform any custom template into some source code. This isn’t as easy as invoking it for Kotlin or Scala, but you can create your generation without substantial modification in the generator.

What’s next?

In the next blog post, we will define a basic API to show how this technology work, and we will generate the API interface for a Spring Boot server and an iOS client that will consume it.

Photo by Neven Krcmarek on Unsplash

Continue ReadingWhy you should be using OpenAPI right now?

iOS UI development, ludicrously fast.

iOS UI development, ludicrously fast.

One of the biggest complaints you can find between iOS developers is that sometimes, the feedback loop you have when you are doing some fine-tuning of the UI is long. It produces a new Swift compilation, creates a new binary, then the app gets deployed to the simulator, once that’s done, the system will start the app, and then you will be able to navigate to the right screen to check if those small changes are ok.

Sounds familiar?

Meanwhile, you can see your colleges developing websites or React Native apps that they get feedback almost immediately, and they can even modify the UI with a designer in “real-time.”

Feel any envy yet?

What if I tell you that in iOS, we can achieve something similar to that with almost no effort? Would you believe me?

In Karumi, we’ve been playing a bit with a tool that will help us to hot-swap our code so we can shrink our feedback loop duration to just a couple of seconds.

Injection III to the rescue.

This tool created by John Holdsworth will be the one doing all the magic under the hood; it will be checking which files are being changed, compile them, and dynamically insert that code in your running app. Let’s create a tiny example so we can test how this works.

First, we need to install this app from the AppStore and run it.

HotSwapp.

So, let’s create a brand new iOS project, a “Single View App” with Swift and Storyboards, nothing fancy.

Although Injection III has no issues with Storyboards and xibs, I do ( 😬 ), so let’s get rid of the main storyboard and modify our ViewController to contain a label center on the screen.

Now it’s time to setup Injection III to be able to edit our label in real-time.

First, we have to load a bundle into our app that will help us with the method swizzling. In our AppDelegate we will add the following lines:

func application(_ application: UIApplication,
                     didFinishLaunchingWithOptions launchOptions: [UIApplication.LaunchOptionsKey: Any]?) -> Bool {
         ...
    #if DEBUG
        Bundle(path: "/Applications/InjectionIII.app/Contents/Resources/iOSInjection.bundle")?.load()
     #endif
        ...
    return true
}

then, once the Injection III app is running, we have to open our project in it so it can track any changes in our files.

Re-run your app, and you should see something like:

💉 Injection connected 👍
💉 Watching /Users/Fran/Development/HotSwapp/**

That means that your app is ready to handle code injection at runtime, let’s give it a go. Without stopping the app, change the label text color and save it.

Your Xcode output will display something like:

💉 *** Compiling /Users/Fran/Development/HotSwapp/HotSwapp/ViewController.swift ***
💉 Loading .dylib ...
objc[7606]: Class _TtC8HotSwapp14ViewController is implemented in both /Users/Fran/Library/Developer/CoreSimulator/Devices/5625C398-4862-4C4E-A5AF-E51A78D1113F/data/Containers/Bundle/Application/BDCBDDA4-A09B-4D72-8048-C24FF1193279/HotSwapp.app/HotSwapp (0x101d72a10) and /Users/Fran/Library/Containers/com.johnholdsworth.InjectionIII/Data/eval101.dylib (0x104b19278). One of the two will be used. Which one is undefined.
💉 Loaded .dylib - Ignore any duplicate class warning ^
💉 Injected 'ViewController'

But your app label keeps having the same color, what’s going on?

Your app has a new code, but you have to respond to that change. Create a new file, called it UIViewController+HotSwap.swift and add this content:

import UIKit

#if DEBUG
    extension UIViewController {
        @objc func injected() {
            for subview in view.subviews {
                subview.removeFromSuperview()
            }
            if let sublayers = self.view.layer.sublayers {
                for sublayer in sublayers {
                    sublayer.removeFromSuperlayer()
                }
            }

            viewDidLoad()
        }
    }
#endif

What this method is doing is removing all views and layers from your view controller and will invoke the viewDidLoad method again. Stop your app, and rerun it, now it will show the new color.

Now, change the label color and save it.

🎉🎉🎉

Without stopping it, replace one of the constraints to adjust the label to the left border. Once you save it, in one second, the UI will be reflecting that change.

Now imagine that instead of this app, how this could improve your development speed in some scenarios with a big app, with thousands of lines of code with a lot of third parties dependencies.

iOS UI development, ludicrously fast.

Our experience so far.

After using this for a few weeks, we would like to share with you what we’ve learned about this so you can get up to speed without making the same mistakes we did.

  • Check the documentation from the project.
  • This does not work well when there are new methods or properties; in those cases, rebuild the whole app. What we do is define upfront the methods we are going to need, and then we fill them with the logic.
  • Do not create your views outside the viewDidLoad method; otherwise after the first run, the UI could end up in an invalid state. Keep this in mind, viewDidLoad should init every view and their constraints.
  • You cannot use this on a real device.
  • Code swapping does not get along code coverage, so we recommend you to keep a different scheme for the usage of Injection III while you are fine-tuning your UI.

References

Photo by Jean Gerber on Unsplash

Continue ReadingiOS UI development, ludicrously fast.

iOS UI development, ludicrously fast.

iOS UI development, ludicrously fast.

One of the biggest complaints you can find between iOS developers is that sometimes, the feedback loop you have when you are doing some fine-tuning of the UI is long. It produces a new Swift compilation, creates a new binary, then the app gets deployed to the simulator, once that’s done, the system will start the app, and then you will be able to navigate to the right screen to check if those small changes are ok.

Sounds familiar?

Meanwhile, you can see your colleges developing websites or React Native apps that they get feedback almost immediately, and they can even modify the UI with a designer in “real-time.”

Feel any envy yet?

What if I tell you that in iOS, we can achieve something similar to that with almost no effort? Would you believe me?

In Karumi, we’ve been playing a bit with a tool that will help us to hot-swap our code so we can shrink our feedback loop duration to just a couple of seconds.

Injection III to the rescue.

This tool created by John Holdsworth will be the one doing all the magic under the hood; it will be checking which files are being changed, compile them, and dynamically insert that code in your running app. Let’s create a tiny example so we can test how this works.

First, we need to install this app from the AppStore and run it.

HotSwapp.

So, let’s create a brand new iOS project, a “Single View App” with Swift and Storyboards, nothing fancy.

Although Injection III has no issues with Storyboards and xibs, I do ( 😬 ), so let’s get rid of the main storyboard and modify our ViewController to contain a label center on the screen.

Now it’s time to setup Injection III to be able to edit our label in real-time.

First, we have to load a bundle into our app that will help us with the method swizzling. In our AppDelegate we will add the following lines:

func application(_ application: UIApplication,
                     didFinishLaunchingWithOptions launchOptions: [UIApplication.LaunchOptionsKey: Any]?) -> Bool {
         ...
    #if DEBUG
        Bundle(path: "/Applications/InjectionIII.app/Contents/Resources/iOSInjection.bundle")?.load()
     #endif
        ...
    return true
}

then, once the Injection III app is running, we have to open our project in it so it can track any changes in our files.

Re-run your app, and you should see something like:

💉 Injection connected 👍
💉 Watching /Users/Fran/Development/HotSwapp/**

That means that your app is ready to handle code injection at runtime, let’s give it a go. Without stopping the app, change the label text color and save it.

Your Xcode output will display something like:

💉 *** Compiling /Users/Fran/Development/HotSwapp/HotSwapp/ViewController.swift ***
💉 Loading .dylib ...
objc[7606]: Class _TtC8HotSwapp14ViewController is implemented in both /Users/Fran/Library/Developer/CoreSimulator/Devices/5625C398-4862-4C4E-A5AF-E51A78D1113F/data/Containers/Bundle/Application/BDCBDDA4-A09B-4D72-8048-C24FF1193279/HotSwapp.app/HotSwapp (0x101d72a10) and /Users/Fran/Library/Containers/com.johnholdsworth.InjectionIII/Data/eval101.dylib (0x104b19278). One of the two will be used. Which one is undefined.
💉 Loaded .dylib - Ignore any duplicate class warning ^
💉 Injected 'ViewController'

But your app label keeps having the same color, what’s going on?

Your app has a new code, but you have to respond to that change. Create a new file, called it UIViewController+HotSwap.swift and add this content:

import UIKit

#if DEBUG
    extension UIViewController {
        @objc func injected() {
            for subview in view.subviews {
                subview.removeFromSuperview()
            }
            if let sublayers = self.view.layer.sublayers {
                for sublayer in sublayers {
                    sublayer.removeFromSuperlayer()
                }
            }

            viewDidLoad()
        }
    }
#endif

What this method is doing is removing all views and layers from your view controller and will invoke the viewDidLoad method again. Stop your app, and rerun it, now it will show the new color.

Now, change the label color and save it.

🎉🎉🎉

Without stopping it, replace one of the constraints to adjust the label to the left border. Once you save it, in one second, the UI will be reflecting that change.

Now imagine that instead of this app, how this could improve your development speed in some scenarios with a big app, with thousands of lines of code with a lot of third parties dependencies.

iOS UI development, ludicrously fast.

Our experience so far.

After using this for a few weeks, we would like to share with you what we’ve learned about this so you can get up to speed without making the same mistakes we did.

  • Check the documentation from the project.
  • This does not work well when there are new methods or properties; in those cases, rebuild the whole app. What we do is define upfront the methods we are going to need, and then we fill them with the logic.
  • Do not create your views outside the viewDidLoad method; otherwise after the first run, the UI could end up in an invalid state. Keep this in mind, viewDidLoad should init every view and their constraints.
  • You cannot use this on a real device.
  • Code swapping does not get along code coverage, so we recommend you to keep a different scheme for the usage of Injection III while you are fine-tuning your UI.

References

Photo by Jean Gerber on Unsplash

Continue ReadingiOS UI development, ludicrously fast.

Shared Library in Kotlin Multiplatform

Shared Library in Kotlin Multiplatform

Here is the second post from our series about Kotlin Multiplatform focused on mobile app development. Check out the first steps into Kotlin Multiplatform, we always want to share with you our experience in development and we hope this kind of series will help you to build your first Multiplatform application in Kotlin.

The purpose of this post is to show you how to integrate your common module into two different mobile platforms. We will also review the problems and solutions we found while using this development approach. From the UI layer to automated testing, or some troubles we found while coding.

If you want to read more about this Architecture, you can read GUI Architecture by Martin Fowler.

Shared Library goals

Sharing code between platforms by using the same library can be a formidable but we first need to have clear our goals:

  • To share as much code as possible, that is, to avoid re-implementing the same things for every platform we want to support.
  • To have the ability to provide the dependencies once for every platform without needing to build the dependencies twice.
  • We don’t want to solve dependency inversion using different dependency injectors or providers for each platform. Ideally, we want only one dependency injector.
  • To be able to replace dependencies in tests.
  • Write tests as we are used to: UI testing, integration testing, etc…

Implementing the UI layer

Now, when we thought about which architecture should we use for our task, we had it clear: for our first attempt we’d use Model View Presenter.

Shared Library in Kotlin Multiplatform
Image from Jt Liew in his post MVP Kotlin Multiplatform

MVP was created to improve the way UI tests are written. The creators of the pattern needed to write automated tests for the UI layer without any real GUI involved as the subject under test. That’s why they decided to move all the presentation logic to the classes named “presenters”.

Applying this pattern, and moving the UI behavior inside our shared library, will help us a lot to achieve our goal. All the code related to the UI rendering (but the actual drawing part, coupled to the native platforms) will be moved to our shared library. This will help us define a public view contract every platform will have to implement. Therefore, we will simplify every platform implementation because we will have to only think about how the UI will show the already defined behavior.

Platform-specific infrastructure

The first problems you will face will be related to the infrastructure code. You will want to request information from any data source, like network or a local database. Perhaps, you just want to print some logs that you will need to see in both, Android and iOS. For this kind of problems, we need to declare expected features we want to implement in every platform. At the same time, platform-specific code will declare its actual implementation of those expected features. These keywords are very well explained in the official documentation.

Luckily, we won’t have to write this code twice. Most of the things we will require are already done in libraries that implement the solution in the multiple platforms Kotlin Native support.

Here is a set of libraries that have support for kotlin multiplatform:

Real life

Multiplatform projects are an experimental feature in Kotlin 1.2 and 1.3. All of the language and tooling features described in this document are subject to change in future Kotlin versions.

We want you to know we had problems with 1.3.30 Kotlin versions. These are some of the issues we found while creating a shared library with Kotlin Multiplatform.

  • Native tests worked but it would randomly skip some tests.
  • Our shared library wasn’t refreshed sometimes after updating its code. This made us thought we couldn’t rely on the iOS code we were running.
  • Compile time is a problem. The average compile time now is about 5 minutes.

Another example of the issues we found is related to the Kotlin version upgrade. We found that, once Kotlin 1.3.40 was released, and after updating our project to use it, the app stopped compiling. One of the key problems with this is that if you have many dependencies like we did they may have not updated to the very last version of Kotlin, and therefore, when you do, there might be inconsistencies until they decide to support it. Besides, remember to always upgrade the gradle wrapper.

Dealing with iOS and XCode

You will most probably find a lot of issues when working with iOS. If you find yourself being able to make your Android app but not yours iOS one, here are some tips we got from first-hand experience.

Using static objects or fields will use the frozen modifier in iOS. That means they will be immutable. If you have some mutable variable in a static context, then you won’t be able to replace it in runtime, otherwise you’ll get an `InvalidMutabilityException` exception. You can read how mutability works in Kotlin Native in this document, and see an example of how we use it to replace dependency implementations at runtime in the Karumi KotlinMultiplatformApp Github repository.

As we have mentioned before we use the library Ktor client for HTTP requests and they have some old issues that are still present like issue #1165: Ktor client cannot catch offline exceptions and issue #887: InvalidMutabilityException on HttpRequestPipeline when your HttpClient object is on a static context and you try to make a POST/PUT request. You will find nasty crashes while your Android app will work perfectly.

Automated testing

Last but not least, we wanted to know if the current testing stack could be used like we are used to in any other Android or iOS project. Here are some thoughts about the testing strategy for any Mobile Multiplatform app.

As we knew, we can’t really make sure our iOS code works even though it does in Android. That’s why we wanted to do integration testing in every platform and make sure we are not breaking things. For that we had to go as deep as possible on our stack.

We needed a service locator to provide us dependencies, and more importantly, to replace instances in tests. We haven’t found any Multiplatform project meeting these requirements yet. If you know of any, please drop a comment.

The following snippet is an example of how to handle Mutability in our service locator using AtomicReference. InjectionModule is the place where we save our dependencies to be replaced using Swift and Kotlin. You can see the complete code in our github repository.

object GalleryInjector {
  private val galleryInjector = AtomicReference<InjectionModule?>(null)
  private val defaultInjector = InjectionModule()

  operator fun invoke(): InjectionModule =
    galleryInjector.value ?: defaultInjector

  fun config(injector: InjectionModule) {
    galleryInjector.value = injector.freeze()
  }
}

The problem here is we need to use mockito or mockk and we can’t use it in Swift. That’s why we have to create some stubs manually in Kotlin in order to use them in iOS tests.

Here is how we replace them in Android Tests.

val apiClient = mock<PhotosApiClient> {
      onBlocking { getPhotos() } doThrow NullPointerException()
    }

GalleryInjector.config(PhotoListStub(apiClient))

And here is how we replace them in iOS.

let injectionModule = TestModule(apiClient: PhotoApiClientStub(photos: photos, withErrors: false))
        GalleryInjector().config(injector: injectionModule)       

We decided not to write native tests for presenters and that was only because we didn’t know we could create unit tests, translate them to Swift and run them in a native environment. That’d save us a lot of duplicated tests.

Final thoughts

Kotlin Multiplatform is an awesome solution to create a common library for our projects. This approach unlocks an interesting feature, to create rich models and share most of the app behavior between platforms. Based on this solution we can minimize the amount of code we need to create our apps.

There is an interesting detail about the compiler you should keep in mind when you find yourself having problems with iOS builds. You can see the generated Swift code to try to understand what is wrong with your Kotlin native code, or at least, how the generated code works.

Remember, Kotlin Multiplatform is experimental for now and it has a lot of bugs. It is not production ready, but it brings a new world when talking about how to share code between different platforms.

You can see the full source code used on this blog post on Github, you can see how to build the complete stack including integration tests to your project.

We will keep working on the project, talking about databases, network requests, and automated testing… If you want to know more about Kotlin Multiplatform, just drop a comment below with the topics you are more interested in!

Continue ReadingShared Library in Kotlin Multiplatform

Shared Library in Kotlin Multiplatform

Shared Library in Kotlin Multiplatform

Here is the second post from our series about Kotlin Multiplatform focused on mobile app development. Check out the first steps into Kotlin Multiplatform, we always want to share with you our experience in development and we hope this kind of series will help you to build your first Multiplatform application in Kotlin.

The purpose of this post is to show you how to integrate your common module into two different mobile platforms. We will also review the problems and solutions we found while using this development approach. From the UI layer to automated testing, or some troubles we found while coding.

If you want to read more about this Architecture, you can read GUI Architecture by Martin Fowler.

Shared Library goals

Sharing code between platforms by using the same library can be a formidable but we first need to have clear our goals:

  • To share as much code as possible, that is, to avoid re-implementing the same things for every platform we want to support.
  • To have the ability to provide the dependencies once for every platform without needing to build the dependencies twice.
  • We don’t want to solve dependency inversion using different dependency injectors or providers for each platform. Ideally, we want only one dependency injector.
  • To be able to replace dependencies in tests.
  • Write tests as we are used to: UI testing, integration testing, etc…

Implementing the UI layer

Now, when we thought about which architecture should we use for our task, we had it clear: for our first attempt we’d use Model View Presenter.

Shared Library in Kotlin Multiplatform
Image from Jt Liew in his post MVP Kotlin Multiplatform

MVP was created to improve the way UI tests are written. The creators of the pattern needed to write automated tests for the UI layer without any real GUI involved as the subject under test. That’s why they decided to move all the presentation logic to the classes named “presenters”.

Applying this pattern, and moving the UI behavior inside our shared library, will help us a lot to achieve our goal. All the code related to the UI rendering (but the actual drawing part, coupled to the native platforms) will be moved to our shared library. This will help us define a public view contract every platform will have to implement. Therefore, we will simplify every platform implementation because we will have to only think about how the UI will show the already defined behavior.

Platform-specific infrastructure

The first problems you will face will be related to the infrastructure code. You will want to request information from any data source, like network or a local database. Perhaps, you just want to print some logs that you will need to see in both, Android and iOS. For this kind of problems, we need to declare expected features we want to implement in every platform. At the same time, platform-specific code will declare its actual implementation of those expected features. These keywords are very well explained in the official documentation.

Luckily, we won’t have to write this code twice. Most of the things we will require are already done in libraries that implement the solution in the multiple platforms Kotlin Native support.

Here is a set of libraries that have support for kotlin multiplatform:

Real life

Multiplatform projects are an experimental feature in Kotlin 1.2 and 1.3. All of the language and tooling features described in this document are subject to change in future Kotlin versions.

We want you to know we had problems with 1.3.30 Kotlin versions. These are some of the issues we found while creating a shared library with Kotlin Multiplatform.

  • Native tests worked but it would randomly skip some tests.
  • Our shared library wasn’t refreshed sometimes after updating its code. This made us thought we couldn’t rely on the iOS code we were running.
  • Compile time is a problem. The average compile time now is about 5 minutes.

Another example of the issues we found is related to the Kotlin version upgrade. We found that, once Kotlin 1.3.40 was released, and after updating our project to use it, the app stopped compiling. One of the key problems with this is that if you have many dependencies like we did they may have not updated to the very last version of Kotlin, and therefore, when you do, there might be inconsistencies until they decide to support it. Besides, remember to always upgrade the gradle wrapper.

Dealing with iOS and XCode

You will most probably find a lot of issues when working with iOS. If you find yourself being able to make your Android app but not yours iOS one, here are some tips we got from first-hand experience.

Using static objects or fields will use the frozen modifier in iOS. That means they will be immutable. If you have some mutable variable in a static context, then you won’t be able to replace it in runtime, otherwise you’ll get an `InvalidMutabilityException` exception. You can read how mutability works in Kotlin Native in this document, and see an example of how we use it to replace dependency implementations at runtime in the Karumi KotlinMultiplatformApp Github repository.

As we have mentioned before we use the library Ktor client for HTTP requests and they have some old issues that are still present like issue #1165: Ktor client cannot catch offline exceptions and issue #887: InvalidMutabilityException on HttpRequestPipeline when your HttpClient object is on a static context and you try to make a POST/PUT request. You will find nasty crashes while your Android app will work perfectly.

Automated testing

Last but not least, we wanted to know if the current testing stack could be used like we are used to in any other Android or iOS project. Here are some thoughts about the testing strategy for any Mobile Multiplatform app.

As we knew, we can’t really make sure our iOS code works even though it does in Android. That’s why we wanted to do integration testing in every platform and make sure we are not breaking things. For that we had to go as deep as possible on our stack.

We needed a service locator to provide us dependencies, and more importantly, to replace instances in tests. We haven’t found any Multiplatform project meeting these requirements yet. If you know of any, please drop a comment.

The following snippet is an example of how to handle Mutability in our service locator using AtomicReference. InjectionModule is the place where we save our dependencies to be replaced using Swift and Kotlin. You can see the complete code in our github repository.

object GalleryInjector {
  private val galleryInjector = AtomicReference<InjectionModule?>(null)
  private val defaultInjector = InjectionModule()

  operator fun invoke(): InjectionModule =
    galleryInjector.value ?: defaultInjector

  fun config(injector: InjectionModule) {
    galleryInjector.value = injector.freeze()
  }
}

The problem here is we need to use mockito or mockk and we can’t use it in Swift. That’s why we have to create some stubs manually in Kotlin in order to use them in iOS tests.

Here is how we replace them in Android Tests.

val apiClient = mock<PhotosApiClient> {
      onBlocking { getPhotos() } doThrow NullPointerException()
    }

GalleryInjector.config(PhotoListStub(apiClient))

And here is how we replace them in iOS.

let injectionModule = TestModule(apiClient: PhotoApiClientStub(photos: photos, withErrors: false))
        GalleryInjector().config(injector: injectionModule)       

We decided not to write native tests for presenters and that was only because we didn’t know we could create unit tests, translate them to Swift and run them in a native environment. That’d save us a lot of duplicated tests.

Final thoughts

Kotlin Multiplatform is an awesome solution to create a common library for our projects. This approach unlocks an interesting feature, to create rich models and share most of the app behavior between platforms. Based on this solution we can minimize the amount of code we need to create our apps.

There is an interesting detail about the compiler you should keep in mind when you find yourself having problems with iOS builds. You can see the generated Swift code to try to understand what is wrong with your Kotlin native code, or at least, how the generated code works.

Remember, Kotlin Multiplatform is experimental for now and it has a lot of bugs. It is not production ready, but it brings a new world when talking about how to share code between different platforms.

You can see the full source code used on this blog post on Github, you can see how to build the complete stack including integration tests to your project.

We will keep working on the project, talking about databases, network requests, and automated testing… If you want to know more about Kotlin Multiplatform, just drop a comment below with the topics you are more interested in!

Continue ReadingShared Library in Kotlin Multiplatform

End of content

No more pages to load